webAPI for softMC

Introduction
WebAPI allows users to do the following actions from a web-browser:
- Query softMC – send MC-Basic commands and get a response, async.
- Upload files – files will be uploaded into /var/home/mc/FFS0/SSMC folder.
- Get the file list on MC – retrieve a list of the files inside the SSMC folder.
- Get file content – retrieve the content of a file inside the SSMC folder.
In order to use the Web API, the following should be installed on the softMC:
- softMC Web Server
- softMC minimum version: 0.4.17.3
- WebAPI license
| NOTE | |
| webAPI license provided by Servotronix |
Getting Started
| NOTE | |
| The way to upload and access files to softMC explained HERE |
Installing the JavaScript library
- Download the JavaScript script which will be provided with your webAPI license, and located it in your project's folder.

NOTE Projects should be located in /var/home/mc/www - In your HTML file, include conn.js in your <head> tag:
<head>
    <script src = "js/conn.js"></script>
</head>
Connecting to softMC
Use those commands at your project to be able to communicate with softMC:
- To initialize a WebSocket connection:
new MC_CONNECTION().init(); - In case you want a callback to be called once a connection has been made (when the WebSocket’s onopen method is called), you can pass a callback as a parameter like so:
new MC_CONNECTION(callback).init(); - Advanced users who wishes to customize the WebSocket behavior (onopen, onerror, onmessage, onclose…) can open conn.js and edit the functions there.
Querying softMC
- After initializing the WebSocket connection, you may use the following command to query the controller using MC-Basic syntax:
conn.queryMC(query,callback); - For example:
conn.queryMC(“?ver”,function(result){
    alert(“Your softMC version is “ + result);
});
File Operation
Overview
- File operations (upload, get content, etc…) can be done using a REST API.
- It’s best practice to use AJAX to retrieve the data asynchronously.
| IMPORTANT | |
| All requests should be done to PORT 1207 (!) |
Getting Files List
| Description | Get Files |
| URL | /cs/files |
| Method | GET |
| Data Params (optional) | {ext: [string], asJSON: [Boolean]} ext: A comma-separated list of the extensions you want to get. asJSON": should the list return as a JSON array? Examples: {ext: “PRG,LIB”, asJSON: false} {ext: “PRG,LIB”, asJSON: true} |
| Success Response | Code: 200 Content: [String of comma-separated files] or [JSON Array of files objects] Examples: 1. "AUTOEXEC.PRG,SETUP.PRG,TP.LIB” 2. [
{
fileName: AUTOEXEC.PRG,
modified: 1499679189000,
fileNameOnly: AUTOEXEC
extension: PRG
}
]
|
| Sample Call | $.get(“http://” + ip + “:1207/cs/files/”,{asJSON:true},callback);
|
| Notes | If an error occurs, the file list would be empty |
Getting File Content
| Description | Get a specific file content |
| URL | /cs/file/:filename |
| Method | GET |
| Success Response | Code: 200 Content: [String of file content] Example: “This is the file content\nReturned as a string” |
| Sample Call | $.get(“http://” + ip + “:1207/cs/file/MYFILE.PRG”,function(result){
console.log(result);
});
|
| Notes | If an error occurs, the file content would be empty |
Uploading Files - No Overwrite
| Description | Uploading files (Unless the file already exists) |
| URL | /cs/upload |
| method | POST |
| Data (Required) | Data Type: multipart/from-data File Part name: file |
| Success Response | code: 200 or 403 if permission is denied Response Type: JSON Content: {
err: [integer] / undefined
}
Error Codes: -1 - File already exist -2 - Unknown Error -3 - Invalid data format sent -4 - Permission denied |
| Sample Call | var formData = new FormData();
formData.append('file', new File([new Blob([“content”])], “A.PRG” ));
$.ajax({
contentType: "multipart/form-data;",
url: “http://” + ip + “:1207/cs/upload”,
type: 'POST',
data: formData,
cache: false,
contentType: false,
processData: false,
success: function(result) {
if (result.err)
// do something with the error
}
});
|
Uploading Files - Overwrite Existing
| Description | Uploading files and overwrite existing file if exists |
| URL | /cs/upload/overwrite |
| method | POST |
| Data (Required) | Data Type: multipart/from-data File Part name: file |
| Success Response | code: 200 or 403 if permission is denied Response Type: JSON Content: {
err: [integer] / undefined
}
Error Codes: -2 - Unknown Error -4 - Permission denied |
| Sample Call | var formData = new FormData();
formData.append('file', new File([new Blob([“content”])], “A.PRG” ));
$.ajax({
contentType: "multipart/form-data;",
url: “http://” + ip + “:1207/cs/upload/overwrite”,
type: 'POST',
data: formData,
cache: false,
contentType: false,
processData: false,
success: function(result) {
if (result.err)
// do something with the error
}
});
|
Deleting Files
| Description | Delete a specific file |
| URL | /cs/file/:filename |
| method | DELETE |
| Success Response | code: 200 Content: true/false |
| Sample Call | $.ajax({
url: “http://” + ip + ”:1207/cs/file/MYFILE.PRG”,
type: 'DELETE',
success: function(result) {
if (result) {
// success
} else {
// failed
}
}
});
|
Examples
Example #1
This example present an HMI for single axis system.
You can download example files over here: 
In this .ZIP folder you will find simulated single axis project, and the html HMI.
| IMPORTANT | |
| Its very important that your project will locate in the same folder as the softMC JavaScript file that provided to you by Servotronix or in your project you guide the right address |
steps
- Upload your HTML page to softMC as explained HERE
In this example we used the HTML project attached to the .ZIP folder named "index.html" - After uploading the project to sofMC, insert your softMC IP address and the project address.

- Your html HMI will open, and now you be able to communicate with your softMC using your browser.
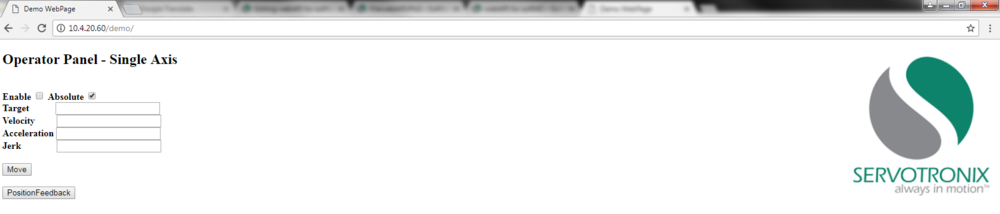
- In this example you can set axis target point, velocity, acceleration and jerk, to enable/disable the axis, determine the motion type (absolute) and check axis PotisionFeedback.


Example #2
This example present an HMI for single axis system which allow users to manage files on the controller.
You can download example files over here:
In this .ZIP folder you will find simulated single axis project, and the html HMI.
| IMPORTANT | |
| Its very important that your project will locate in the same folder as the softMC JavaScript file that provided to you by Servotronix or in your project you guide the right address |
steps
- Upload your HTML page to softMC as explained HERE
In this example we used the HTML project attached to the .ZIP folder named "index.html" - After uploading the project to sofMC, insert your softMC IP address and the project address.

- Your html HMI will open, and now you be able to communicate with your softMC using your browser.
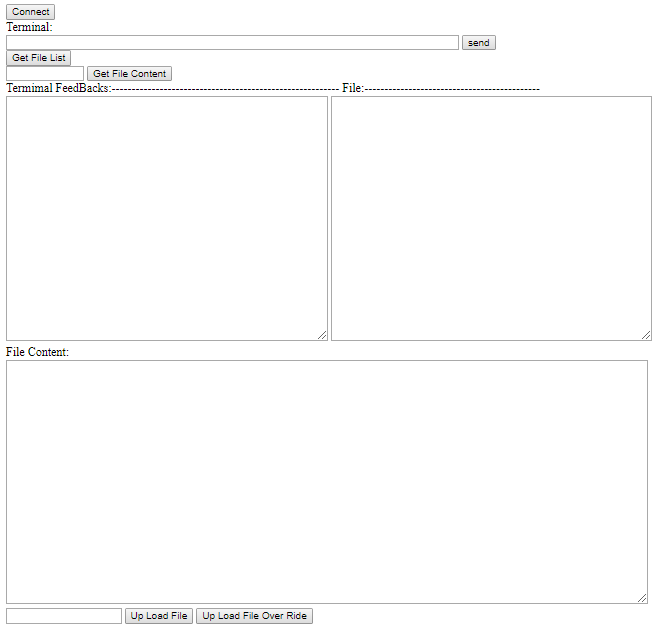
- In this example you can send commands using the terminal, get files list, edit chosen file and upload new files to the controller.
- To open file do the following:
- Press "Get File List" button.
- Copy file name to the text box bellow the button, from files list that opened in File window.
- Press "Get File Content" - the file will open at the "File Content" window.
- From "File Content" window you can edit the chosen file as you wish.
- To save your edited file - copy file name to the lowest text box, and chose from two options:
- Up Load File - to upload your file additionally to other files in the controller.
- Up Load File Over Ride - to upload your file to the controller and replace other files which name the same.


