3-Axis XYZ Cartesian Group Setup in EtherCAT Network
| Language: | English • 中文(简体) |
|---|
Contents
- 1 Introduction
- 2 Procedures
- 2.1 step 1: Install and activate ControlStudio
- 2.2 step 2: Install device parameter (library) file on PC
- 2.3 step 3: Make the cable connections
- 2.4 step 4: Establish communication between PC and softMC
- 2.5 step 5: Create a Configurator project
- 2.6 step 6: Define three axes for the configuration
- 2.7 step 7: Define axis A1 configuration settings
- 2.8 step 8: Define axis A2 and axis 3 configuration settings
- 2.9 step 9: Define the Cartesian group
- 2.10 step 10: Compile project files and send configuration to the softMC
- 2.11 step 11: Verify the configuration by moving the axes
- 3 Appendices
Introduction
Note: Only essential background information is included in this training manual. For downloads and more information about the softMC hardware and software systems, use the resources available on the Servotronix website.
ControlStudio is a PC-based graphical user interface for developing and testing motion applications controlled and/or coordinated by the softMC. ControlStudio contains a programming editor, data recorder, debugger and monitoring tools. Once the application programs are completed, the PC can be removed and the softMC controller can operate standalone or within a network.
softMC Configurator is a wizard that is bundled with ControlStudio. The Configurator is used to define the axes and IOs to be controlled in the motion application; it then generates a set of programs and files for initializing the softMC.
MC-Basic (Motion Control BASIC) is the proprietary programming language developed by Servotronix for use with the softMC. It is based on standard BASIC programming language, with extensive enhancements for multi-tasking and motion control functionalities.
Procedures
step 1: Install and activate ControlStudio
Windows
- If any previous versions of softMC are installed on the PC, uninstall them.
For instructions, refer to Appendix A of this document and/or contact Technical Support. - Run CSSetup.exe to install ControlStudio.
Accept the default settings during the installation.
Four programs are installed. - If not already opened, activate ControlStudio (from the Start menu or desktop icon).
step 2: Install device parameter (library) file on PC
ControlStudio Offline
- From the ControlStudio menu bar, activate the softMC Configurator.
Select: Tools > softMC Configurator
Note: Always activate Configurator from ControlStudio (do not use desktop icon).
- When operating offline, the Configurator looks like this.
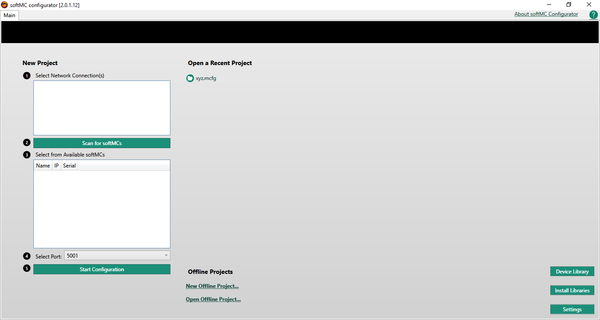
At the bottom-right of the Configurator screen, click Install Libraries.
Note: Libraries is a file that contains the parameters of all I/O devices and drives that can be controlled by the softMC.
An updated Libraries file must be installed on the PC whenever new controller firmware is installed.
- Browse to the folder containing the file configurator_archive_0.4.x.x.bndl
This is the Libraries file.
Click Open.
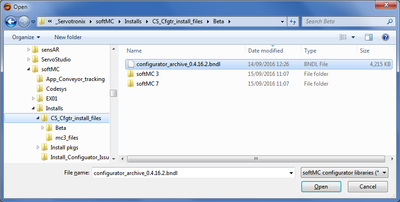
Wait for the confirmation message. Click OK.
- Close Configurator.
Note: Do not minimize. You must close Configurator.
step 3: Make the cable connections
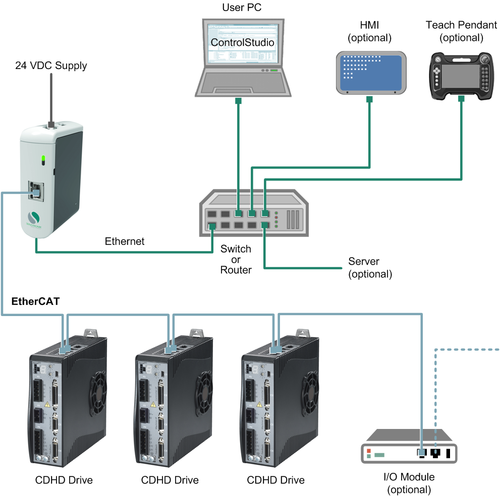
- Connect the system cables, if not already connected.
Refer to diagram below.
For more instructions, refer to the softMC Installation Guide'.
softMC 7 with CDHD – EtherCAT devices and network
- Turn on the softMC system.
step 4: Establish communication between PC and softMC
ControlStudio Online
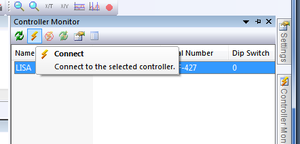
- At the right side of the ControlStudio screen, hover over Controller Monitor.
The Controller Monitor pane opens.
Click the Refresh button.
Wait a few moments until the softMC in your setup is recognized and displayed in the list. (e.g., “DEMO”)

- Select the detected softMC, and click the Connect button.
- The communication status at the bottom of the screen turns green, indicating that the softMC and ControlStudio are communicating.

- In the middle of the ControlStudio screen, you will see the Terminal pane.
Note: The Terminal is a command line interface to the softMC. It allows you to send commands and queries to the softMC, and receive responses in return.
To confirm communication has been established, place the cursor in the Terminal pane.
Query the firmware version: ?ver

Make sure the response to the version query is 0.4.16.2 or later.
If necessary, update the softMC firmware. For instructions, refer to Appendix B of this document and/or contact Technical Support.
- Make sure program config.prg is cleared of all program lines.
It must contain only 2 lines:
Program
End program
step 5: Create a Configurator project
- Open Configurator.
Access through: Tools > softMC Configurator
The Open Project dialog box opens:
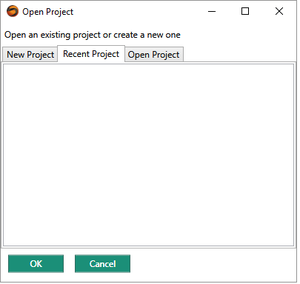
- Select the New Project tab.
A list of all installed libraries is displayed, with the library most suitable for the currently installed firmware selected.
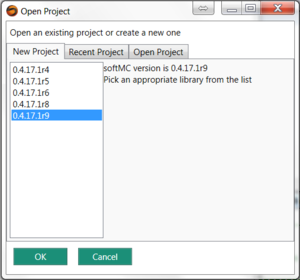
Click OK.
A Configurator project is created, but is not yet saved.
- The Configurator opens.
If using EtherCAT network, the Configurator online screen will look like this:
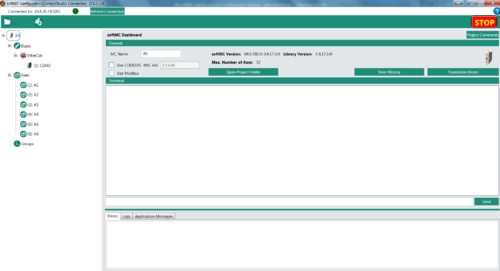
Note: If using an EtherCAT network, drives and I/O devices are automatically detected and displayed in the Buses section of the navigation pane.
- Optional: In the MC Name field, enter a name for the softMC; e.g., DEMO_EX
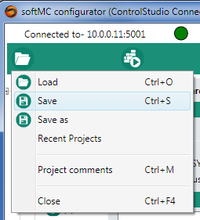
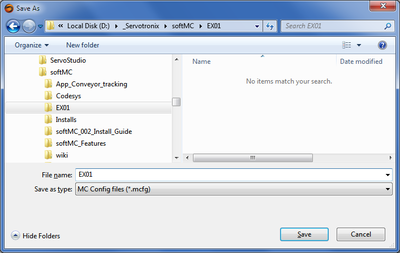
- Optional: Create a folder/file and save the Configurator project (called EX01).
step 6: Define three axes for the configuration
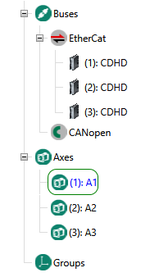
- In the navigation pane, right-click on Axes, and add Axis A1.
Repeat for Axis 2 and Axis 3.
- Optional: Save the Configurator project.
step 7: Define axis A1 configuration settings
- In the navigation pane, select the first drive (CDHD).
When selected, the device is displayed in blue text.
- Enter settings as shown below.
General Settings:
Initial Active OpMode = 8-Cyclic synchronous position
Physical Address = 1
Click Apply.
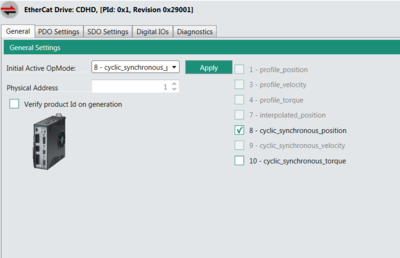
Note: For proper operation, Initial Active OpMode must be set to 8-Cyclic synchronous position.
Drive Axis Linkage:
Link Drive to Axis = A1.
Click the Link arrow.

- The Configurator displays the Axis:A1 screen.
The screen has four tabs: General, Properties, Motion and Graph.
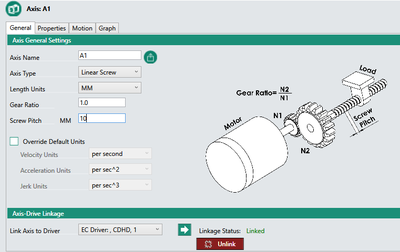
In the General tab, enter settings as shown below.
Note: These values are for demonstration purposes only, and are not necessarily suitable for your application.'
Axis Type = Linear Screw
Length Units = mm
Gear Ratio = 1.0
Screw Pitch = 10 (mm)
:
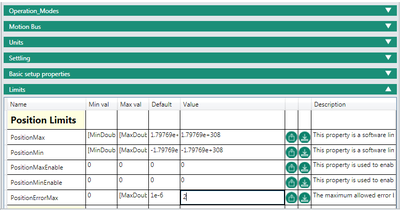
- In the Properties tab, click on the Limits bar to access Limit parameters.
Change the value of the following parameter:
Position Error Max = 2
After typing in a value, be sure to press Enter.
- Optional: Save the Configurator project.
step 8: Define axis A2 and axis 3 configuration settings
Configurator online
- Define the parameters for Axis A2 and for Axis 3 by repeating the steps in Step 7.
- Optional: Save the Configurator project.
step 9: Define the Cartesian group
- In the navigation pane, right-click on Groups, and select Add Group.
The Add a Group/Robot dialog box opens:
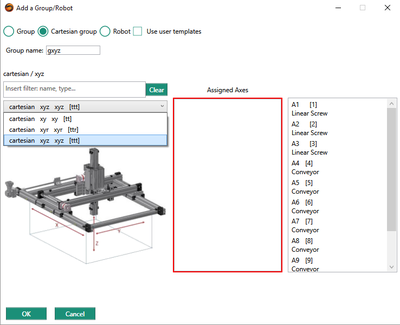
Select: Cartesian group
Enter a name for the group; for example: gxyz
Select the specific configuration; for example: cartesian xyz xyz
- Assign axes to the group: in the list; double-click on axis A1, A2 and A3.
They will move to the Assigned Axes list.
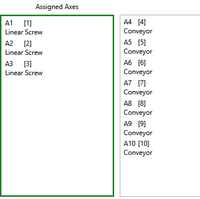
Click OK.
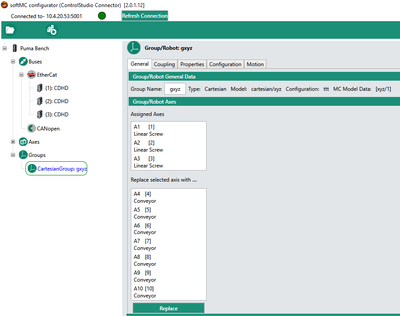
The axis group is now defined:
- Optional: Save the Configurator project.
step 10: Compile project files and send configuration to the softMC
- In the Configurator menu bar, click the Build & Run button.

Note: The project is saved before the compilation is executed. If you have not yet saved the project, a File Manager dialog box will prompt you to save.
- The Configurator generates files on the PC and sends them to the softMC.
When complete, click Close.
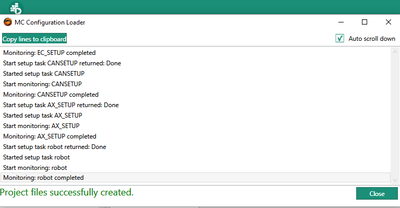
- You can view folders and files using the ControlStudio File View pane.
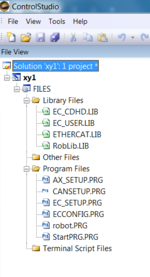
- Note: If you created and saved folder/files named EXO1, the Configurator will generate a ControlStudio file called EX01.APJ file.: It will also generate a folder called EXO1_Files
In ControlStudio, go to the File Manager pane at the bottom of the screen.
Select folder EX01 in the left pane, and look at the middle pane.
If files do not appear, right-click in the middle pane > Refresh List
Note: Files in the right pane reside in the softMC. Do not click on these files, or attempt to manipulate them.

step 11: Verify the configuration by moving the axes
- Select the Axis Group you configured (Cartesian group gxyz), and open the Motion tab.
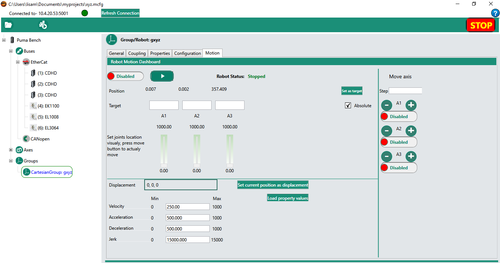
- Enter Target Position values for the three axes in the group; for example:
Target A1: 10
Target A2: 20
Target A3: 30
Change the value of the Velocity parameter to 20. (A slow speed allows you to more easily verify the motion).
Switch the axis group to Enabled.
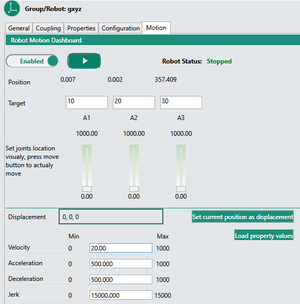
- Hold and press the Run button.

Watch the actual axes and/or watch the position values on the screen.
Motion will end when the Position values equal the Target values.
Appendices
Appendix A: Uninstall previous ControlStudio installation
Windows
- Uninstall all previously installed softMC programs.
You can identify and uninstall the programs to be removed according to the publisher name: Servotronix.
Note: Do not uninstall ServoStudio by Servotronix.
Appendix B: Update the softMC firmware
ControlStudio online
- To update the firmware:
Tools > Firmware Update
- At the prompt, click Update.
- Browse to the folder containing the firmware zip file.
Select the file and click Open.
- Follow the prompts.
During the firmware update, the controller power cycles automatically.
The Communication status indication turns yellow.
Wait for the yellow LED on the front of the Demo Kit to turn off.
To reestablish communication, use the Reset Communication button in the Controller Monitor pane (or Ctrl+D).
- When finished, check the version again.
If it does not appear to be updated, turn the controller off and then on again.
Make sure Communication status in indicates Connected.
