3-Axis Group Setup in EtherCAT Network/zh-hans
| 语言: | [[::3-Axis Group Setup in EtherCAT Network|English]] • [[::3-Axis Group Setup in EtherCAT Network/zh-hans|中文(简体)]] |
|---|
Contents
- 1 简介
- 2 步骤
- 2.1 (1) 安装并启动ControlStudio
- 2.2 (2) 在PC上安装设备参数(库)文件
- 2.3 (3) 连接电缆
- 2.4 (4) 建立PC与softMC之间的通信
- 2.5 (5) 创建一个配置器项目
- 2.6 (6) Define three axes for the configuration
- 2.7 (7) Define axis A1 configuration settings
- 2.8 (8) Define axis A2 and axis 3 configuration settings
- 2.9 (9) Define the axis group
- 2.10 (10) Compile project files and send configuration to the softMC
- 2.11 (11) Verify the configuration by moving the axes
- 3 附录
简介
注意: 本培训手册中仅包含必要的背景信息。 有关softMC硬件和软件系统的下载和更多信息,请使用Servotronix网站上提供的资源。
ControlStudio是基于PC的图形用户界面,用于softMC开发和测试控制和/或协调的运动应用程序。 ControlStudio包含编程编辑器,数据记录器,调试器和监视工具。 一旦应用程序完成,PC可以被移除,并且softMC控制器可以独立运行或在网络内运行。
softMC配置器是ControlStudio绑定的应用程序。配置器用于定义运动应用中要控制的轴和IO; 然后生成一组用于初始化softMC的程序和文件。
MC-Basic (Motion Control BASIC)是由Servotronix开发的用于softMC的专有编程语言。 它基于标准的BASIC编程语言,对多任务和运动控制功能进行了增强。
步骤
(1) 安装并启动ControlStudio
Windows
(1A) 如果PC上安装了以前版本的softMC,请卸载它们。有关说明,请参阅本文档的附录A和/或联系技术支持。
(1B) 运行CSSetup.exe来安装ControlStudio。 在安装期间接受默认设置。安装四个程序。
(1C) 如果尚未打开,请打开ControlStudio(从“开始”菜单或桌面图标)。
(2) 在PC上安装设备参数(库)文件
ControlStudio 离线
(2A) 从ControlStudio菜单栏,激活softMC配置器
- 选择: Tools > softMC Configurator
- 注意: 始终从ControlStudio激活Configurator(而不是桌面图标)。
(2B) 当离线操作时,配置器是这样。

- 在配置器屏幕的底部,点击 Install Libraries。
- 注意: 库 是包含可由softMC控制的所有设备(如CDHD,stepIM,IO)的参数的文件。
- 每当安装新的控制器固件时,必须在PC上安装更新的库文件。
(2C) 浏览到包含该文件的文件夹 configurator_archive_0.4.x.x.bndl
- 这是库文件.
- 点击 Open.

- 等待确认消息: Libraries successfully imported.
- 点击 OK.
(2D)关闭配置器.
- 注意: 不要最小化。 您必须关闭配置器。
(3) 连接电缆
(3A) 如果尚未连接,连接系统电缆.
- 请参考下图。
- 有关更多说明,参考softMC 安装指南'.
- softMC 7 with CDHD – EtherCAT devices and network

(3B) 打开softMC培训系统。
(4) 建立PC与softMC之间的通信
ControlStudio 在线
(4A) 在ControlStudio屏幕的右侧,将鼠标悬停在Controller Monitor.
- 控制器监视器窗格打开。
- 单击Refresh 按钮。
- 等待一会儿,直到您的设置中的softMC被识别并显示在列表中。(例如, “DEMO”)

(4B) 选择检测到的softMC, 单击 Connect 按钮。

(5C) 屏幕底部的通信状态变为绿色,表示softMC和ControlStudio正在通信。
(4D) 在ControlStudio屏幕的中间,您将看到Terminal窗格。
- 注意: 终端是softMC的命令行界面。 它允许您向softMC发送命令和查询,并返回接收响应。
- 要确认通信已建立,请将光标放在“终端”窗格中。
- 查询固件版本: ?ver

- 确保对版本查询的返回是0.4.16.2或更高版本。
- 如有必要,请更新softMC固件。 有关说明,请参阅本文档的附录B和/或联系技术支持。
(4E) 确保程序config.prg被清除所有程序行。
- 它必须只包含2行:
Program
End program
(5) 创建一个配置器项目
(5A)打开配置器
- 通过访问: Tools > softMC Configurator
- 打开项目对话框:
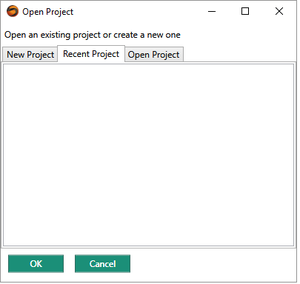

(5B) 选择New Project选项卡.
- 显示所有已安装库的列表,所选的当前安装的固件最适用的库。
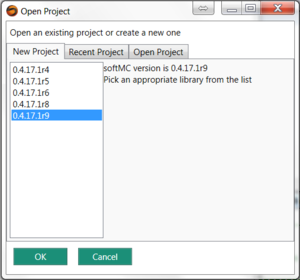

- 点击OK.
- 配置器项目已创建,但尚未保存。
(5C) 打开配置器
- 如果使用EtherCAT网络, 配置器在线屏幕将如下所示:
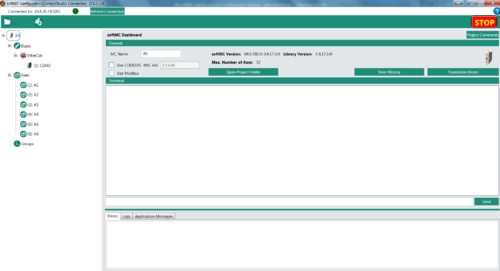

- 注意: 如果使用EtherCAT网络,驱动器和I / O设备将自动检测并显示在导航窗格的“Buses”部分。
(5D) 可选项: I在“MC名称”字段中,输入softMC的名称; 例如, DEMO_EX
(5E) 可选项: 创建文件夹/文件并保存Configurator项目(称为EX01)。


(6) Define three axes for the configuration
(6A) In the navigation pane, right-click on Axes, and add Axis A1.
- Repeat for Axis 2 and Axis 3.

(6B) Optional: Save the Configurator project.
(7) Define axis A1 configuration settings
(7A) In the navigation pane, select the first drive (CDHD).
- When selected, the device is displayed in blue text.
(7B) Enter settings as shown below.
- General Settings:
- Initial Active OpMode = 8-Cyclic synchronous position
- Physical Address = 1
- Click Apply.

- Note: For proper operation, Initial Active OpMode must be set to 8-Cyclic synchronous position.
- Drive Axis Linkage:
- Link Drive to Axis = A1.
- Click the Link arrow.

(7C) The Configurator displays the Axis:A1 screen.
- The screen has four tabs: General, Properties, Motion and Graph.
- In the General tab, enter settings as shown below.
- Note: These values are for demonstration purposes only, and are not necessarily suitable for your application.'
- Axis Type = Linear Screw
- Length Units = mm
- Gear Ratio = 1.0
- Screw Pitch = 10 (mm)

(7D) In the Properties tab, click on the Limits bar to access Limit parameters.
- Change the value of the following parameter:
- Position Error Max = 2
- After typing in a value, be sure to press Enter.

(7E) Optional: Save the Configurator project.
(8) Define axis A2 and axis 3 configuration settings
Configurator online
(8A) Define the parameters for Axis A2 and for Axis 3 by repeating the steps in Step 7.
(8B) Optional: Save the Configurator project.
(9) Define the axis group
(9A) In the navigation pane, right-click on Groups, and select Add Group.
- The Add a Group/Robot dialog box opens:

- Select: Cartesian group
- Enter a name for the group; for example: gxyz
- Select the specific configuration; for example: cartesian xyz xyz
(9B) Assign axes to the group: in the list; double-click on axis A1, A2 and A3.
- They will move to the Assigned Axes list.

- Click OK.
- The axis group is now defined:

(9C) Optional: Save the Configurator project.
(10) Compile project files and send configuration to the softMC
(10A) In the Configurator menu bar, click the Build & Run button.

- Note: The project is saved before the compilation is executed. If you have not yet saved the project, a File Manager dialog box will prompt you to save.
(10B) The Configurator generates files on the PC and sends them to the softMC.
- When complete, click Close.

(10C) You can view folders and files using the ControlStudio File View pane.

(10D) Note: If you created and saved folder/files named EXO1, the Configurator will generate a ControlStudio file called EX01.APJ file.:
It will also generate a folder called EXO1_Files
- In ControlStudio, go to the File Manager pane at the bottom of the screen.
- Select folder EX01 in the left pane, and look at the middle pane.
- If files do not appear, right-click in the middle pane > Refresh List
- Note: Files in the right pane reside in the softMC. Do not click on these files, or attempt to manipulate them.

(11) Verify the configuration by moving the axes
(11A) Select the Axis Group you configured (Cartesian group gxyz), and open the Motion tab.

(11B) Enter Target Position values for the three axes in the group; for example:
- Target A1: 10
- Target A2: 20
- Target A3: 30
- Change the value of the Velocity parameter to 20.
- (A slow speed allows you to more easily verify the motion).
- Switch the axis group to Enabled.

(11C) Hold and press the Run button.

- Watch the actual axes and/or watch the position values on the screen .
- Motion will end when the Position values equal the Target values.
附录
附录A: 卸载之前安装的ControlStudio
Windows
(A1) 卸载所有以前安装的softMC程序。
- 您可以根据发布商名称: Servotronix来识别和卸载要删除的程序:Servotronix。
- 注意: 不要通过Servotronix卸载ServoStudio。
附录B: 更新softMC固件
ControlStudio 在线
(B1) 更新固件:
- Tools > Firmware Update
(B2) 在提示下,单击 Update.
(B3) 浏览到包含固件 zip文件的文件夹。
- 选择文件,然后单击Open。
(B4) 按照提示进行
- 在固件更新期间,控制器自动重新上电。
- 通信状态指示变为黄色。
- 等待Demo Kit前面的黄色LED熄灭。
- 要重新建立通信,请使用控制器监视器窗格中的 Reset Communication按钮。(或Ctrl+D)
(B5) 完成后,再次检查版本
- 如果看起来未更新,请关闭控制器,然后重新打开。
- 确保通信状态指示已连接。