Teach Pendant Installation Guide/zh-hans
| 语言: | [[::Teach Pendant Installation Guide|English]] • [[::Teach Pendant Installation Guide/zh-hans|中文(简体)]] |
|---|
产品概述
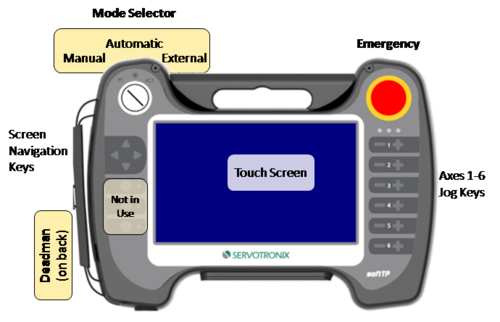
softTP示教器(TP)是用于基于软件的系统的附加工具。 它允许用户通过点动键移动机器人,并创建并运行用MC-Basic编写的完整机器人程序。 softTP触摸屏界面实现了快速简便的应用开发。
示教器硬件
- 触摸屏
- 点动按钮
- 急停开关
- 控制开关
- 模式选择开关
- 电源板,以太网通讯和数字输出板
示教器软件
softTP提供了以下软件组件:
- Java执行引擎
- Java Web服务器(HTML到KMAPI转换器)和WWW文件夹(HTML文件和Java脚本)
- softTP许可证 (MCTP文件)
- softTP程序和库(MC-Basic源代码)
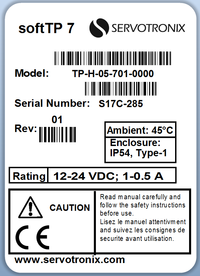
产品标签
安全
警告
处理和维护
- 确保电缆安全,不能跳闸。
- 确保电缆不被其他物体弯曲或压扁。
- 确保布线不会与可能导致其磨损的尖锐边缘接触。
- 确保softTP不会以操作元件机械损坏的方式进行安装。
- 不要将softTP放置在高热源或阳光直射的地方。
- 避免softTP受到机械冲击,灰尘过多,潮湿或强磁场的损害。
- 不要在softTP上使用溶剂或研磨材料。清洁时请使用蘸有水或温和清洁剂的软布。
- softTP具有触摸屏。 只能用手指操作。 确保没有锋利的物体与屏幕接触。
规格
技术规格
| 项目 | 规格 |
|---|---|
| 处理器 | Intel®Atom™E3800/1.6 GHz 单核 |
| 内存 | DDR3 4 GB |
| NAND | SSD 32 GB |
| Rating | 12-24 VDC, 1-0.5 A |
| LCD 屏 | TFT LCD. 7-inch (163 x 104 mm). 分辨率800x480像素. Background lighting 24 LEDs. |
| 触摸屏 | 4线模拟电阻。 USB触摸控制器. |
| OS | Lubunto |
| LEDs | 3-color LED x 6 |
| SD/MMC | 外置SD卡 |
| USB | USB host |
| 键盘 | -)键. 4屏幕导航键。 4个功能键(未使用)。 |
| 开关 | 急停/模式选择/控制 |
| 通信端口 | RS232/RS485/Ethernet. Selectable |
| 运行环境 | 45°C max. ambient |
| 防护等级 | IP54 |
| 认证 | CE |
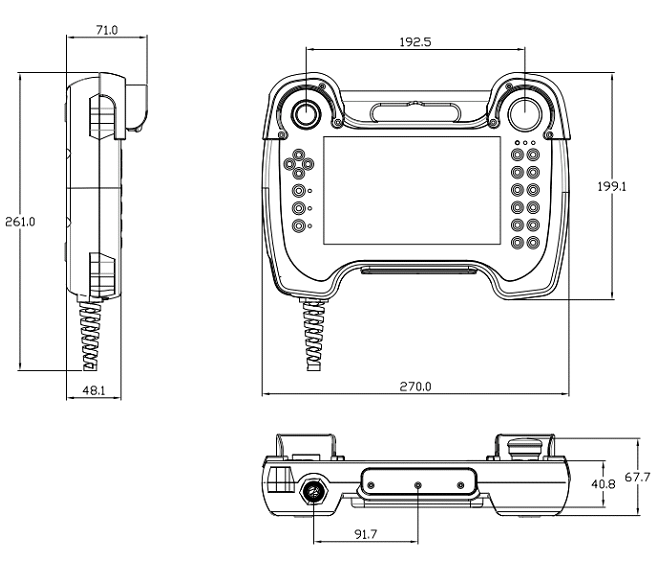
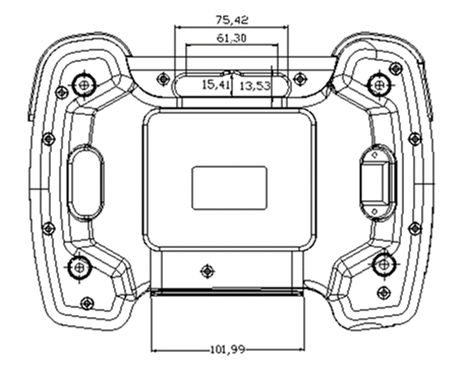
尺寸
接线
示教器电缆
示教电缆是softTP的一部分; 它不能分离。
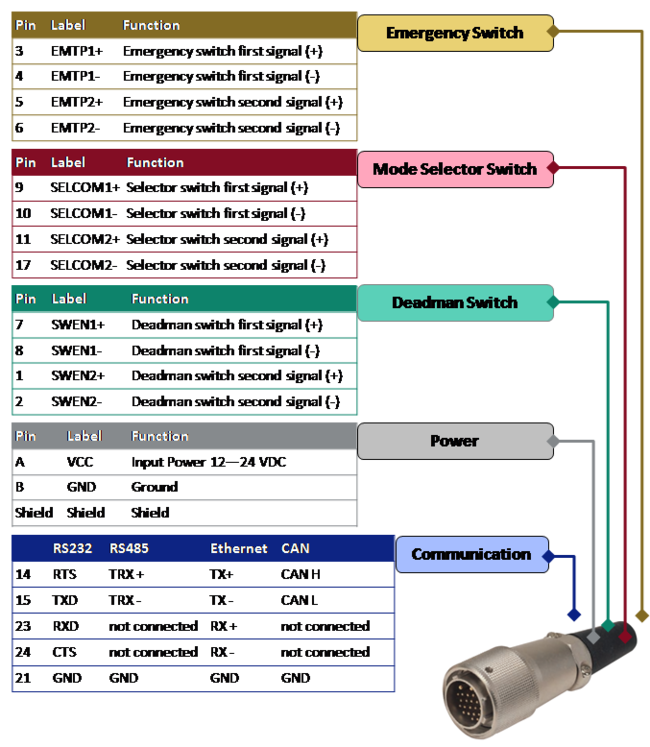
TP电缆线分配表
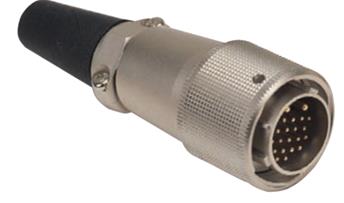
TP电缆连接器 - 公接头
| 零件号 | A | ΦB | ΦC | ΦD | |
|---|---|---|---|---|---|
| SRC6A21-26P | mm | 98.0 | 31.0 | 20.4 | 12.2 |
电源板
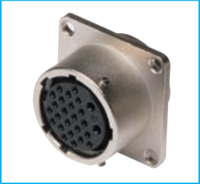
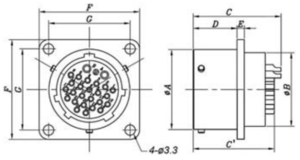
TP上的电缆接线板 - 公接头
| 零件号 | A | ΦB | C(C') | D | E | F | G | |
|---|---|---|---|---|---|---|---|---|
| SRC6A21-26P | mm | 25.6 | 20.4 | 27.7 (25.5) | 14 | 2.3 | 32 | 26 |
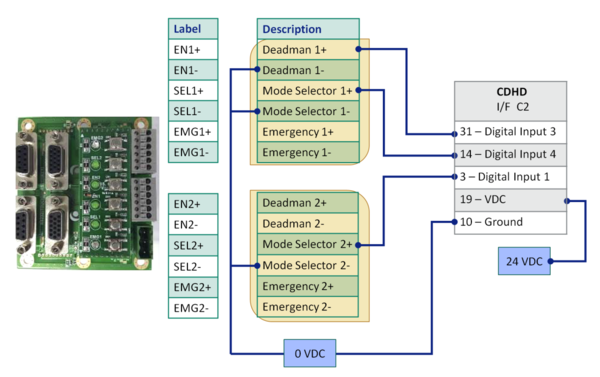
IO电缆接口上夹板 - 引脚分配
例子: 连接CDHD
- 紧急停止和控制开关根据用户要求连接到系统的安全电路(STO,安全继电器)。
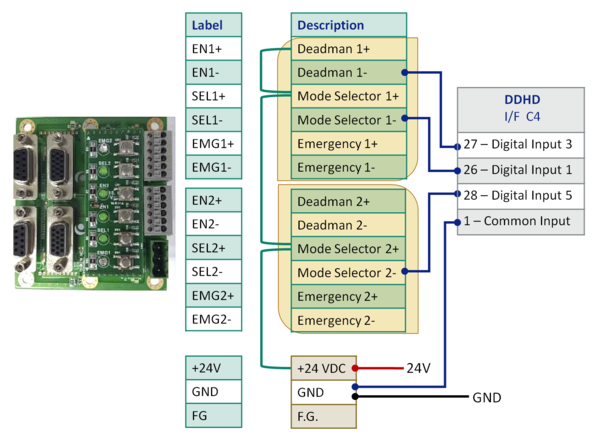
例子: 连接到DDHD
- 不同的输入顺序和没有紧急开关连接。绿线是桥梁; 红线和黑线来自外部来源。
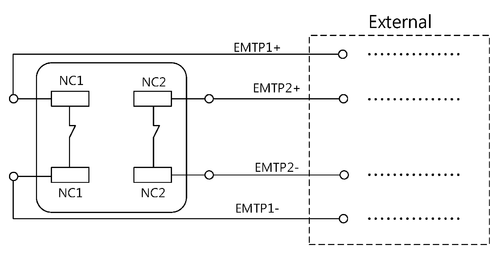
急停开关
将紧急开关连接到机器人系统是用户的责任,并遵循所有必要的安全准则和注意事项。
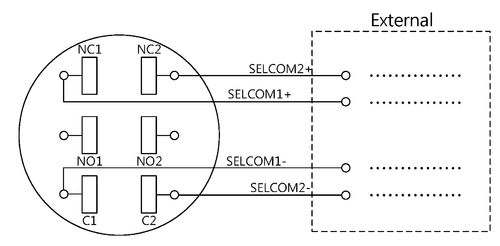
模式选择开关
| 位置 | 符号 |
|---|---|
| 左边 | 
|
| 中间 | 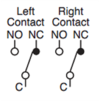
|
| 右边 | 
|
控制开关
将控制开关连接到机器人系统是用户的责任,并遵循所有必要的安全准则和注意事项。
自动按下或释放控制开关,立即停止所有轴的运动。
| 动作 | 位置 | 符号 | |
|---|---|---|---|
| 如果没有按下控制开关或按下太轻。
开关是关. |

|
Null | 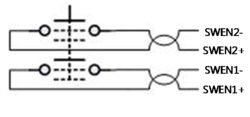
|
| 如果在正常压力下按下控制开关。
开关是开。 |

|
使能 | 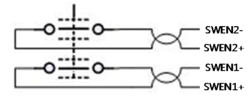
|
| 如果控制开关按压太重,
开关是关。 |

|
Panic | 
|
设置
硬件设置
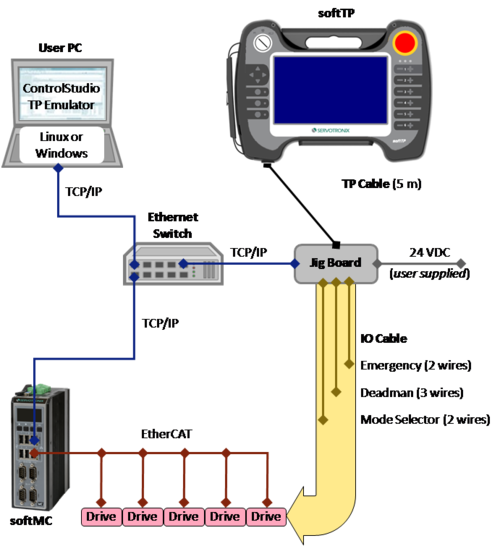
下图显示了典型的系统配置。
- softTP通过示教器电缆连接到夹具板上。
- 夹具板:接受24 VDC电源(由用户提供); 通过以太网(RJ45)电缆连接到以太网交换机; 通过IO电缆(由用户提供)连接到驱动器或外部IO模块。
- 三个softTP开关 - 模式选择,紧急和控制 - 通过IO电缆(由用户提供)连接到驱动器或外部IO模块的数字输入。
- 紧急停止和控制开关根据用户要求连接到系统的安全电路(STO,安全继电器)。
软件设置
注意: IPK文件用于softMC 7系统; ZIP文件用于softMC 3系统。
使用ControlStudio软件,执行以下步骤:
- 安装Java执行引擎:
- 发送JREx.x.x_xxx.IPK / ZIP文件到softMC:
Tools > Firmware Update > File > Open. - 等待softMC重新启动(自动)。
- 发送JREx.x.x_xxx.IPK / ZIP文件到softMC:
- 安装Java Web Server和HTML(WWW文件夹)文件:
- 发送JAVA_FILES. .IPK/ZIP文件到softMC:
Tools > Firmware Update > JAVA_FILES.IPK > Open - 等待softMC重新启动(自动)。
- 发送JAVA_FILES. .IPK/ZIP文件到softMC:
- 安装和激活softTP许可证:
- 在用户PC上,创建一组专用文件夹,该文件夹用于定义SoftTP操作的设置。
将示教器文件解压缩到该文件夹。
在ControlStudio文件管理器,找到并打开专用文件夹。
从PC文件列表(中间窗格)中选择并拖动所有MC-Basic示教器文件到控制器文件列表(右窗格)。

- In the Controller File list, locate the file TP_INIT.PRG.
Select and drag the file from the Controller File list to the PC File list.
Double-click to open TP_INIT.PRG for editing in the Terminal pane. - Edit the lines in TP_INIT.PRG to map I/Os and define relevant values for various teach pendant functions, as follows:
- Set the digital input numbers of the Deadman and Mode Selector switches:

- Define the type of teach pendant (2 options):

- Define the type of coordinate frame (2 options):

- Define whether a log file will be created and maintained (true or false):

- If a log file is enabled, set the maximum size of file:

A log file is created and filled until it reaches the maximum size. When filled, a second log file is created and filled to maximum size.
Once the second file is filled to capacity, the log overwrites the first log file. - Define the type of teach pendant keyboard. Currently only one type is available; the line should be as follows:

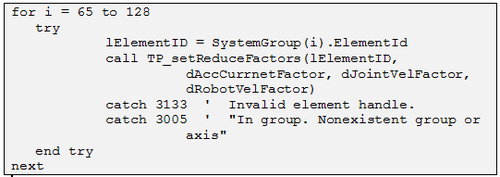
- For safety purposes, set values for reducing velocity, acceleration and current for each motion element (group and/or single axis).
Invoke the settings for each motion element ID, as shown here:

- Set the digital input numbers of the Deadman and Mode Selector switches:
- Save TP_INIT.PRG and send the file to the controller (right-click “Copy to Controller”).
- In the Controller File list, locate the file AUTOEXEC.PRG.
[Alternately, if using Configurator, use the file STARTPRG.PRG].
Select and drag the file from the Controller Files list to the PC File list.
Double-click to open AUTOEXEC.PRG for editing in the Terminal pane.
At the end of the program, add the line:

Save AUTOEXEC.PRG and send the file to the controller (right-click “Copy to Controller”). - Initialize the softMC and the TP. In the Terminal pane, enter the commands:

[Alternately, if using Configurator, enter the commands:].

- In the Message Log pane, check for the following message:

The softTP is now ready for operation.
Browser Setup
To set-up the IP address of the softMC on your softTP you will need to do the following (Note, all the snapshots below are from softTP screen):
- Strat softMC Scanner (from Desktop)
- Select network adapter
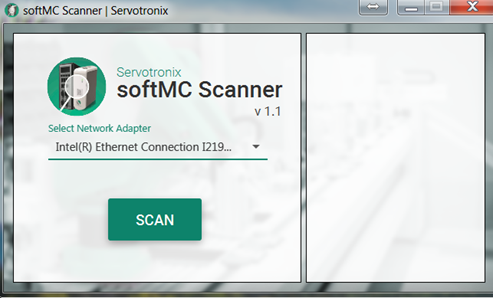
- Click on softMC in the list to open in browser and then set as homepage
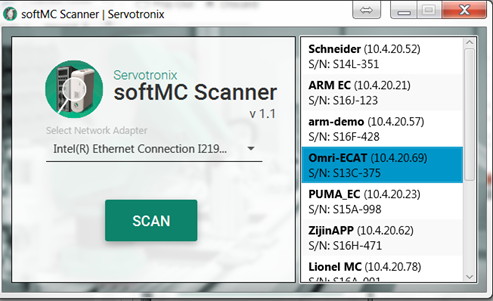
- Go to firefox options (the menu is located right of the address bar):
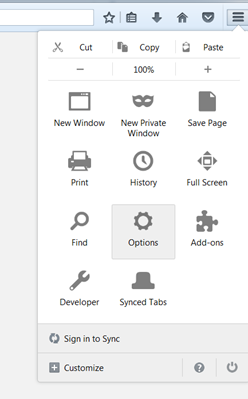
- Change the homepage to the softMC’s IP and close the window.
Appendix
This appendix describes alternative setups for using the TP Emulator software instead of the actual softTP.
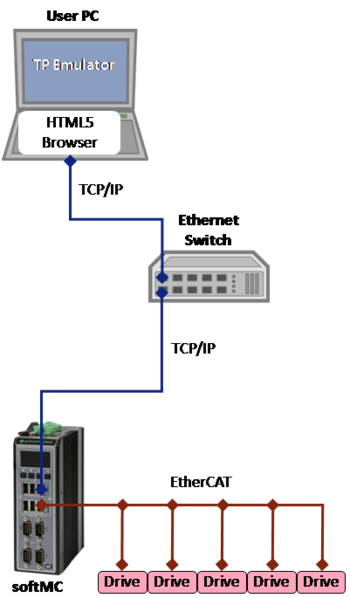
TP Emulator Communicating with softMC
This configuration is useful for working with a real robotic system when an actual teach pendant is not available.
An HTML5 browser is used either on laptop or tablet.

|
It is extremely dangerous to work without safety switches. Maintain a safe distance (beyond the reach of the robotic arm) while working with robot. |
Hardware setup
Software Setup
To prefer the software for this configuration, refer to the section Software Setup, and do the following:
- Step 1: Java Runtime Engine
- Step 2: Java Web Server
- Step 3: softTP license
- Step 4: TP library of MC-BASIC files
- Step 5: TP_INIT.PRG file:
Do not define any I/Os.
Define the teach pendant and keyboard types as follows:

- In the browser, call the file emulator.html (instead of index.html).
For example: e.g., 10.4.20.148/emulator.html
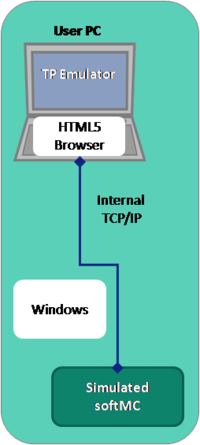
TP Emulator Communicating with Virtual (Simulated) softMC
This configuration is useful for working with a completely simulated robotic system.
An HTML5 browser is used on either the same or a different PC.
Hardware Setup
Software Setup
To prefer the software for this configuration, refer to the section Software Setup, and do the following:
- Step 1: Java Runtime Engine
- Step 2: Java Web Server
- Step 3: softTP license
- Step 4: TP library of MC-BASIC files
- Step 5: TP_INIT.PRG file:
Do not define any I/Os.
Define the teach pendant and keyboard types as follows:

- In the browser, call the file emulator.html (instead of index.html).
For example: e.g., 10.4.20.148/emulator.html
