Difference between revisions of "3-Axis Group Setup in EtherCAT Network/zh-hans"
(Created page with "{{Languages}} = Introduction = '''Note''': Only essential background information is included in this training manual. For downloads and more information about the softMC hardw...") |
|||
| Line 1: | Line 1: | ||
{{Languages}} | {{Languages}} | ||
| − | = | + | = 简介 = |
| − | ''' | + | '''注意''': 本培训手册中仅包含必要的背景信息。 有关softMC硬件和软件系统的下载和更多信息,请使用Servotronix网站上提供的资源。 |
| − | '''ControlStudio''' | + | '''ControlStudio'''是基于PC的图形用户界面,用于softMC开发和测试控制和/或协调的运动应用程序。 ControlStudio包含编程编辑器,数据记录器,调试器和监视工具。 一旦应用程序完成,PC可以被移除,并且softMC控制器可以独立运行或在网络内运行。 |
| − | ''' | + | '''softMC配置器'''是ControlStudio绑定的应用程序。配置器用于定义运动应用中要控制的轴和IO; 然后生成一组用于初始化softMC的程序和文件。 |
| − | '''MC-Basic '''(Motion Control BASIC) | + | '''MC-Basic '''(Motion Control BASIC)是由Servotronix开发的用于softMC的专有编程语言。 它基于标准的BASIC编程语言,对多任务和运动控制功能进行了增强。 |
| − | = | + | = 步骤 = |
| − | + | == (1) 安装并启动ControlStudio == | |
| − | == (1) | ||
'''Windows''' | '''Windows''' | ||
| − | + | (1A) 如果PC上安装了以前版本的softMC,请卸载它们。有关说明,请参阅本文档的附录A和/或联系技术支持。 | |
| − | (1A) | ||
| − | |||
| − | + | (1B) 运行'''CSSetup.exe'''来安装ControlStudio。 在安装期间接受默认设置。安装四个程序。 | |
| − | (1B) | ||
| − | |||
| − | |||
| − | + | (1C) 如果尚未打开,请打开ControlStudio(从“开始”菜单或桌面图标)。 | |
| − | (1C) | ||
| − | |||
<br/> | <br/> | ||
| − | == (2) | + | == (2) 在PC上安装设备参数(库)文件 == |
| + | '''ControlStudio 离线''' | ||
| − | ''' | + | (2A) 从ControlStudio菜单栏,激活softMC配置器 |
| + | :选择: '''Tools''' > '''softMC Configurator''' | ||
| + | :'''注意''': 始终从ControlStudio激活Configurator(而不是桌面图标)。 | ||
<br/> | <br/> | ||
| − | |||
| − | + | (2B) 当离线操作时,配置器是这样。 | |
| − | |||
| − | |||
| − | |||
| − | |||
<br/> | <br/> | ||
::[[File:configurator-2.png|600px]] | ::[[File:configurator-2.png|600px]] | ||
<br/> | <br/> | ||
| − | |||
| − | |||
| − | |||
| − | : | + | :在配置器屏幕的底部,点击''' Install Libraries'''。 |
| + | :'''注意: 库''' 是包含可由softMC控制的所有设备(如CDHD,stepIM,IO)的参数的文件。 | ||
| + | |||
| + | :每当安装新的控制器固件时,必须在PC上安装更新的'''库文件'''。 | ||
<br/> | <br/> | ||
| − | (2C) | + | |
| − | : | + | <br/> |
| − | : | + | (2C) 浏览到包含该文件的文件夹 '''configurator_archive_0.4.x.x.<u>bndl</u>''' |
| + | :这是库文件. | ||
| + | :点击 '''Open'''. | ||
<br/> | <br/> | ||
::[[File:configurator-library.png|400px]] | ::[[File:configurator-library.png|400px]] | ||
<br/> | <br/> | ||
| − | |||
| − | |||
| − | <br/> | + | :等待确认消息: Libraries successfully imported. |
| − | + | :点击 '''OK'''. | |
| + | <br/> | ||
| − | :''' | + | (2D)关闭配置器. |
| + | :'''注意''': 不要最小化。 您必须关闭配置器。 | ||
<br/> | <br/> | ||
Revision as of 09:39, 10 May 2017
| 语言: | [[::3-Axis Group Setup in EtherCAT Network|English]] • [[::3-Axis Group Setup in EtherCAT Network/zh-hans|中文(简体)]] |
|---|
Contents
- 1 简介
- 2 步骤
- 2.1 (1) 安装并启动ControlStudio
- 2.2 (2) 在PC上安装设备参数(库)文件
- 2.3 (3) Make the cable connections
- 2.4 (4) Establish communication between PC and softMC
- 2.5 (5) Create a Configurator project
- 2.6 (6) Define three axes for the configuration
- 2.7 (7) Define axis A1 configuration settings
- 2.8 (8) Define axis A2 and axis 3 configuration settings
- 2.9 (9) Define the axis group
- 2.10 (10) Compile project files and send configuration to the softMC
- 2.11 (11) Verify the configuration by moving the axes
- 3 Appendices
简介
注意: 本培训手册中仅包含必要的背景信息。 有关softMC硬件和软件系统的下载和更多信息,请使用Servotronix网站上提供的资源。
ControlStudio是基于PC的图形用户界面,用于softMC开发和测试控制和/或协调的运动应用程序。 ControlStudio包含编程编辑器,数据记录器,调试器和监视工具。 一旦应用程序完成,PC可以被移除,并且softMC控制器可以独立运行或在网络内运行。
softMC配置器是ControlStudio绑定的应用程序。配置器用于定义运动应用中要控制的轴和IO; 然后生成一组用于初始化softMC的程序和文件。
MC-Basic (Motion Control BASIC)是由Servotronix开发的用于softMC的专有编程语言。 它基于标准的BASIC编程语言,对多任务和运动控制功能进行了增强。
步骤
(1) 安装并启动ControlStudio
Windows
(1A) 如果PC上安装了以前版本的softMC,请卸载它们。有关说明,请参阅本文档的附录A和/或联系技术支持。
(1B) 运行CSSetup.exe来安装ControlStudio。 在安装期间接受默认设置。安装四个程序。
(1C) 如果尚未打开,请打开ControlStudio(从“开始”菜单或桌面图标)。
(2) 在PC上安装设备参数(库)文件
ControlStudio 离线
(2A) 从ControlStudio菜单栏,激活softMC配置器
- 选择: Tools > softMC Configurator
- 注意: 始终从ControlStudio激活Configurator(而不是桌面图标)。
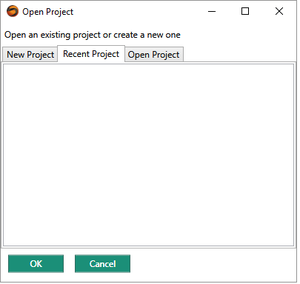
(2B) 当离线操作时,配置器是这样。

- 在配置器屏幕的底部,点击 Install Libraries。
- 注意: 库 是包含可由softMC控制的所有设备(如CDHD,stepIM,IO)的参数的文件。
- 每当安装新的控制器固件时,必须在PC上安装更新的库文件。
(2C) 浏览到包含该文件的文件夹 configurator_archive_0.4.x.x.bndl
- 这是库文件.
- 点击 Open.

- 等待确认消息: Libraries successfully imported.
- 点击 OK.
(2D)关闭配置器.
- 注意: 不要最小化。 您必须关闭配置器。
(3) Make the cable connections
(3A) Connect the system cables, if not already connected.
- Refer to diagram below.
- For more instructions, refer to the softMC Installation Guide'.
- softMC 7 with CDHD – EtherCAT devices and network

(3B) Turn on the softMC system.
(4) Establish communication between PC and softMC
ControlStudio Online
(4A) At the right side of the ControlStudio screen, hover over Controller Monitor.
- The Controller Monitor pane opens.
- Click the Refresh button.
- Wait a few moments until the softMC in your setup is recognized and displayed in the list. (e.g., “DEMO”)

(4B) Select the detected softMC, and click the Connect button.

(5C) The communication status at the bottom of the screen turns green, indicating that the softMC and ControlStudio are communicating.
(4D) In the middle of the ControlStudio screen, you will see the Terminal pane.
- Note: The Terminal is a command line interface to the softMC. It allows you to send commands and queries to the softMC, and receive responses in return.
- To confirm communication has been established, place the cursor in the Terminal pane.
- Query the firmware version: ?ver

- Make sure the response to the version query is 0.4.16.2 or later.
- If necessary, update the softMC firmware. For instructions, refer to Appendix B of this document and/or contact Technical Support.
(4E) Make sure program config.prg is cleared of all program lines.
- It must contain only 2 lines:
Program
End program
(5) Create a Configurator project
(5A) Open Configurator.
- Access through: Tools > softMC Configurator
- The Open Project dialog box opens:

(5B) Select the New Project tab.
- A list of all installed libraries is displayed, with the library most suitable for the currently installed firmware selected.
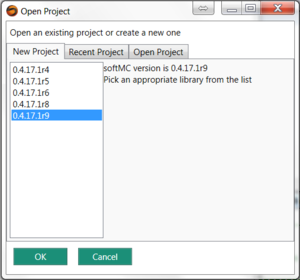

- Click OK.
- A Configurator project is created, but is not yet saved.
(5C) The Configurator opens.
- If using EtherCAT network, the Configurator online screen will look like this:
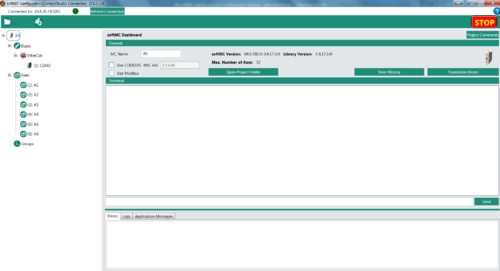

- Note: If using an EtherCAT network, drives and I/O devices are automatically detected and displayed in the Buses section of the navigation pane.
(5D) Optional: In the MC Name field, enter a name for the softMC; e.g., DEMO_EX
(5E) Optional: Create a folder/file and save the Configurator project (called EX01).


(6) Define three axes for the configuration
(6A) In the navigation pane, right-click on Axes, and add Axis A1.
- Repeat for Axis 2 and Axis 3.

(6B) Optional: Save the Configurator project.
(7) Define axis A1 configuration settings
(7A) In the navigation pane, select the first drive (CDHD).
- When selected, the device is displayed in blue text.
(7B) Enter settings as shown below.
- General Settings:
- Initial Active OpMode = 8-Cyclic synchronous position
- Physical Address = 1
- Click Apply.

- Note: For proper operation, Initial Active OpMode must be set to 8-Cyclic synchronous position.
- Drive Axis Linkage:
- Link Drive to Axis = A1.
- Click the Link arrow.

(7C) The Configurator displays the Axis:A1 screen.
- The screen has four tabs: General, Properties, Motion and Graph.
- In the General tab, enter settings as shown below.
- Note: These values are for demonstration purposes only, and are not necessarily suitable for your application.'
- Axis Type = Linear Screw
- Length Units = mm
- Gear Ratio = 1.0
- Screw Pitch = 10 (mm)

(7D) In the Properties tab, click on the Limits bar to access Limit parameters.
- Change the value of the following parameter:
- Position Error Max = 2
- After typing in a value, be sure to press Enter.

(7E) Optional: Save the Configurator project.
(8) Define axis A2 and axis 3 configuration settings
Configurator online
(8A) Define the parameters for Axis A2 and for Axis 3 by repeating the steps in Step 7.
(8B) Optional: Save the Configurator project.
(9) Define the axis group
(9A) In the navigation pane, right-click on Groups, and select Add Group.
- The Add a Group/Robot dialog box opens:

- Select: Cartesian group
- Enter a name for the group; for example: gxyz
- Select the specific configuration; for example: cartesian xyz xyz
(9B) Assign axes to the group: in the list; double-click on axis A1, A2 and A3.
- They will move to the Assigned Axes list.

- Click OK.
- The axis group is now defined:

(9C) Optional: Save the Configurator project.
(10) Compile project files and send configuration to the softMC
(10A) In the Configurator menu bar, click the Build & Run button.

- Note: The project is saved before the compilation is executed. If you have not yet saved the project, a File Manager dialog box will prompt you to save.
(10B) The Configurator generates files on the PC and sends them to the softMC.
- When complete, click Close.

(10C) You can view folders and files using the ControlStudio File View pane.

(10D) Note: If you created and saved folder/files named EXO1, the Configurator will generate a ControlStudio file called EX01.APJ file.:
It will also generate a folder called EXO1_Files
- In ControlStudio, go to the File Manager pane at the bottom of the screen.
- Select folder EX01 in the left pane, and look at the middle pane.
- If files do not appear, right-click in the middle pane > Refresh List
- Note: Files in the right pane reside in the softMC. Do not click on these files, or attempt to manipulate them.

(11) Verify the configuration by moving the axes
(11A) Select the Axis Group you configured (Cartesian group gxyz), and open the Motion tab.

(11B) Enter Target Position values for the three axes in the group; for example:
- Target A1: 10
- Target A2: 20
- Target A3: 30
- Change the value of the Velocity parameter to 20.
- (A slow speed allows you to more easily verify the motion).
- Switch the axis group to Enabled.

(11C) Hold and press the Run button.

- Watch the actual axes and/or watch the position values on the screen .
- Motion will end when the Position values equal the Target values.
Appendices
Appendix A: Uninstall previous ControlStudio installation
Windows
(A1) Uninstall all previously installed softMC programs.
- You can identify and uninstall the programs to be removed according to the publisher name: Servotronix.
- Note: Do not uninstall ServoStudio by Servotronix.
Appendix B: Update the softMC firmware
ControlStudio online
(B1) To update the firmware:
- Tools > Firmware Update
(B2) At the prompt, click Update.
(B3) Browse to the folder containing the firmware zip file.
- Select the file and click Open.
(B4) Follow the prompts.
- During the firmware update, the controller power cycles automatically.
- The Communication status indication turns yellow.
- Wait for the yellow LED on the front of the Demo Kit to turn off.
- To reestablish communication, use the Reset Communication button in the Controller Monitor pane (or Ctrl+D).
(B5) When finished, check the version again.
- If it does not appear to be updated, turn the controller off and then on again.
- Make sure Communication status in indicates Connected.