Motion Project Example: Puma Robot CDHD
| Language: | English • 中文(简体) |
|---|
Contents
Download Example Files
System Setup
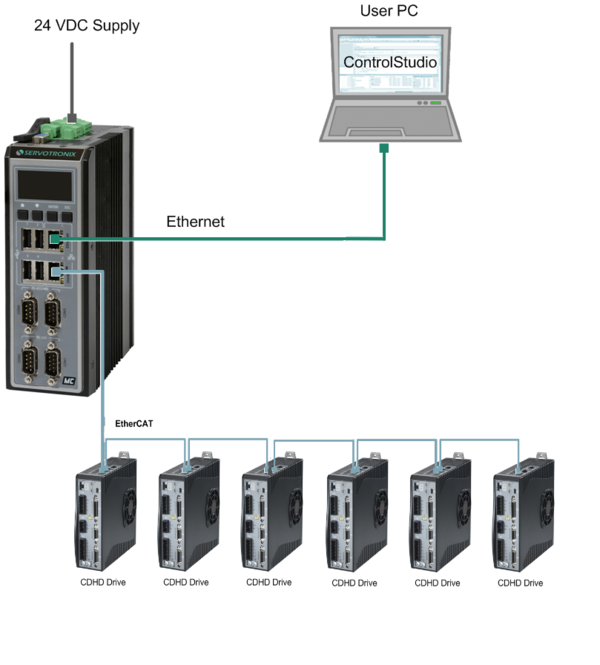
In this example we used the following system:
- softMC 7.
- Six CDHD drivers connected to six motors
- Computer with ControlStudio and softMC Configurator.
- Example files - Programs, setups, properties and more. You can find files description down bellow (4.1)
| NOTE | |
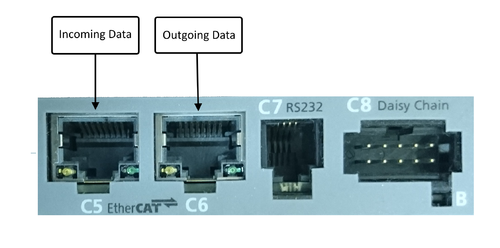
| The connection between softMC 7 to CDHD drivers is through EtherCAT cables and sockets (daisy chain) when C5 socket for incoming data, and C6 for outgoing data. |

The motors parameters calculate according to the manufacture formulas as it's appear in the Excel file.
softMC Configurator
To upload the example setups to your sofMC Configurator, open the example .mcfg file from the softMC Configurator.
After creating all project files with softMC Configurator or upload an existing project, you can run your Puma robot from ControlStudio or from the softMC Configurator itself.
In this example we will make a helical movement and execute Pick and Place program with MC-Basic program, from ControlStudio terminal.
For more information about how to setup Puma robot parameters using softMC Configurator - look here
Running The Program
To upload the example setups to your ControlStudio, open the example .apj file from the Controlstudio.
When all relevant files upload to your controller, use the following code, from ControlStudio-terminal to run the example:
-->reset all
-->load AUTOEXEC.PRG   'wait until the program will terminate
-->load HELIX.PRG      'Load helical movement program
-->Stas HELIX.PRG
-->load PnP.PRG        'Load Pick and Place program
-->Stas PnP.PRG
Files table With Description
| User Files | ||
|---|---|---|
| File Name | Description | Upload to Controller |
| Puma01_CDHD | Excel matrix that contain the information that you need to setup your robot. Notice which information you need to import from your system. |
− |
| CONFIG.PRG | MC-Basic program that define the basic data so that ControlStudio and sofMC Configurator will work. | + |
| AUTOEXEC.PRG | Execute startPRG.PRG program and SERVER.PRG program. | + |
| HELIX.PRG | Basic helical movement program. | + |
| PnP.PRG | Basic "Pick and Place" movement program. | + |
| softMC Configurator files - DO NOT MAKE ANY CHANGE | ||
|---|---|---|
| File Name | Description | Upload to Controller |
| AX_SETUP.PRG | Axes parameters setup program | + |
| CANSETUP.PRG | CANopen communication parameter setup program | + |
| EC_CDHD.LIB | EtherCat communication function and subroutine with CDHD library file | + |
| EC_USER.LIB | EtherCat communication function and subroutine library file | + |
| ETHERCAT.LIB | EtherCat communication function and subroutine library file | + |
| ECCONFIG.PRG | EtherCat configuration program | + |
| EC_SETUP.PRG | EtherCat communication setup program | + |
| RobLib.LIB | Robot function and subroutine library file | + |
| ROBOT.PRG | Robot parameter setup program | + |
| STARTPRG.PRG | Program that runs all other softMC Configurator programs | + |
| Puma01_CDHD.apj | Project file - allowed to load an existing project from ControStudio. | − |
| Puma01_CDHD.mcfg | Project file - allowed to load an existing project from softMC Configurator. | − |
| Puma01_CDHD.dat | General project files | − |
| Puma01_CDHD.asn | − | |
| Puma01_CDHD.pse | − | |


