Single Axis Setup in EtherCAT/CANopen Network/zh-hans
| 语言: | [[::Single Axis Setup in EtherCAT/CANopen Network|English]] • [[::Single Axis Setup in EtherCAT/CANopen Network/zh-hans|中文(简体)]] |
|---|
Contents
- 1 简介
- 2 步骤
- 2.1 (1) 安装并启动ControlStudio
- 2.2 (2) 在PC上安装设备参数(库)文件
- 2.3 (3) 为ControlStudio机器应用程序创建一个文件夹
- 2.4 (4) 连接电缆
- 2.5 (5) 建立PC与softMC之间的通信
- 2.6 (6) 创建一个配置器项目.
- 2.7 (7) 定义轴A1配置设置
- 2.8 (8) Define axis A2 configuration settings
- 2.9 (9) Compile project files and send configuration to the softMC
- 2.10 (10) Verify the configuration by moving the axes
- 2.11 (11) Record a motion
- 2.12 (12) Work with softMC controller via Terminal
- 2.13 (13) Write and run a program
- 3 Appendices
简介
注意: 本培训手册中仅包含必要的背景信息。 有关softMC硬件和软件系统的下载和更多信息,请使用Servotronix网站上提供的资源。
ControlStudio是基于PC的图形用户界面,用于softMC开发和测试控制和/或协调的运动应用程序。 ControlStudio包含编程编辑器,数据记录器,调试器和监视工具。 一旦应用程序完成,PC可以被移除,并且softMC控制器可以独立运行或在网络内运行。
softMC配置器是ControlStudio绑定的应用程序。配置器用于定义运动应用中要控制的轴和IO; 然后生成一组用于初始化softMC的程序和文件。
MC-Basic (Motion Control BASIC)是由Servotronix开发的用于softMC的专有编程语言。 它基于标准的BASIC编程语言,对多任务和运动控制功能进行了广泛的增强。
步骤
(1) 安装并启动ControlStudio
Windows
(1A) 如果PC上安装了以前版本的softMC,请卸载它们。有关说明,请参阅本文档的附录A和/或联系技术支持。
(1B) 运行CSSetup.exe来安装ControlStudio。 在安装期间接受默认设置。安装四个程序。
(1C) 如果尚未打开,请打开ControlStudio(从“开始”菜单或桌面图标)。
(2) 在PC上安装设备参数(库)文件
ControlStudio 离线
(2A) 从ControlStudio菜单栏,激活softMC配置器
- 选择: Tools > softMC Configurator
- 注意: 始终从ControlStudio激活Configurator(而不是桌面图标)。
(2B) 当离线操作时,配置器是这样。
- 在配置器屏幕的底部,点击 Install Libraries。
- 注意: 库 是包含可由softMC控制的所有设备(如CDHD,stepIM,IO)的参数的文件。
- 每当安装新的控制器固件时,必须在PC上安装更新的库文件。
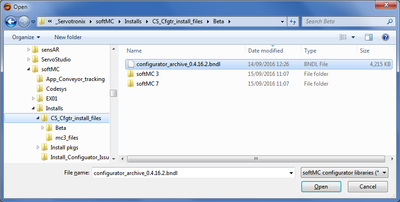
(2C) 浏览到包含该文件的文件夹 configurator_archive_0.4.x.x.bndl
- 这是库文件.
- 点击 Open.
- 等待确认消息: Libraries successfully imported.
- 点击 OK.
(2D)关闭配置器.
- 注意: 不要最小化。 您必须关闭配置器。
(3) 为ControlStudio机器应用程序创建一个文件夹
ControlStudio 离线
(3A) 在ControlStudio屏幕的底部,单击以打开 File Manager.
- File Manager有三个窗格。
- 在左窗格中,选择要为应用程序文件创建文件夹的位置。
- 在中间窗格中,右键单击并选择 New Folder.
- 给新文件夹命名: EX01
- 注意: 在ControlStudio中开发的运动应用程序(Solution)将包含保存任务(程序)文件,库文件和数据文件的Project和Subproject文件夹。 PC文件系统不反映softMC控制器文件系统。
(4) 连接电缆
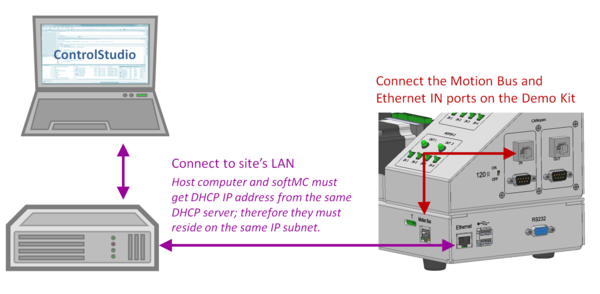
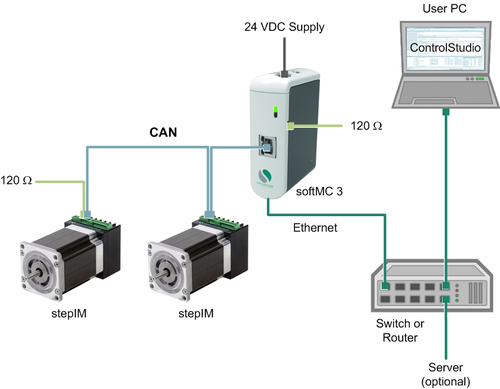
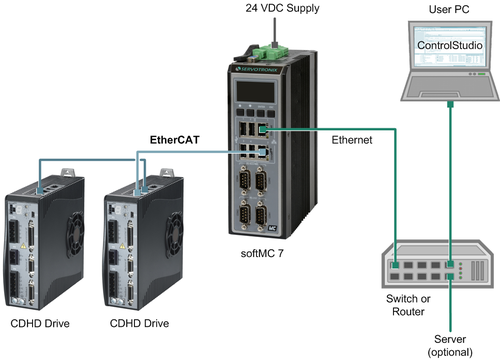
(4A) 连接系统电缆,如果尚未连接。.
- 请参考下图。
- 有关更多说明,请参阅softMC安装指南。
- 注意: 如果使用ServoStudio进行电机设置和/或驱动器调整,则需要使用Kvaser适配器才能与PC进行串行通信。 请参阅stepIM技术培训手册或联系技术支持。
softMC 3 with stepIM - Training Setup - CANopen devices and network
softMC 7 with CDHD – Training Setup - EtherCAT devices and network
(4B) 打开softMC培训系统。.
(5) 建立PC与softMC之间的通信
ControlStudio 在线
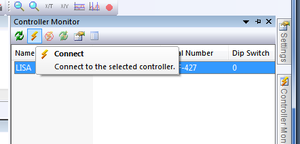
(5A) 在ControlStudio屏幕的右侧,将鼠标悬停在 Controller Monitor.
(5B) 选择检测到的softMC, 单击 Connect 按钮.
(5C) 屏幕底部的通信状态变为绿色,表示softMC和ControlStudio正在通信。
(5D) 在ControlStudio屏幕的中间,您将看到Terminal窗格。
- 确保对版本查询的返回是0.4.16.2或更高版本。
- 如有必要,请更新softMC固件。 有关说明,请参阅本文档的附录B和/或联系技术支持。
(5E) 如果以前没有使用培训系统,请转到步骤6。
- 如果以前已经使用过培训系统,则必须首先清除所有程序行的config.prg程序。 请联系技术支持以获取说明。
(6) 创建一个配置器项目.
Configurator 在线
(6A) 打开配置器.
- 通过访问: Tools > softMC Configurator
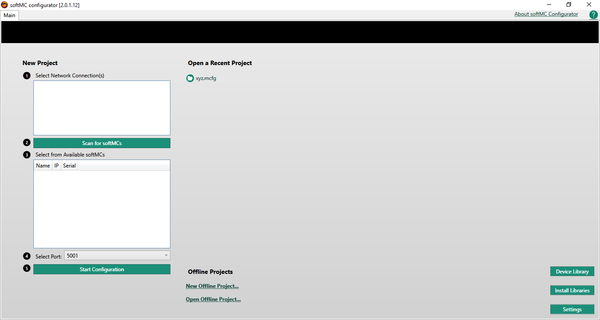
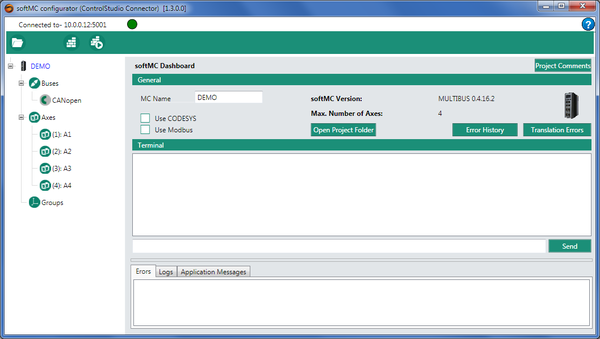
- 如果使用CANopen网络,配置器在线屏幕将如下所示:
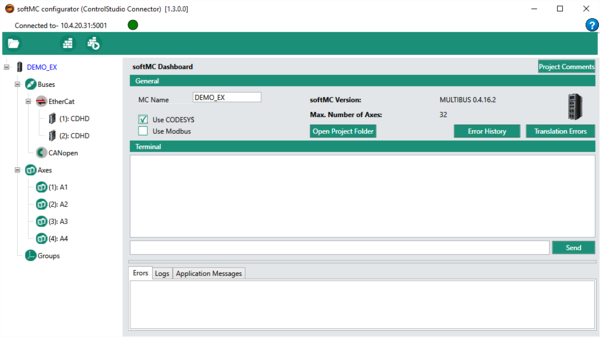
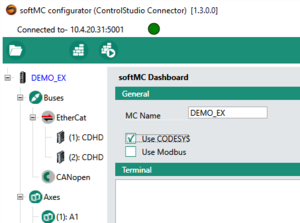
- 如果使用EtherCAT网络, 配置器在线屏幕将如下所示:
- 如果使用EtherCAT网络,请选择该选项: Use CODESYS
(6B) 可选项: 可选:在“MC名称”字段中,输入softMC的名称; 例如, DEMO_EX
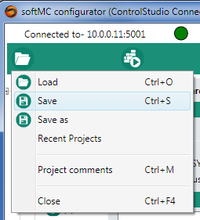
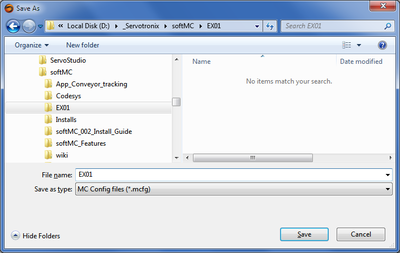
(6C) 通过将文件保存到之前创建的softMC文件夹中,创建 一个配置程序项目 (称为EX01)(步骤3)
(6D) 在ControlStudio(在线)中,转到屏幕底部的“File Manager”窗格。
- 选择左窗格中的文件夹EX01,然后查看中间窗格。
- I如果文件不出现,请右键单击中间窗格>Refresh List
- 您会看到一个名为EX01.mcfg= 配置工程文件
(7) 定义轴A1配置设置
Configurator 在线
(7A) 定义轴A1.
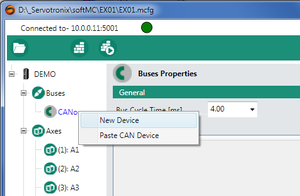
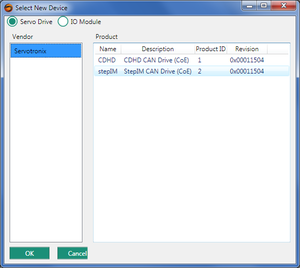
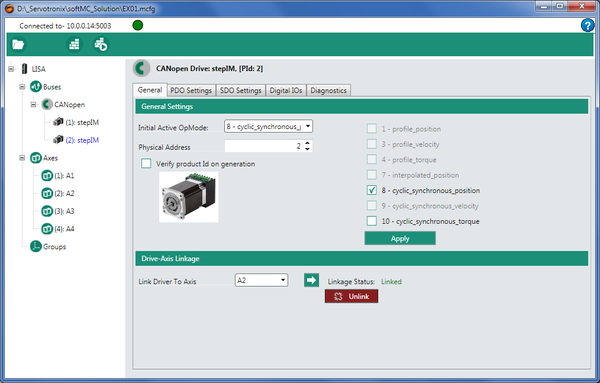
(7B) 如果使用CANopen 设备/驱动器, 选择Servotronix > stepIM或CDHD.
(7C) 根据所选设备,stepIM或CDHD将显示在总线的导航窗格里。
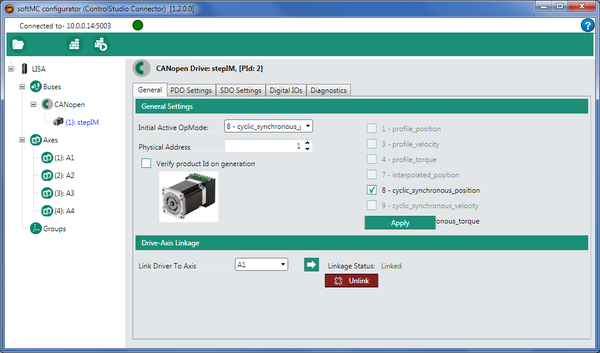
- 选择一个驱动器(stepIM或CDHD)。所选设备以蓝色文本显示。
- 输入如下所示的设置。
- Initial Active OpMode = 8-Cyclic synchronous position
- Physical Address = 1
- 点击Apply.
- Link Drive to Axis = A1.
- 点击Link箭头.
- Note: 为了正常运行, Initial Active OpMode必须设置为 8-Cyclic synchronous position
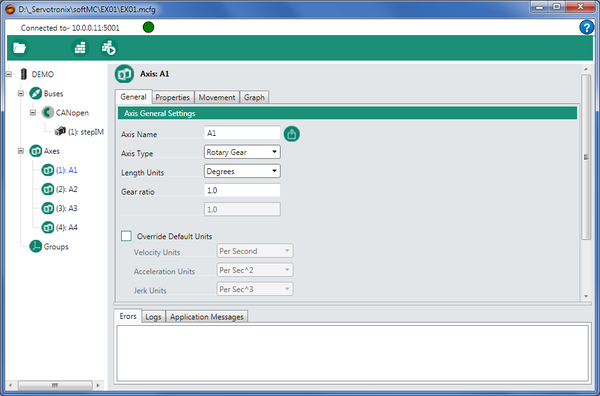
(7D) 配置器在屏幕中显示 Axis:A1 。
- 屏幕有四个选项卡: General, Properties, Movement and Graph.
- 在General 选项卡中, 输入如下所示的设置。
- Axis Type = Rotary Gear
- Length Units = Degrees (default)
- Gear Ratio = 1.0
注意: 齿轮比值通常在10-160范围内。 当使用Servotronix演示套件时,齿轮比值= 1。
(7E) 指南
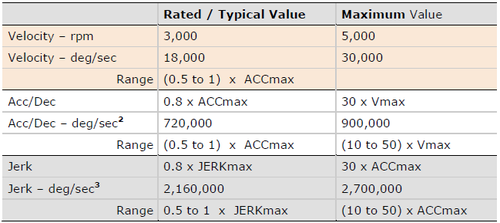
大多数机器人应用程序以 度/秒 为单位进行编程 , 即360度 = 1 转。因此:
- 6 deg/sec = 1 rpm
- 120 deg/sec = 20 rpm
- 360 deg/sec = 60 rpm
- 本文档中的说明使用以下计算和值,这是无刷直流电机的典型值:
- 对加速和减速都使用相同的值。 但是,如果负载电动机惯量比小于10(最佳LMJR值),则可以使用更高的加速度。
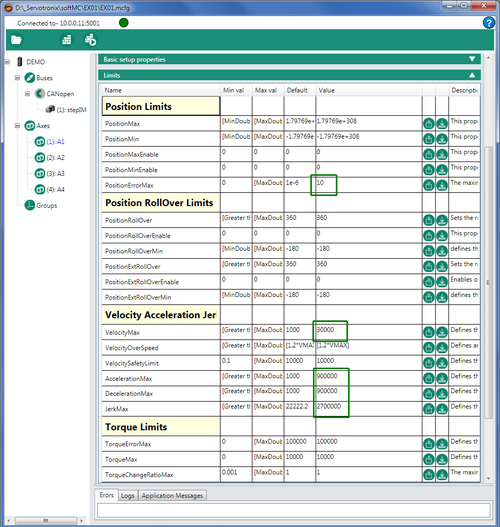
(7F)在Properties 选项中, 点击Limits栏以访问限制参数。
- 更改以下参数的值:
- Position Error Max = 10
- Velocity Max = 30000
- Acceleration Max = 900000
- Deceleration Max = 900000
- Jerk Max = 2700000
- 输入值后,一定要按Enter键。
(7G) Save Configurator project (EX01.mcfg)
(8) Define axis A2 configuration settings
Configurator online
(8A) Define the parameters for Axis A2 by repeating the steps in Step 7.
(8B) Save Configurator project (EX01.mcfg)
(9) Compile project files and send configuration to the softMC
Configurator online
(9A) In the Configurator menu bar, click the Build & Run button.
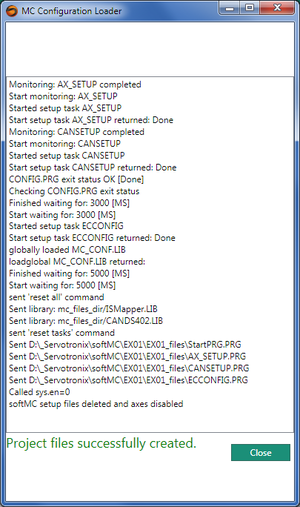
(9B) The Configurator generates files on the PC and sends them to the softMC.
(9C) Save Configurator project (EX01)
(9D) ControlStudio online
- Note: Configurator generates a ControlStudio project file called EX01.APJ file.
Configurator generates a folder called EXO1_Files
- In ControlStudio, go to the File Manager pane at the bottom of the screen.
- Select folder EX01 in the left pane, and look at the middle pane.
- If files do not appear, right-click in the middle pane > Refresh List
- Note: Files in the right pane reside in the softMC. Do not click on these files, or attempt to manipulate them.
- If using an EtherCAT network and devices and Use CODESYS option was selected, the EX01_Files folder will contain an additional file called softmc.devdesc.xml
(10) Verify the configuration by moving the axes
Configurator online
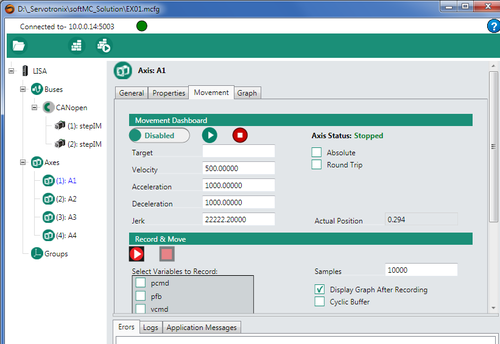
(10A) Select Axis A1, and open the Movement tab.
(10B) Refer to the units of motion table in Step 7.
- Change the values of the following parameters:
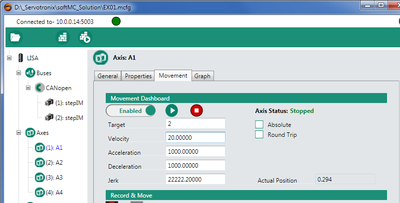
- Set Target = 360 (1 revolution)
- Set Velocity = 120
- Set Acceleration and Deceleration = 720000
- Set Jerk = 2160000
- Make sure Absolute option is not selected.
- Move the switch to Enabled.
- Click the Run button.
- Watch motor 1 load disk – it will rotate once.
- Enable the Absolute option.
- Set Target to 0.
- Click Run.
- When motor stops, note the Actual Position. It will show 0.000
(10C) Select Axis A2, and in the Movement tab, and enter the same settings as above.
- Click the Run button.
- Watch motor 2 load disk – it will rotate once.
- Enable the Round Trip option.
- Click Run.
- Watch motor 2 load disk – it will rotate once in each direction.
(10D) Disable both axes.
(10E) Save the Configurator project.
(11) Record a motion
Configurator online
(11A) Select Axis A1, and open the Movement tab.
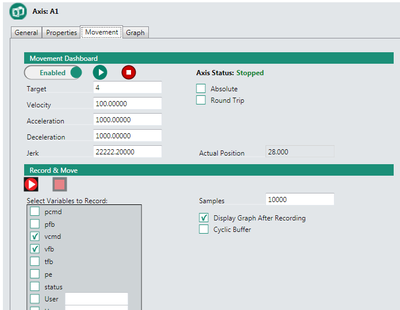
(11B) Change the values of the following parameters:
- Target = 360 (1 revolution)
- Velocity = 360 (60 rpm)
- Acc/Dec = 720000 deg/sec
- Jerk = 2160000 deg/sec
- Clear the Absolute option.
- Clear the Round Trip option.
- Enable the option Display Graph After Recording
- Select Variables: VCMD and VFB.
- Clear all other variables.
- Make sure drive is Enabled.
- Click Record &Move button
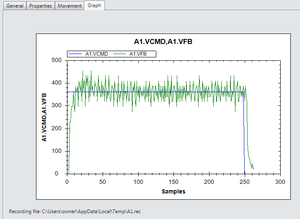
(11C) In a few moments, the recorded plot appears in the Graph tab.
- Note: The recorded plot is saved in a A1.rec (A2.rec) file in a temp folder. The last recording always overwrites the previous recording.
The Configurator recording function is only intended to provide initial confirmation of the axis configuration. For complete testing and adjustment, use the Recording function within ControlStudio.
(11D) In the Movement tab, disable the axes
(11E) Save the Configurator project.
- Exit Configurator
(12) Work with softMC controller via Terminal
ControlStudio online (12A) If softMC has been power cycled, this step is required. Otherwise, skip to Step12C. In the Terminal pane, enter the command reset all
- Note: The command reset all does the following:
- Removes all system variables and tasks from controller RAM.
- Removes all files from controller RAM .
- Runs the CONFIG.PRG task
(12B) If softMC has been power cycled, this step is required. Otherwise, skip to Step12C.
- In the Terminal pane, enter the command load startprg.prg
- Note: The command load startprg.prg loads all configuration data from controller Flash (non-volatile) memory to RAM. Data remains in Flash memory.
- Look at the messages in the Message Log pane.
- The system is now ready to receive commands.
(12C) In the Terminal pane, enable the axes.
- Enable axis 1:
- -->a1.en=1
- Enable axis 2:
- -->a2.en=1
- Gently grasp the motor load disk and try to move them. Strong resistance indicates the motor is enabled.
(12D) Note: The Move executes a point-to-point move from the current position to the target position of a single axis or a group of axes.
- Note: Use F3 as a shorcut to repeat last command entered
- In the Terminal pane, execute Move commands, and observe the response of the motors.
- Move A1 and A2 to absolute position PFB 0:
- -->move a1 0 abs=1
- -->move a2 0 abs=1
- Move A1 and A2 to absolute position PFB 3600 (10 revolutions from 0):
- -->move a1 3600 abs=1
- -->move a2 3600 abs=1
- Move A1 one revolution counterclockwise:
- -->move a1 -360 abs=0
- Move A2 two revolution clockwise:
- -->move a2 720
- Move A1 and A2 to absolute position PFB 7200 at different speeds:
- -->move a1 7200 abs=1 vcruise=720
- -->move a2 7200 abs=1 vcruise=240
(12E) Note: Jog moves the axis at a constant velocity.
- Use the Stop command to stop a Jog motion.
- In the Terminal pane, execute Jog commands, and observe the response of the motors:
- -->jog a1 720
- -->jog a2 240
- Allow both motors to run simultaneously.
- Then stop the motion:
- -->stop a1
- -->stop a2
- Disable the axes:
(13) Write and run a program
ControlStudio online
(13A) To begin writing a program for your motion application:
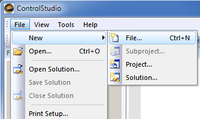
In ControlStudio, select: File > New > File
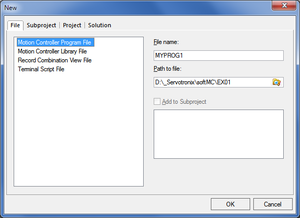
(13B) In the New dialog box, do the following:
- Select Motion Controller Program File.
- Enter a name for your program (e.g., MYPROG1).
- Note: A program name cannot exceed 8 characters.
- Browse to and select the path/folder containing your application files (e.g., EX01)
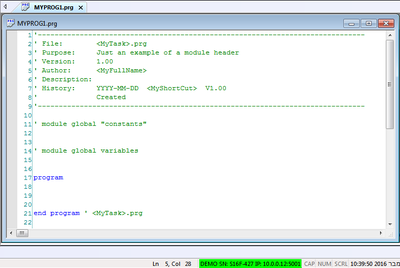
(13C) The Program Editor pane opens in ControlStudio.
(13D) Insert the cursor in the line below program.
- Enter the following program lines:
- program
- attach a1
- attach a2
- a1.En=1
- a2.En =1
- move a1 720 abs=1 vcruise= 360
- move a2 1440 abs=1 vcruise= 360
- delay a1 1000
- delay a2 1000
- move a1 0 abs=1 vcruise=360
- move a2 0 abs=1 vcruise= 360
- delay a1 10
- delay a2 10
- a1.En=0
- a2.En=0
- detach a1
- detach a2
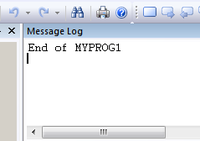
- Print "End of MYPROG1"
- end program
(13E) Save the program: File > Save
- Alternately, click the Save button on the toolbar.
- Check the File Manager pane at the bottom of the screen. Refresh if necessary.
- You now see the program in the application folder.
(13F) Send program MYPROG1 to the controller.
(13G) Run the program.
(13H) Run the program one line at a time.
- Continue clicking and observing the motion of the two motors.
Appendices
Appendix A: Uninstall previous ControlStudio installation
Windows
(A1) Uninstall all previously installed softMC programs.
- You can identify and uninstall the programs to be removed according to the publisher name: Servotronix.
- Note: Do not uninstall ServoStudio by Servotronix.
Appendix B: Update the softMC firmware
ControlStudio online
(B1) To update the firmware:
- Tools > Firmware Update
(B2) At the prompt, click Update.
(B3) Browse to the folder containing the firmware zip file.
- Select the file and click Open.
(B4) Follow the prompts.
- During the firmware update, the controller power cycles automatically.
- The Communication status indication turns yellow.
- Wait for the yellow LED on the front of the Demo Kit to turn off.
- To reestablish communication, use the Reset Communication button in the Controller Monitor pane (or Ctrl+D).
(B5) When finished, check the version again.
- If it does not appear to be updated, turn the controller off and then on again.
- Make sure Communication status indicates Connected.
