Difference between revisions of "Motion Project Examples"
| Line 1: | Line 1: | ||
=Project Examples Manual= | =Project Examples Manual= | ||
| − | The following examples | + | The following examples created to demonstrated simple robots configuration and movement execute by them. <br> |
| − | Every example include '''"ZIP"''' file that contain all the files you need to run the project by your self. You will find the | + | Every example include '''"ZIP"''' file that contain all the files you need to run the project by your self. You will find the files list in the projects examples pages. <br> |
| − | == | + | |
| + | '''Notice''' that there is examples that made for real systems, and examples that made for simulated system. <br> | ||
| + | |||
| + | |||
| + | '''You can duplicate and modify every project example - you will find instructions bellow.''' | ||
| + | |||
| + | |||
| + | {{Note| At the '''"ZIP"''' folder you will find an '''excel''' file that contain the basic parameters that provided by the robot/motors manufactures. Those parameter were used at the robot setup with softMC Configurator}} | ||
| + | |||
| + | {{Note | In some simulated examples there is an option to run simulated robot through '''RoboDK''' software, you will find relevant instructions in the specific project example page. }} | ||
| + | |||
| + | |||
| + | ==How to Run Project Example from ControlStudio== | ||
| + | # Download project ZIP file to your computer, extract and save it in accessible folder. <br> | ||
| + | # Open [[Control Studio|ControlStudio]]. From the menu-bar, choose '''File → Open Project...''' and locate the project example file. '''Notice''' that the relevant file is the '''".apj"''' file. <br> [[image: open project.png|700px]] <br> | ||
| + | # To upload the project files to the controller do the following: | ||
| + | ## At the '''"File View"''' window, at the project tree, right click on the project name. | ||
| + | ## Choose '''"Add file(s)..."''', and upload all files from the project folder.<br> [[image: open project2.png|700px]] <br> | ||
| + | ## At the project tree, right click project name, and choose '''"Copy all files to controller"''' <br> [[image: open project3.png|700px]] <br> | ||
| + | ## From terminal → send '''Reset All''' command, and after execute send ''' Load AUTOEXEC.PRG''' task. <br> [[image: open project4.png|700px]] <br> | ||
| + | # The project now ready to run the specific movement example program, according to example files - instructions given in each example page. <br> | ||
| + | |||
| + | |||
| + | ==How to Run Project Example from softMC Configurator== | ||
# Download project ZIP file to your computer, extract and save it in accessible folder. <br> | # Download project ZIP file to your computer, extract and save it in accessible folder. <br> | ||
| − | # Open [[ControlStudio]]. From the menu-bar, choose ''' | + | # Open [[Control Studio|ControlStudio]] and '''don't''' connect to the controller. From the menu-bar, choose '''Tools → softMC Configurator'''. You can find more information about softMC Configurator [[softMC Configurator | HERE]] <br> [[image: open project5.png|700px]] <br> |
| + | # At the '''Main''' window: | ||
| + | ## Select your network | ||
| + | ## Scan for softMC's | ||
| + | ## Select your softMC | ||
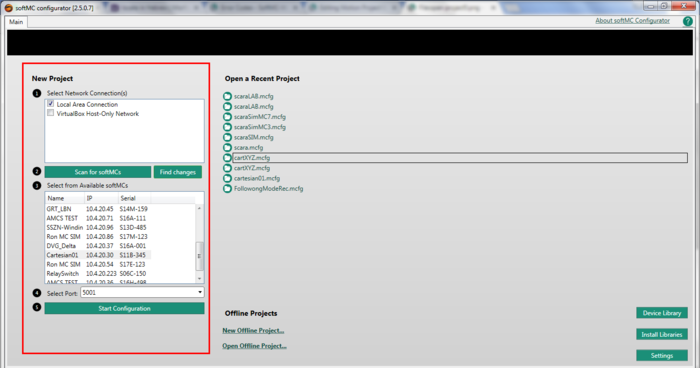
| + | ## Press '''"Start configuration"''' <br> [[image: open project6.png|700px]] <br> | ||
| + | # New window will open. Choose '''"Open Project"''' and then '''"Select a Project"''' <br> [[image: open project7.png|700px]] <br> | ||
| + | # From the example folder, open the '''".mcfg"''' file. | ||
| + | # To create and load all project files to the controller, press the '''"Bulid & Configure"''' button <br> [[image: open project8.png|700px]] <br> | ||
| + | # Now you can run the example robot from ControlStudio terminal or from '''Motion''' section in the softMC Configurator, at the relevant group/robot. <br> | ||
| + | |||
| + | |||
| + | ==Project Example Duplication== | ||
| + | In case you want to use the projects examples setups, or want to create your own setups, you can copy the examples properties, including programs files, library and more, by following the next steps: | ||
| + | # From ControlStudio, at the menu-bar, choose '''File → Save Project as...''' | ||
| + | # Locate project copy at any folder you'll like. | ||
| + | # You have now a new robot, with all necessary files, ready for you to take control. | ||
=Robot Examples= | =Robot Examples= | ||
* [[Motion Project Example: Cartesian Robot|Cartesian robot with 3 CDHD]] - Cartesian robot, and circular movement. | * [[Motion Project Example: Cartesian Robot|Cartesian robot with 3 CDHD]] - Cartesian robot, and circular movement. | ||
* [[Motion Project Example: Puma Robot CDHD|Puma robot with 6 CDHD]] - Puma robot, P&P and helical movement. | * [[Motion Project Example: Puma Robot CDHD|Puma robot with 6 CDHD]] - Puma robot, P&P and helical movement. | ||
* [[Motion Project Example: Puma Robot simulated|Puma robot with 6 simulated axis]] - Puma robot, P&P helical movement and robot simulation. | * [[Motion Project Example: Puma Robot simulated|Puma robot with 6 simulated axis]] - Puma robot, P&P helical movement and robot simulation. | ||
Revision as of 09:56, 10 October 2017
Contents
Project Examples Manual
The following examples created to demonstrated simple robots configuration and movement execute by them.
Every example include "ZIP" file that contain all the files you need to run the project by your self. You will find the files list in the projects examples pages.
Notice that there is examples that made for real systems, and examples that made for simulated system.
You can duplicate and modify every project example - you will find instructions bellow.
| NOTE | |
| At the "ZIP" folder you will find an excel file that contain the basic parameters that provided by the robot/motors manufactures. Those parameter were used at the robot setup with softMC Configurator |
| NOTE | |
| In some simulated examples there is an option to run simulated robot through RoboDK software, you will find relevant instructions in the specific project example page. |
How to Run Project Example from ControlStudio
- Download project ZIP file to your computer, extract and save it in accessible folder.
- Open ControlStudio. From the menu-bar, choose File → Open Project... and locate the project example file. Notice that the relevant file is the ".apj" file.
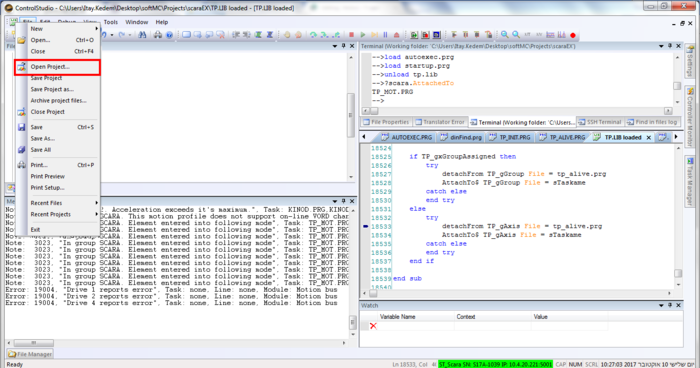
- To upload the project files to the controller do the following:
- At the "File View" window, at the project tree, right click on the project name.
- Choose "Add file(s)...", and upload all files from the project folder.
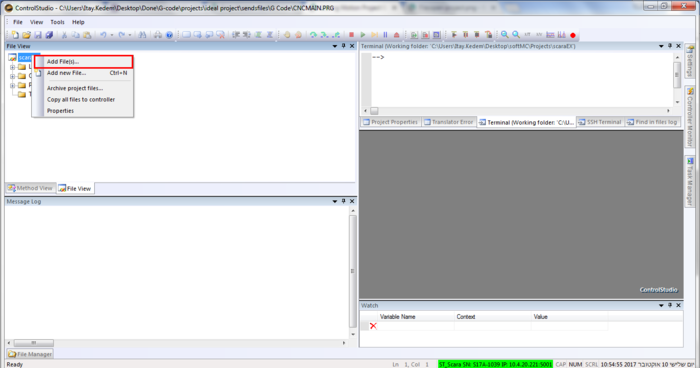
- At the project tree, right click project name, and choose "Copy all files to controller"
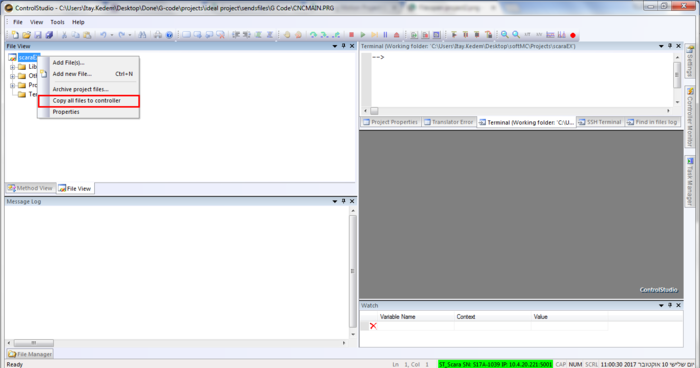
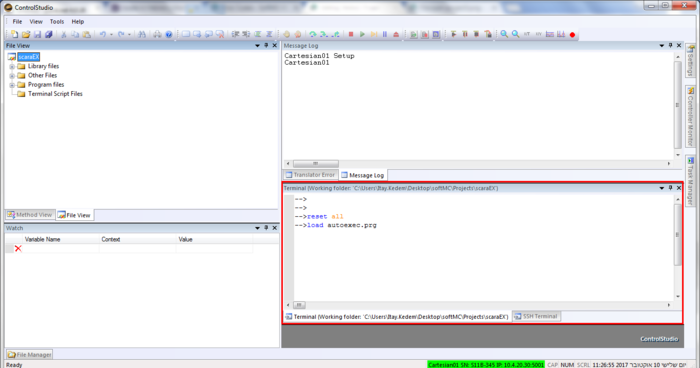
- From terminal → send Reset All command, and after execute send Load AUTOEXEC.PRG task.
- The project now ready to run the specific movement example program, according to example files - instructions given in each example page.
How to Run Project Example from softMC Configurator
- Download project ZIP file to your computer, extract and save it in accessible folder.
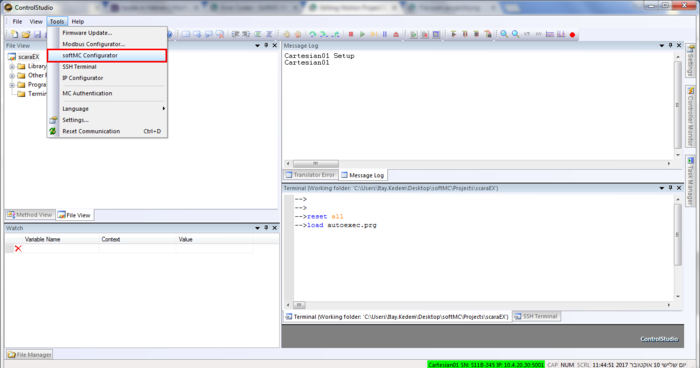
- Open ControlStudio and don't connect to the controller. From the menu-bar, choose Tools → softMC Configurator. You can find more information about softMC Configurator HERE
- At the Main window:
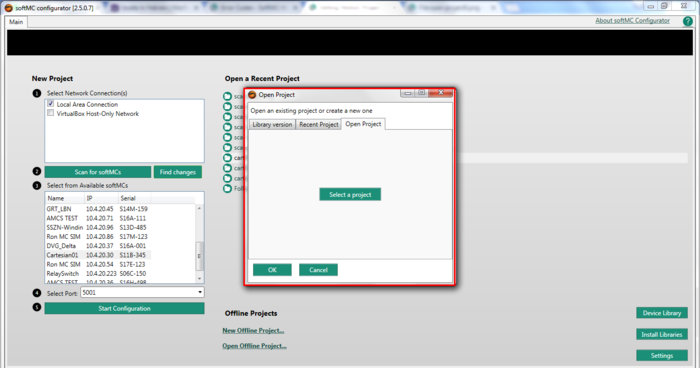
- New window will open. Choose "Open Project" and then "Select a Project"
- From the example folder, open the ".mcfg" file.
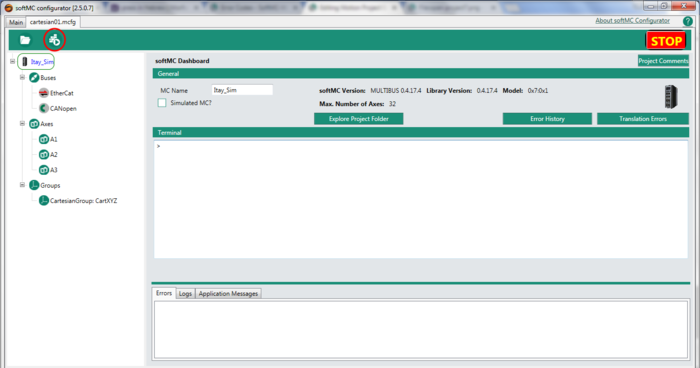
- To create and load all project files to the controller, press the "Bulid & Configure" button
- Now you can run the example robot from ControlStudio terminal or from Motion section in the softMC Configurator, at the relevant group/robot.
Project Example Duplication
In case you want to use the projects examples setups, or want to create your own setups, you can copy the examples properties, including programs files, library and more, by following the next steps:
- From ControlStudio, at the menu-bar, choose File → Save Project as...
- Locate project copy at any folder you'll like.
- You have now a new robot, with all necessary files, ready for you to take control.
Robot Examples
- Cartesian robot with 3 CDHD - Cartesian robot, and circular movement.
- Puma robot with 6 CDHD - Puma robot, P&P and helical movement.
- Puma robot with 6 simulated axis - Puma robot, P&P helical movement and robot simulation.
