Difference between revisions of "Motion Project Example: Puma Robot CDHD/zh-hans"
(Created page with "{{Languages}} The following example show how to set Puma robot properties using softMC Configurator and how to make Helix movement and Pick and Place method using it. <br>...") |
|||
| (3 intermediate revisions by the same user not shown) | |||
| Line 1: | Line 1: | ||
| − | {{Languages}} | + | {{Languages|Motion_Project_Example:_Puma_Robot_CDHD}} |
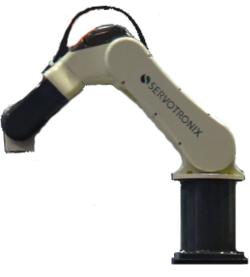
| − | + | 以下示例显示如何使用[[softMC Configurator]]设置Puma机器人属性以及如何使用Helix运动,并使用它进行拾取和放置。 <br> | |
| − | = | + | [[File:Puma02.png|right|250px|Puma Robot]]<br> |
| + | =下载示例文件= | ||
{|class="wikitable" style="text-align: center" | {|class="wikitable" style="text-align: center" | ||
| − | |''' | + | |'''描述''' |
| − | |''' | + | |'''下载''' |
|- | |- | ||
| − | | | + | |建议下载示例'''ZIP'''文件,提取所有项目文件,使用ControlStudio打开项目,并自行运行示例。 文件说明在下面的文件描述表(4.1)。说明将在下面列出。 |
|[[image:Download.png|90px|link=http://softmc.servotronix.com/img_auth.php/9/99/Puma01_CDHD.zip]] | |[[image:Download.png|90px|link=http://softmc.servotronix.com/img_auth.php/9/99/Puma01_CDHD.zip]] | ||
|} | |} | ||
| − | = | + | =系统设置= |
| − | + | 在这个例子中,我们使用了下面的系统: <br> | |
* softMC 7. | * softMC 7. | ||
| − | * | + | * 六个CDHD驱动器连接到六个电机 |
| − | * | + | * 安装[[Control Studio|ControlStudio]]和[[softMC Configurator]]的电脑.<br> |
| − | * | + | * 示例文件 - 程序,设置,属性等等。 你可以在下面找到文件描述(4.1) |
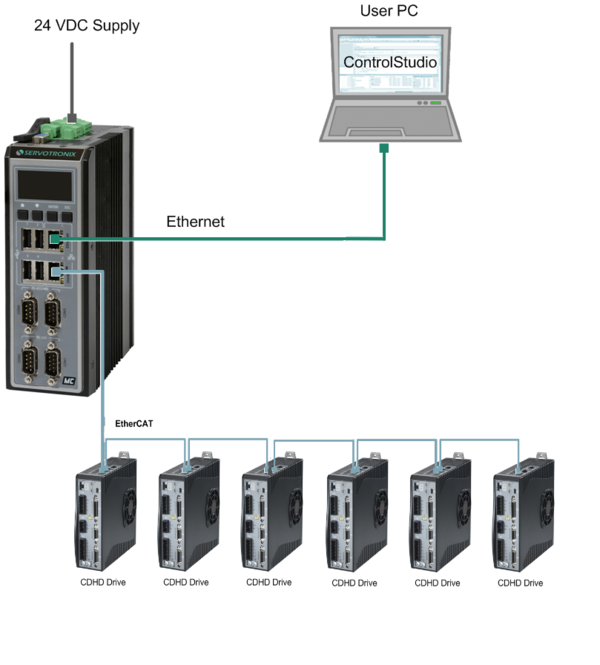
| − | + | 接线如下: <br> | |
[[image:puma 1.png |600px]] <br> | [[image:puma 1.png |600px]] <br> | ||
| − | + | 电机参数根据Excel文件中显示的制造公式计算。 | |
=softMC Configurator= | =softMC Configurator= | ||
| − | + | 要将示例设置上传到您的sofMC Configurator,请从softMC Configurator中打开示例的'''.mcfg''' 文件。 | |
| − | + | 在使用softMC Configurator创建所有项目文件或上传现有项目后,可以从ControlStudio或从SoftMC Configurator本身运行Puma机器人 <br> | |
| − | + | 在这个例子中,我们将从ControlStudio终端执行一个螺旋运动,并执行的拾取和放置的MC-Basic程序。 | |
| − | + | 有关如何使用softMC Configurator设置Puma机器人参数的更多信息 - [[6-Axis Puma robot Setup|请参阅这里]] <br> | |
| − | = | + | =运行程序= |
| − | + | 要将示例设置上传到ControlStudio,请从Controlstudio打开示例'''.apj'''文件。<br> | |
| − | + | 当所有相关文件上传到您的控制器时,请使用以下代码从ControlStudio终端运行该示例: | |
<syntaxhighlight lang='VB'> | <syntaxhighlight lang='VB'> | ||
| Line 41: | Line 42: | ||
</syntaxhighlight> | </syntaxhighlight> | ||
| − | == | + | ==文件表与说明== |
{|class="wikitable" | {|class="wikitable" | ||
!colspan = "3"|'''<big>User Files</big>''' | !colspan = "3"|'''<big>User Files</big>''' | ||
|- | |- | ||
| − | ! | + | !文件名称 |
| − | ! | + | !描述 |
| − | ! | + | !上传到控制器 |
|- | |- | ||
|Puma01_CDHD | |Puma01_CDHD | ||
| − | | | + | |包含您设置机器人所需信息的Excel矩阵.<br> 注意您需要从系统导入哪些信息. |
|align="center" |'''−''' | |align="center" |'''−''' | ||
|- | |- | ||
|CONFIG.PRG | |CONFIG.PRG | ||
| − | | | + | |定义基本数据的MC-Basic程序,以便ControlStudio和sofMC Configurator能够工作。 |
|align="center" |'''+''' | |align="center" |'''+''' | ||
|- | |- | ||
|AUTOEXEC.PRG | |AUTOEXEC.PRG | ||
| − | | | + | |执行startPRG.PRG程序和SERVER.PRG程序。 |
|align="center" |'''+''' | |align="center" |'''+''' | ||
|- | |- | ||
|HELIX.PRG | |HELIX.PRG | ||
| − | | | + | |基本的螺旋运动程序。 |
|align="center" |'''+''' | |align="center" |'''+''' | ||
|- | |- | ||
|PnP.PRG | |PnP.PRG | ||
| − | | | + | |基本 "拾取和放置"运动程序 |
|align="center" |'''+''' | |align="center" |'''+''' | ||
|} | |} | ||
| Line 73: | Line 74: | ||
{|class = "wikitable" | {|class = "wikitable" | ||
| − | !colspan = "3"| '''<big>softMC Configurator files - | + | !colspan = "3"| '''<big>softMC Configurator files - 不要做任何改变</big>''' |
|- | |- | ||
| − | ! | + | !文件名称 |
| − | ! | + | !描述 |
| − | ! | + | !上传到控制器 |
|- | |- | ||
|AX_SETUP.PRG | |AX_SETUP.PRG | ||
| − | | | + | |轴参数设置程序 |
|align="center" |'''+''' | |align="center" |'''+''' | ||
|- | |- | ||
|CANSETUP.PRG | |CANSETUP.PRG | ||
| − | | | + | |CANopen通讯参数设置程序 |
|align="center" |'''+''' | |align="center" |'''+''' | ||
|- | |- | ||
|EC_CDHD.LIB | |EC_CDHD.LIB | ||
| − | | | + | |EtherCat通讯功能和CDHD库文件子程序 |
|align="center" |'''+''' | |align="center" |'''+''' | ||
|- | |- | ||
|EC_USER.LIB | |EC_USER.LIB | ||
| − | | | + | |EtherCat通讯功能和子程序库文件 |
|align="center" |'''+''' | |align="center" |'''+''' | ||
|- | |- | ||
|ETHERCAT.LIB | |ETHERCAT.LIB | ||
| − | | | + | |EtherCat通讯功能和子程序库文件 |
|align="center" |'''+''' | |align="center" |'''+''' | ||
|- | |- | ||
|ECCONFIG.PRG | |ECCONFIG.PRG | ||
| − | | | + | |EtherCat配置程序 |
|align="center" |'''+''' | |align="center" |'''+''' | ||
|- | |- | ||
|EC_SETUP.PRG | |EC_SETUP.PRG | ||
| − | | | + | |EtherCat通讯设置程序 |
|align="center" |'''+''' | |align="center" |'''+''' | ||
|- | |- | ||
|RobLib.LIB | |RobLib.LIB | ||
| − | | | + | |机器人功能和子程序库文件 |
|align="center" |'''+''' | |align="center" |'''+''' | ||
|- | |- | ||
|ROBOT.PRG | |ROBOT.PRG | ||
| − | | | + | |机器人参数设置程序 |
|align="center" |'''+''' | |align="center" |'''+''' | ||
|- | |- | ||
|STARTPRG.PRG | |STARTPRG.PRG | ||
| − | | | + | |运行所有其他softMC Configurator程序的程序 |
|align="center" |'''+''' | |align="center" |'''+''' | ||
|- | |- | ||
|Puma01_CDHD.apj | |Puma01_CDHD.apj | ||
| − | | | + | |项目文件 - 允许从ControStudio加载现有项目。 |
|align="center" |'''−''' | |align="center" |'''−''' | ||
|- | |- | ||
|Puma01_CDHD.mcfg | |Puma01_CDHD.mcfg | ||
| − | | | + | |项目文件 - 允许加载来自softMC Configurator的现有项目。 |
|align="center" |'''−''' | |align="center" |'''−''' | ||
|- | |- | ||
|Puma01_CDHD.dat | |Puma01_CDHD.dat | ||
| − | |rowspan="3" align="center"| | + | |rowspan="3" align="center"|一般项目文件 |
|align="center" |'''−''' | |align="center" |'''−''' | ||
|- | |- | ||
Latest revision as of 14:14, 6 January 2018
| 语言: | English • 中文(简体) |
|---|
以下示例显示如何使用softMC Configurator设置Puma机器人属性以及如何使用Helix运动,并使用它进行拾取和放置。
Contents
下载示例文件
| 描述 | 下载 |
| 建议下载示例ZIP文件,提取所有项目文件,使用ControlStudio打开项目,并自行运行示例。 文件说明在下面的文件描述表(4.1)。说明将在下面列出。 | 
|
系统设置
在这个例子中,我们使用了下面的系统:
- softMC 7.
- 六个CDHD驱动器连接到六个电机
- 安装ControlStudio和softMC Configurator的电脑.
- 示例文件 - 程序,设置,属性等等。 你可以在下面找到文件描述(4.1)
接线如下:

电机参数根据Excel文件中显示的制造公式计算。
softMC Configurator
要将示例设置上传到您的sofMC Configurator,请从softMC Configurator中打开示例的.mcfg 文件。
在使用softMC Configurator创建所有项目文件或上传现有项目后,可以从ControlStudio或从SoftMC Configurator本身运行Puma机器人
在这个例子中,我们将从ControlStudio终端执行一个螺旋运动,并执行的拾取和放置的MC-Basic程序。
有关如何使用softMC Configurator设置Puma机器人参数的更多信息 - 请参阅这里
运行程序
要将示例设置上传到ControlStudio,请从Controlstudio打开示例.apj文件。
当所有相关文件上传到您的控制器时,请使用以下代码从ControlStudio终端运行该示例:
-->reset all
-->load AUTOEXEC.PRG   'wait until the program will terminate
-->load HELIX.PRG      'Load helical movement program
-->Stas HELIX.PRG
-->load PnP.PRG        'Load Pick and Place program
-->Stas PnP.PRG
文件表与说明
| User Files | ||
|---|---|---|
| 文件名称 | 描述 | 上传到控制器 |
| Puma01_CDHD | 包含您设置机器人所需信息的Excel矩阵. 注意您需要从系统导入哪些信息. |
− |
| CONFIG.PRG | 定义基本数据的MC-Basic程序,以便ControlStudio和sofMC Configurator能够工作。 | + |
| AUTOEXEC.PRG | 执行startPRG.PRG程序和SERVER.PRG程序。 | + |
| HELIX.PRG | 基本的螺旋运动程序。 | + |
| PnP.PRG | 基本 "拾取和放置"运动程序 | + |
| softMC Configurator files - 不要做任何改变 | ||
|---|---|---|
| 文件名称 | 描述 | 上传到控制器 |
| AX_SETUP.PRG | 轴参数设置程序 | + |
| CANSETUP.PRG | CANopen通讯参数设置程序 | + |
| EC_CDHD.LIB | EtherCat通讯功能和CDHD库文件子程序 | + |
| EC_USER.LIB | EtherCat通讯功能和子程序库文件 | + |
| ETHERCAT.LIB | EtherCat通讯功能和子程序库文件 | + |
| ECCONFIG.PRG | EtherCat配置程序 | + |
| EC_SETUP.PRG | EtherCat通讯设置程序 | + |
| RobLib.LIB | 机器人功能和子程序库文件 | + |
| ROBOT.PRG | 机器人参数设置程序 | + |
| STARTPRG.PRG | 运行所有其他softMC Configurator程序的程序 | + |
| Puma01_CDHD.apj | 项目文件 - 允许从ControStudio加载现有项目。 | − |
| Puma01_CDHD.mcfg | 项目文件 - 允许加载来自softMC Configurator的现有项目。 | − |
| Puma01_CDHD.dat | 一般项目文件 | − |
| Puma01_CDHD.asn | − | |
| Puma01_CDHD.pse | − | |
