Difference between revisions of "Single Axis Setup in EtherCAT/CANopen Network/zh-hans"
| (12 intermediate revisions by 2 users not shown) | |||
| Line 1: | Line 1: | ||
| − | {{Languages}} | + | {{Languages|Single_Axis_Setup_in_EtherCAT}} |
| + | <div id="BackToTop" class="noprint" style="background-color:; position:fixed; bottom:32px; left:95%; z-index:9999; padding:0; margin:0;"> | ||
| + | <span style="color:blue; font-size:8pt; font-face:verdana,sans-serif; border:0.2em outset:#ceebf7; padding:0.1em; font-weight:bolder; -moz-border-radius:8px; "> | ||
| + | [[Image:TOP2.png|50px|link=#top]] </span></div> | ||
| + | |||
= 简介 = | = 简介 = | ||
'''注意''': 本培训手册中仅包含必要的背景信息。 有关softMC硬件和软件系统的下载和更多信息,请使用Servotronix网站上提供的资源。 | '''注意''': 本培训手册中仅包含必要的背景信息。 有关softMC硬件和软件系统的下载和更多信息,请使用Servotronix网站上提供的资源。 | ||
| Line 7: | Line 11: | ||
'''softMC配置器'''是ControlStudio绑定的应用程序。配置器用于定义运动应用中要控制的轴和IO; 然后生成一组用于初始化softMC的程序和文件。 | '''softMC配置器'''是ControlStudio绑定的应用程序。配置器用于定义运动应用中要控制的轴和IO; 然后生成一组用于初始化softMC的程序和文件。 | ||
| − | '''MC-Basic '''(Motion Control BASIC)是由Servotronix开发的用于softMC的专有编程语言。 | + | '''MC-Basic '''(Motion Control BASIC)是由Servotronix开发的用于softMC的专有编程语言。 它基于标准的BASIC编程语言,对多任务和运动控制功能进行了增强。 |
= 步骤 = | = 步骤 = | ||
| − | == (1) | + | == (1) 安装并启动ControlStudio == |
'''Windows''' | '''Windows''' | ||
| − | (1A) | + | (1A) 如果PC上安装了以前版本的softMC,请卸载它们。有关说明,请参阅本文档的附录A和/或联系技术支持。 |
| − | |||
| − | (1B) | + | (1B) 运行'''CSSetup.exe'''来安装ControlStudio。 在安装期间接受默认设置。安装四个程序。 |
| − | |||
| − | |||
| − | (1C) | + | (1C) 如果尚未打开,请打开ControlStudio(从“开始”菜单或桌面图标)。 |
<br/> | <br/> | ||
| − | == (2) | + | == (2) 在PC上安装设备参数(库)文件 == |
| − | '''ControlStudio | + | '''ControlStudio 离线''' |
| − | (2A) | + | (2A) 从ControlStudio菜单栏,激活softMC配置器 |
| − | : | + | :选择: '''Tools''' > '''softMC Configurator''' |
| − | :''' | + | :'''注意''': 始终从ControlStudio激活Configurator(而不是桌面图标)。 |
<br/> | <br/> | ||
| − | (2B) | + | (2B) 当离线操作时,配置器是这样。 |
<br/> | <br/> | ||
| Line 40: | Line 41: | ||
<br/> | <br/> | ||
| − | : | + | :在配置器屏幕的底部,点击''' Install Libraries'''。 |
| − | :''' | + | :'''注意: 库''' 是包含可由softMC控制的所有设备(如CDHD,stepIM,IO)的参数的文件。 |
| − | : | + | :每当安装新的控制器固件时,必须在PC上安装更新的'''库文件'''。 |
<br/> | <br/> | ||
<br/> | <br/> | ||
| − | (2C) | + | (2C) 浏览到包含该文件的文件夹 '''configurator_archive_0.4.x.x.<u>bndl</u>''' |
| − | : | + | :这是库文件. |
| − | : | + | :点击 '''Open'''. |
<br/> | <br/> | ||
::[[File:configurator-library.png|400px]] | ::[[File:configurator-library.png|400px]] | ||
<br/> | <br/> | ||
| − | : | + | :等待确认消息: Libraries successfully imported. |
| − | : | + | :点击 '''OK'''. |
<br/> | <br/> | ||
| − | (2D) | + | (2D)关闭配置器. |
| − | :''' | + | :'''注意''': 不要最小化。 您必须关闭配置器。 |
<br/> | <br/> | ||
| − | ==(3) | + | == (3) 为ControlStudio机器应用程序创建一个文件夹 == |
| − | '''ControlStudio | + | '''ControlStudio 离线''' |
| − | (3A) | + | (3A) 在ControlStudio屏幕的底部,单击以打开 '''File Manager'''. |
| − | : | + | :File Manager有三个窗格。 |
| − | : | + | :在左窗格中,选择要为应用程序文件创建文件夹的位置。 |
| − | : | + | :在中间窗格中,右键单击并选择 '''New Folder'''. |
| − | : | + | :给新文件夹命名: '''EX01''' |
<br/> | <br/> | ||
| Line 78: | Line 79: | ||
<br/> | <br/> | ||
| − | :''' | + | :'''注意''': 在ControlStudio中开发的运动应用程序(Solution)将包含保存任务(程序)文件,库文件和数据文件的Project和Subproject文件夹。 PC文件系统不反映softMC控制器文件系统。 |
<br/> | <br/> | ||
| − | ==(4) | + | ==(4) 连接电缆 == |
| − | (4A) | + | (4A) 如果尚未连接,连接系统电缆。 |
| − | : | + | :请参考下图。 |
| − | : | + | :有关更多说明,请参阅softMC安装指南。 |
<br/> | <br/> | ||
| Line 92: | Line 93: | ||
<br/> | <br/> | ||
| − | :''' | + | :'''注意''': 如果使用ServoStudio进行电机设置和/或驱动器调整,则需要使用Kvaser适配器才能与PC进行串行通信。 请参阅stepIM技术培训手册或联系技术支持。 |
<br/> | <br/> | ||
| Line 108: | Line 109: | ||
| − | (4B) | + | (4B) 打开softMC培训系统。 |
<br/> | <br/> | ||
| − | ==(5) | + | ==(5) 建立PC与softMC之间的通信== |
| − | '''ControlStudio | + | '''ControlStudio 在线 ''' |
| − | (5A) | + | (5A) 在ControlStudio屏幕的右侧,将鼠标悬停在 '''Controller Monitor'''. |
| − | : | + | :控制器监视器窗格打开。 |
| − | : | + | :单击'''Refresh''' 按钮。 |
| − | : | + | :等待一会儿,直到您的设置中的softMC被识别并显示在列表中。(例如, “DEMO”) |
::[[File:configurator-169.png|200px]] | ::[[File:configurator-169.png|200px]] | ||
<br/> | <br/> | ||
| − | (5B) | + | (5B) 选择检测到的softMC, 单击 '''Connect''' 按钮。 |
<br/> | <br/> | ||
::[[File:configurator-118.png|300px]] | ::[[File:configurator-118.png|300px]] | ||
| Line 129: | Line 130: | ||
| − | (5C) | + | (5C) 屏幕底部的通信状态变为绿色,表示softMC和ControlStudio正在通信。 |
<br/> | <br/> | ||
::[[File:configurator-170.png|300px]] | ::[[File:configurator-170.png|300px]] | ||
| Line 135: | Line 136: | ||
| − | (5D) | + | (5D) 在ControlStudio屏幕的中间,您将看到'''Terminal'''窗格。 |
| − | :''' | + | :'''注意''': 终端是softMC的命令行界面。 它允许您向softMC发送命令和查询,并返回接收响应。 |
| − | : | + | :要确认通信已建立,请将光标放在“终端”窗格中。 |
| − | : | + | :查询固件版本: '''?ver''' |
::[[File:configurator-152b.png|300px]] | ::[[File:configurator-152b.png|300px]] | ||
<br/> | <br/> | ||
| − | : | + | :确保对版本查询的返回是'''0.4.16.2'''或更高版本。 |
| − | : | + | :如有必要,请更新softMC固件。 有关说明,请参阅本文档的附录B和/或联系技术支持。 |
<br/> | <br/> | ||
| − | (5E) '' | + | (5E) ''如果以前没有使用培训系统,请转到步骤6。'' |
| − | : | + | :如果以前已经使用过培训系统,则必须首先清除所有程序行的'''config.prg'''程序。 请联系技术支持以获取说明。 |
<br/> | <br/> | ||
| − | ==(6) | + | ==(6) 创建一个配置器项目 == |
| − | '''Configurator | + | '''Configurator 在线''' |
| − | (6A) | + | (6A) 打开配置器 |
| − | : | + | :通过访问: '''Tools''' > '''softMC Configurator''' |
| − | : | + | :如果使用'''CANopen'''网络,配置器在线屏幕将如下所示: |
<br/> | <br/> | ||
::[[File:configurator-172a.png|600px]] | ::[[File:configurator-172a.png|600px]] | ||
| Line 163: | Line 164: | ||
| − | : | + | :如果使用'''EtherCAT'''网络, 配置器在线屏幕将如下所示: |
<br/> | <br/> | ||
::[[File:configurator-172b.png|600px]] | ::[[File:configurator-172b.png|600px]] | ||
| Line 170: | Line 171: | ||
| − | : | + | :如果使用EtherCAT网络,请选择该选项:''' Use CODESYS''' |
<br/> | <br/> | ||
| − | (6B) ''' | + | (6B) '''可选项''': 可选:在“MC名称”字段中,输入softMC的名称; 例如, '''DEMO_EX''' |
<br/> | <br/> | ||
| − | (6C) | + | (6C) 通过将文件保存到之前创建的softMC文件夹中,创建''' 一个配置程序项目 '''(称为'''EX01''')(步骤3) |
<br/> | <br/> | ||
::[[File:configurator-16.png|200px]] | ::[[File:configurator-16.png|200px]] | ||
| Line 185: | Line 186: | ||
<br/> | <br/> | ||
| − | (6D) | + | (6D) 在ControlStudio(在线)中,转到屏幕底部的“File Manager”窗格。 |
| − | : | + | :选择左窗格中的文件夹EX01,然后查看中间窗格。 |
| − | : | + | :I如果文件不出现,请右键单击中间窗格>'''Refresh List''' |
| − | : | + | :您会看到一个名为'''EX01.mcfg'''= 配置工程文件 |
| − | |||
<br/> | <br/> | ||
::[[File:configurator-158.png|400px]] | ::[[File:configurator-158.png|400px]] | ||
| Line 195: | Line 195: | ||
<br/> | <br/> | ||
| − | ==(7) | + | ==(7) 定义轴A1配置设置 == |
| − | '''Configurator | + | '''Configurator 在线''' |
| − | (7A) | + | (7A) 定义轴A1. |
| − | :'' | + | :''如果使用EtherCAT设备/驱动器,将自动检测并显示。 跳到步骤7C |
:::[[File:configurator-159a.png|300px]] | :::[[File:configurator-159a.png|300px]] | ||
<br/> | <br/> | ||
| − | : | + | :如果使用'''CANopen'''设备/驱动器,右键单击导航窗格中的''CANopen'''。 |
| − | : | + | :选择'''New Device.''' |
:::[[File:configurator-159b.png|300px]] | :::[[File:configurator-159b.png|300px]] | ||
<br/> | <br/> | ||
| − | (7B) | + | (7B) 如果使用CANopen 设备/驱动器, 选择'''Servotronix''' > '''stepIM'''或'''CDHD'''. |
| − | : | + | :单击 '''OK'''. |
:::[[File:configurator-130.png|300px]] | :::[[File:configurator-130.png|300px]] | ||
<br/> | <br/> | ||
<br/> | <br/> | ||
| − | (7C) | + | (7C) 根据所选设备,stepIM或CDHD将显示在总线的导航窗格里。 |
| − | : | + | :选择一个驱动器('''stepIM'''或'''CDHD''')。所选设备以蓝色文本显示。 |
| − | : | + | :输入如下所示的设置。 |
:Initial Active OpMode = '''8-Cyclic synchronous position''' | :Initial Active OpMode = '''8-Cyclic synchronous position''' | ||
:Physical Address = '''1''' | :Physical Address = '''1''' | ||
| − | : | + | :点击'''Apply'''. |
:Link Drive to Axis''' = A1'''. | :Link Drive to Axis''' = A1'''. | ||
| − | : | + | :点击'''Link'''箭头. |
:::[[File:configurator-131.png|600px]] | :::[[File:configurator-131.png|600px]] | ||
<br/> | <br/> | ||
| − | :'''Note''': | + | :'''Note''': 为了正常运行, Initial Active OpMode必须设置为 '''8-Cyclic synchronous position''' |
<br/> | <br/> | ||
| − | (7D) | + | (7D) 配置器在屏幕中显示''' Axis:A1 '''。 |
| − | : | + | :屏幕有四个选项卡: General, Properties, Movement and Graph. |
| − | : | + | :在'''General '''选项卡中, 输入如下所示的设置。 |
::Axis Type = '''Rotary Gear''' | ::Axis Type = '''Rotary Gear''' | ||
::Length Units = '''Degrees''' (default) | ::Length Units = '''Degrees''' (default) | ||
| Line 242: | Line 242: | ||
<br/> | <br/> | ||
| − | ''' | + | '''注意''': 齿轮比值通常在10-160范围内。 |
| − | + | 当使用Servotronix演示套件时,齿轮比值= 1。 | |
<br/> | <br/> | ||
| − | (7E) ''' | + | (7E) '''指南''' |
| − | + | 大多数机器人应用程序以 '''度/秒 '''为单位进行编程 , 即360度 = 1 转。因此: | |
:6 deg/sec = 1 rpm | :6 deg/sec = 1 rpm | ||
:120 deg/sec = 20 rpm | :120 deg/sec = 20 rpm | ||
:360 deg/sec = 60 rpm | :360 deg/sec = 60 rpm | ||
| − | : | + | :本文档中的说明使用以下计算和值,这是无刷直流电机的典型值: |
:::[[File:configurator-guidelines.png|500px]] | :::[[File:configurator-guidelines.png|500px]] | ||
<br/> | <br/> | ||
| − | : | + | :对加速和减速都使用相同的值。 但是,如果负载电动机惯量比小于10(最佳LMJR值),则可以使用更高的加速度。 |
<br/> | <br/> | ||
| − | (7F) | + | (7F)在'''Properties '''选项中, 点击'''Limits'''栏以访问限制参数。 |
| − | : | + | :更改以下参数的值: |
::Position Error Max = '''10''' | ::Position Error Max = '''10''' | ||
::Velocity Max = '''30000''' | ::Velocity Max = '''30000''' | ||
| Line 266: | Line 266: | ||
::Deceleration Max = '''900000''' | ::Deceleration Max = '''900000''' | ||
::Jerk Max = '''2700000''' | ::Jerk Max = '''2700000''' | ||
| − | : | + | :输入值后,一定要按'''Enter'''键。 |
:::[[File:configurator-161.png|500px]] | :::[[File:configurator-161.png|500px]] | ||
| Line 276: | Line 276: | ||
<br/> | <br/> | ||
| − | ==(8) | + | ==(8) 定义轴A2配置设置== |
| − | ''' | + | '''Configurator在线''' |
| + | |||
| + | (8A) 重复步骤 '''7'''中的步骤来定义 '''Axis A2'''的参数。 | ||
| − | |||
:::[[File:configurator-136.png|600px]] | :::[[File:configurator-136.png|600px]] | ||
<br/> | <br/> | ||
| − | (8B) | + | (8B) 保存''' Configurator project '''('''EX01.mcfg''') |
<br/> | <br/> | ||
| − | ==(9) | + | ==(9) 编译项目文件并将配置发送到softMC== |
| − | ''' | + | '''Configurator在线''' |
| − | (9A) | + | (9A) 在配置器菜单栏中,单击'''Build & Run'''按钮. |
:[[File:configurator-buildrun.png|100px]] | :[[File:configurator-buildrun.png|100px]] | ||
<br/> | <br/> | ||
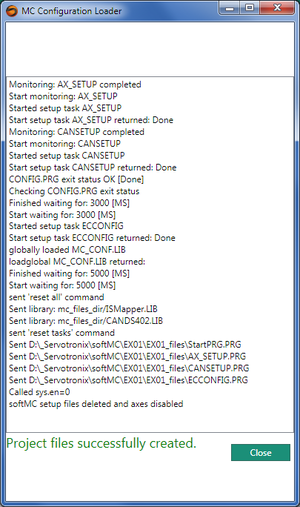
| − | (9B) | + | (9B) 将配置器在PC上生成文件发送到softMC。 |
| − | : | + | :完成时,点击 '''Close.''' |
:[[File:configurator-163.png|300px]] | :[[File:configurator-163.png|300px]] | ||
<br/> | <br/> | ||
| − | (9C) | + | (9C) 保存''' Configurator project '''('''EX01''') |
<br/> | <br/> | ||
<br/> | <br/> | ||
| − | (9D) '''ControlStudio | + | (9D) '''ControlStudio 在线''' |
| − | :''' | + | :'''注意: '''Configurator生成一个名为''' EX01.APJ'''的ControlStudio项目文件。 <br/>配置器生成'''''EXO1_''Files'''文件夹 |
| − | : | + | :在ControlStudio, 转到屏幕底部的''' File Manager '''窗格。 |
| − | : | + | :选择左窗格中的文件夹'''EX01''', 然后查看中间窗格。 |
| − | |||
| − | :''' | + | :如果文件不出现,请右键单击中间窗格> '''Refresh List''' |
| − | : | + | :'''注意''': 右窗格中的文件在softMC中。 ''不要点击这些文件,或尝试操作它们。'' |
| + | :如果使用EtherCAT网络并选择了'''Use CODESYS'''选项,''EX01_'''''Files''' 文件夹将包含一个名为'''softmc.devdesc.xml'''的附加文件 | ||
<br/> | <br/> | ||
| − | ==(10) | + | ==(10) 通过移动轴验证配置== |
| − | ''' | + | '''Configurator在线''' |
| − | (10A) | + | (10A) 选择轴 '''A1''', 并打开 '''Movement'''选项卡.<br/> |
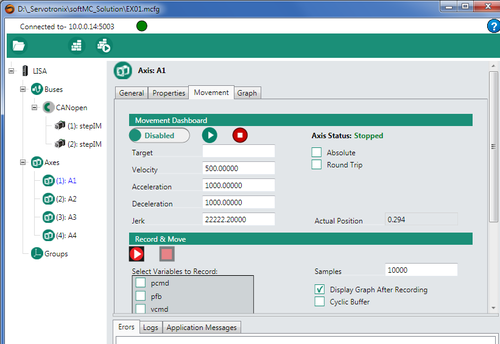
:[[File:configurator-141a.png|500px]] | :[[File:configurator-141a.png|500px]] | ||
<br/> | <br/> | ||
| − | (10B) | + | (10B) 请参阅''' Step 7'''中的运动选项卡中的单位。<br/> |
| − | : | + | : 更改以下参数的值: |
::Set Target = '''360''' (1 revolution) | ::Set Target = '''360''' (1 revolution) | ||
::Set Velocity = '''120''' | ::Set Velocity = '''120''' | ||
| Line 332: | Line 333: | ||
::Set Jerk = '''2160000''' | ::Set Jerk = '''2160000''' | ||
::Make sure '''Absolute''' option is not selected. | ::Make sure '''Absolute''' option is not selected. | ||
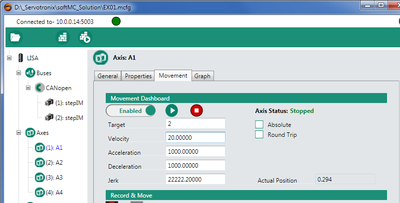
| − | : | + | :将开关更改为'''Enabled'''. |
| − | : | + | :点击'''Run'''按钮. |
| − | : | + | :观察电机1负载的圆盘 - 它将旋转一圈。<br/> |
:[[File:configurator-142.png|400px]] | :[[File:configurator-142.png|400px]] | ||
| Line 340: | Line 341: | ||
| − | : | + | :使能 '''Absolute'''选项。 |
| − | : | + | :设置 Target为 '''0'''. |
| − | : | + | :点击'''Run'''. |
| − | : | + | :当电机停止, 注意'''Actual Position'''. 将会显示 '''0.000''' |
<br/> | <br/> | ||
| − | (10C) | + | (10C) 选择轴'''A2''',在'''Movement'''选项卡中, 输入与上述相同的设置。 |
| − | : | + | :点击'''Run'''按钮。 |
| − | : | + | :观察电机2负载的圆盘 – 它将旋转一圈。 |
| − | : | + | : 使能'''Round Trip'''选项。 |
| − | : | + | :点击'''Run'''。 |
| − | : | + | :观察电机1负载的圆盘 – 它将在每个方向旋转一圈。 |
<br/> | <br/> | ||
| − | (10D) | + | (10D) 两个轴下使能。 |
<br/> | <br/> | ||
| − | (10E) | + | (10E) 保存配置器项目。 |
<br/> | <br/> | ||
| − | ==(11) | + | ==(11) 记录运动== |
| − | ''' | + | '''Configurator在线''' |
(11A) | (11A) | ||
| − | + | 选择轴'''A1''', 打开'''Movement'''选项卡。 | |
<br/> | <br/> | ||
| − | (11B) | + | (11B) 更改以下参数的值: |
::Target = '''360''' (1 revolution) | ::Target = '''360''' (1 revolution) | ||
::Velocity = '''360''' (60 rpm) | ::Velocity = '''360''' (60 rpm) | ||
::Acc/Dec = '''720000''' deg/sec | ::Acc/Dec = '''720000''' deg/sec | ||
::Jerk = '''2160000''' deg/sec | ::Jerk = '''2160000''' deg/sec | ||
| − | :: | + | ::清除'''Absolute'''选项 |
| − | :: | + | ::清除 '''Round Trip'''选项 |
| − | :: | + | ::使能 '''Display Graph After Recording''' |
| − | :: | + | ::选择变量: ''' VCMD''' and '''VFB'''. |
| − | :: | + | ::清除其他所有变量. |
| − | :: | + | ::确保驱动器 '''Enabled'''. |
| − | :: | + | ::点击'''Record &Move'''按钮<br/> |
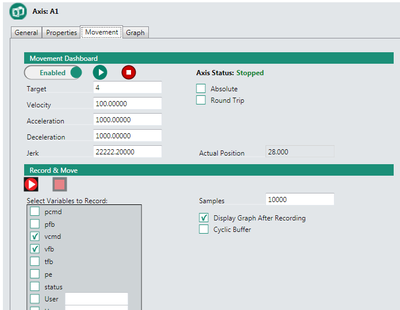
:[[File:configurator-144.png|400px]] | :[[File:configurator-144.png|400px]] | ||
| Line 386: | Line 387: | ||
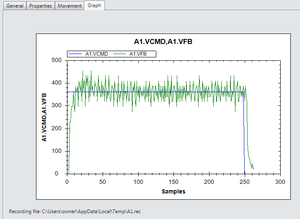
| − | (11C) | + | (11C) 在一段时间内,记录的曲线出现在 '''Graph'''选项卡中。<br/> |
:[[File:configurator-175.png|300px]] | :[[File:configurator-175.png|300px]] | ||
<br/> | <br/> | ||
| − | :''' | + | :'''注意''': 记录的曲线保存在临时文件夹中的A1.rec(A2.rec)文件中。 最后一次记录的曲线总是覆盖之前的记录曲线。<br/>配置器记录功能仅用于提供轴配置的初始确认。 要进行完整的测试和调整,请使用ControlStudio中的记录功能。 |
<br/> | <br/> | ||
| − | (11D) | + | (11D) 在Movement选项卡中, 下使能轴。 |
| − | |||
<br/> | <br/> | ||
| − | (11E) | + | (11E) 保存配置器项目 |
| − | : | + | :退出配置器 |
<br/> | <br/> | ||
| − | ==(12) | + | ==(12) 通过终端处理softMC控制器== |
| − | '''ControlStudio | + | '''ControlStudio 在线''' |
| − | (12A) | + | (12A) 如果softMC已经重新上电,则需要执行此步骤。''在终端窗格中,输入命令'''reset all'''。 |
| − | |||
| − | : ''' | + | : '''注意: '''命令'''reset all'''执行以下操作: |
| − | :: | + | ::从控制器RAM中删除所有系统变量和任务。 |
| − | :: | + | ::从控制器RAM中删除所有文件。 |
| − | :: | + | ::运行CONFIG.PRG任务 |
<br/> | <br/> | ||
| − | (12B) '' | + | (12B) ''如果softMC已经重新上电,则需要执行此步骤。 否则跳到步骤12C。'' |
| − | : | + | :在终端窗格中,输入命令'''load startprg.prg''' |
| − | :''' | + | :'''注意: '''命令 '''load startprg.prg '''命令load sta tprg.prg将所有配置数据从控制器Flash(非易失性)存储器加载到RAM。 数据保留在闪存中。 |
| − | : | + | :查看消息日志窗格中的消息。 |
| − | : | + | :系统现在可以接收命令。 |
<br/> | <br/> | ||
| − | (12C) | + | (12C) 在终端窗格中, 使能轴。 |
| − | + | 使能 axis 1: | |
::-->'''a1.en=1''' | ::-->'''a1.en=1''' | ||
| − | :: | + | ::使能 axis 2: |
::-->'''a2.en=1''' | ::-->'''a2.en=1''' | ||
| − | : | + | :轻轻抓住电机负载盘,并尝试移动它们。 强阻力表示电机已使能。 |
<br/> | <br/> | ||
| − | (12D) ''' | + | (12D) '''注意''': '''Move''' 将执行从单个轴或一组轴的当前位置到目标位置的点对点移动。 |
| − | :''' | + | :'''注意''':使用''' F3'''作为重复输入的最后一个命令的快捷方式。 |
| − | : | + | :在终端中, 执行'''Move'''命令, 观察电机响应 |
| − | : | + | :将A1和A2移动到绝对位置PFB 0:: |
::-->'''move a1 0 abs=1''' | ::-->'''move a1 0 abs=1''' | ||
::-->'''move a2 0 abs=1''' | ::-->'''move a2 0 abs=1''' | ||
| − | : | + | :将A1和A2移动到绝对位置PFB 3600(从0转到10圈): |
::-->'''move a1 3600 abs=1''' | ::-->'''move a1 3600 abs=1''' | ||
::-->'''move a2 3600 abs=1''' | ::-->'''move a2 3600 abs=1''' | ||
| − | : | + | :逆时针移动A1一圈: |
::-->'''move a1 -360 abs=0''' | ::-->'''move a1 -360 abs=0''' | ||
| − | : | + | :顺时针方向移动A2两圈: |
::-->'''move a2 720''' | ::-->'''move a2 720''' | ||
| − | : | + | :将A1和A2以不同的速度移动到绝对位置PFB 7200: |
::-->'''move a1 7200 abs=1 vcruise=720''' | ::-->'''move a1 7200 abs=1 vcruise=720''' | ||
::-->'''move a2 7200 abs=1 vcruise=240''' | ::-->'''move a2 7200 abs=1 vcruise=240''' | ||
<br/> | <br/> | ||
| − | (12E) ''' | + | (12E) '''注意''': '''Jog'''以恒定的速度移动轴。 |
| − | : | + | :使用'''Stop'''命令停止点动运动。 |
| − | : | + | :在终端窗格中, 执行'''Jog'''命令,观察电机的响应: |
::-->'''jog a1 720''' | ::-->'''jog a1 720''' | ||
::-->'''jog a2 240''' | ::-->'''jog a2 240''' | ||
| − | : | + | :允许两台电机同时运行。 |
| − | : | + | :停止运动: |
::-->'''stop a1''' | ::-->'''stop a1''' | ||
::-->'''stop a2''' | ::-->'''stop a2''' | ||
| − | : | + | :轴下使能: |
<br/> | <br/> | ||
| − | ==(13) | + | ==(13) 编写并运行程序== |
| − | ''' | + | '''ControlStudio在线''' |
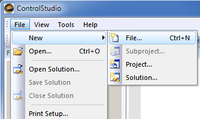
| − | (13A) | + | (13A) 开始为运动应用程序编写程序:在ControlStudio中,选择: '''File''' > '''New''' > '''File'''<br/> |
| − | |||
::[[File:configurator-176.png|200px]]<br/> | ::[[File:configurator-176.png|200px]]<br/> | ||
<br/> | <br/> | ||
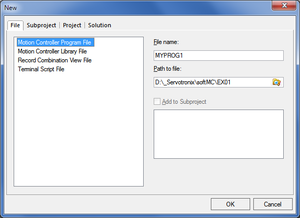
| − | (13B) | + | (13B)在'''New'''对话框中, 执行以下操作: |
| − | : | + | :选择'''Motion Controller Program File'''. |
| − | : | + | :输入您的程序的名称 (例如, '''MYPROG1'''). |
| − | :''' | + | :'''注意''': 程序名称不能超过8个字符。 |
| − | : | + | :浏览并选择包含应用程序文件的路径/文件夹(例如, '''EX01''')<br/> |
::[[File:configurator-177.png|300px]]<br/> | ::[[File:configurator-177.png|300px]]<br/> | ||
<br/> | <br/> | ||
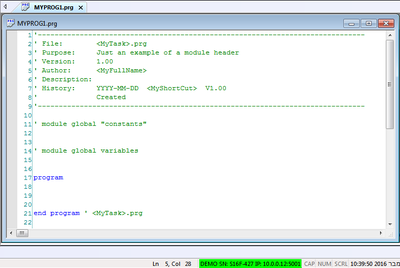
| − | (13C) | + | (13C) 在ControlStudio打开 '''Program Editor''' 窗格 |
| − | : | + | :该窗格具有新程序的选项卡,其中包含空白程序模板。<br/> |
::[[File:configurator-178.png|400px]]<br/> | ::[[File:configurator-178.png|400px]]<br/> | ||
<br/> | <br/> | ||
| − | (13D) | + | (13D) 将光标插入'''program'''下面的行 |
| − | : | + | :输入以下程序行: |
::'''program''' | ::'''program''' | ||
::attach a1 | ::attach a1 | ||
| Line 507: | Line 505: | ||
<br/> | <br/> | ||
| − | (13E) | + | (13E) 保存: File > '''Save''' |
| − | : | + | :或者,单击工具栏上的'''Save'''按钮。 |
| − | : | + | :检查屏幕底部的文件管理器窗格。 必要时刷新。 |
| − | : | + | :您现在可以在应用程序文件夹中看到该程序。<br/> |
::[[File:configurator-180.png|500px]]<br/> | ::[[File:configurator-180.png|500px]]<br/> | ||
<br/> | <br/> | ||
| − | (13F) | + | (13F) 发送程序MYPROG1到控制器 |
| − | : | + | :单击ControlStudio菜单栏中的 '''Save and Load''' 按钮。<br/> |
::[[File:configurator-181.png|300px]]<br/> | ::[[File:configurator-181.png|300px]]<br/> | ||
<br/> | <br/> | ||
| − | (13G) | + | (13G) 运行程序. |
| − | : | + | :单击ControlStudio菜单栏中的 '''Continue Task'''按钮。<br/> |
::[[File:configurator-182.png|200px]]<br/> | ::[[File:configurator-182.png|200px]]<br/> | ||
<br/> | <br/> | ||
| − | : | + | :观察两个电机的运动. |
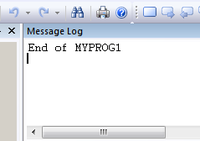
| − | : | + | :当运动停止时, 注意在'''Message Log'''窗格中的消息:<br/> |
::[[File:configurator-184.png|200px]]<br/> | ::[[File:configurator-184.png|200px]]<br/> | ||
<br/> | <br/> | ||
| − | (13H) | + | (13H) 一次运行一行程序。 |
| − | : | + | :单击ControlStudio菜单栏中的'''Step by Step''' 按钮。<br/> |
::[[File:configurator-183.png|150px]]<br/> | ::[[File:configurator-183.png|150px]]<br/> | ||
| − | : | + | :继续点击并观察两台电机的运动。 |
<br/> | <br/> | ||
| − | = | + | = 附录 = |
| − | == | + | == 附录A: 卸载之前安装的ControlStudio == |
'''Windows''' | '''Windows''' | ||
| − | (A1) | + | (A1) 卸载所有以前安装的softMC程序。 |
| − | : | + | :您可以根据发布商名称: '''Servotronix'''来识别和卸载要删除的程序:Servotronix。 |
| − | :''' | + | :'''注意''': 不要通过Servotronix卸载ServoStudio。 |
<br/> | <br/> | ||
| − | == | + | == 附录B: 更新softMC固件 == |
| − | '''ControlStudio | + | '''ControlStudio 在线''' |
| − | (B1) | + | (B1) 更新固件: |
:Tools > '''Firmware Update''' | :Tools > '''Firmware Update''' | ||
| − | (B2) | + | (B2) 在提示下,单击 '''Update'''. |
| − | (B3) | + | (B3) 浏览到包含固件 '''zip'''文件的文件夹。 |
| − | : | + | :选择文件,然后单击'''Open'''。 |
| − | (B4) | + | (B4) 按照提示进行 |
| − | : | + | :在固件更新期间,控制器自动重新上电。 |
| − | : | + | :通信状态指示变为黄色。 |
| − | : | + | :等待Demo Kit前面的黄色LED熄灭。 |
| − | : | + | :要重新建立通信,请使用控制器监视器窗格中的 '''Reset Communication'''按钮。(或Ctrl+D) |
| − | (B5) | + | (B5) 完成后,再次检查版本 |
| − | : | + | :如果看起来未更新,请关闭控制器,然后重新打开。 |
| − | : | + | :确保通信状态指示已连接。 |
<br/> | <br/> | ||
Latest revision as of 03:34, 23 October 2017
| 语言: | English |
|---|
简介
注意: 本培训手册中仅包含必要的背景信息。 有关softMC硬件和软件系统的下载和更多信息,请使用Servotronix网站上提供的资源。
ControlStudio是基于PC的图形用户界面,用于softMC开发和测试控制和/或协调的运动应用程序。 ControlStudio包含编程编辑器,数据记录器,调试器和监视工具。 一旦应用程序完成,PC可以被移除,并且softMC控制器可以独立运行或在网络内运行。
softMC配置器是ControlStudio绑定的应用程序。配置器用于定义运动应用中要控制的轴和IO; 然后生成一组用于初始化softMC的程序和文件。
MC-Basic (Motion Control BASIC)是由Servotronix开发的用于softMC的专有编程语言。 它基于标准的BASIC编程语言,对多任务和运动控制功能进行了增强。
步骤
(1) 安装并启动ControlStudio
Windows
(1A) 如果PC上安装了以前版本的softMC,请卸载它们。有关说明,请参阅本文档的附录A和/或联系技术支持。
(1B) 运行CSSetup.exe来安装ControlStudio。 在安装期间接受默认设置。安装四个程序。
(1C) 如果尚未打开,请打开ControlStudio(从“开始”菜单或桌面图标)。
(2) 在PC上安装设备参数(库)文件
ControlStudio 离线
(2A) 从ControlStudio菜单栏,激活softMC配置器
- 选择: Tools > softMC Configurator
- 注意: 始终从ControlStudio激活Configurator(而不是桌面图标)。
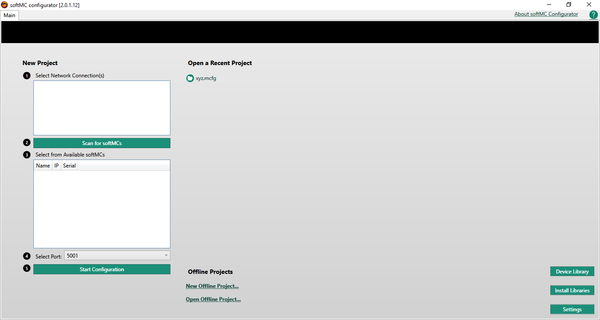
(2B) 当离线操作时,配置器是这样。
- 在配置器屏幕的底部,点击 Install Libraries。
- 注意: 库 是包含可由softMC控制的所有设备(如CDHD,stepIM,IO)的参数的文件。
- 每当安装新的控制器固件时,必须在PC上安装更新的库文件。
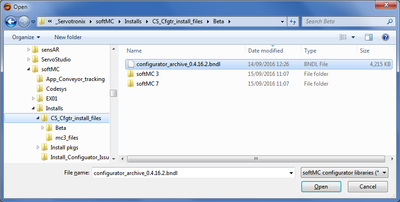
(2C) 浏览到包含该文件的文件夹 configurator_archive_0.4.x.x.bndl
- 这是库文件.
- 点击 Open.
- 等待确认消息: Libraries successfully imported.
- 点击 OK.
(2D)关闭配置器.
- 注意: 不要最小化。 您必须关闭配置器。
(3) 为ControlStudio机器应用程序创建一个文件夹
ControlStudio 离线
(3A) 在ControlStudio屏幕的底部,单击以打开 File Manager.
- File Manager有三个窗格。
- 在左窗格中,选择要为应用程序文件创建文件夹的位置。
- 在中间窗格中,右键单击并选择 New Folder.
- 给新文件夹命名: EX01
- 注意: 在ControlStudio中开发的运动应用程序(Solution)将包含保存任务(程序)文件,库文件和数据文件的Project和Subproject文件夹。 PC文件系统不反映softMC控制器文件系统。
(4) 连接电缆
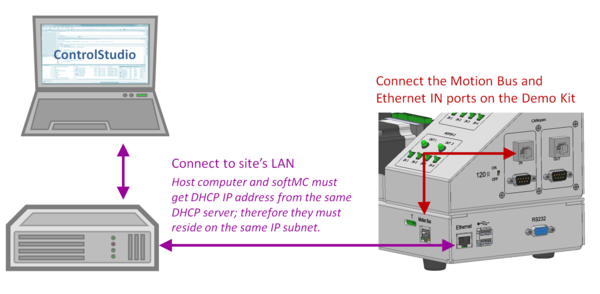
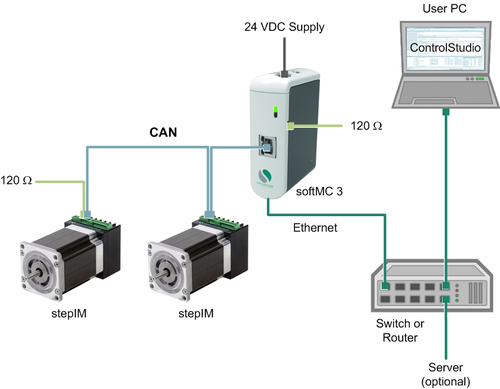
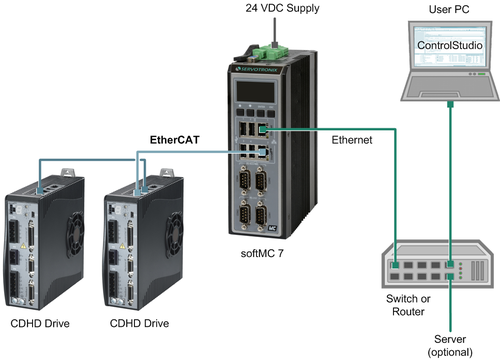
(4A) 如果尚未连接,连接系统电缆。
- 请参考下图。
- 有关更多说明,请参阅softMC安装指南。
- 注意: 如果使用ServoStudio进行电机设置和/或驱动器调整,则需要使用Kvaser适配器才能与PC进行串行通信。 请参阅stepIM技术培训手册或联系技术支持。
softMC 3 with stepIM - Training Setup - CANopen devices and network
softMC 7 with CDHD – Training Setup - EtherCAT devices and network
(4B) 打开softMC培训系统。
(5) 建立PC与softMC之间的通信
ControlStudio 在线
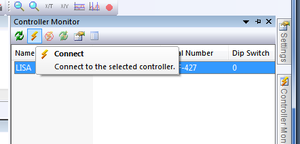
(5A) 在ControlStudio屏幕的右侧,将鼠标悬停在 Controller Monitor.
(5B) 选择检测到的softMC, 单击 Connect 按钮。
(5C) 屏幕底部的通信状态变为绿色,表示softMC和ControlStudio正在通信。
(5D) 在ControlStudio屏幕的中间,您将看到Terminal窗格。
- 确保对版本查询的返回是0.4.16.2或更高版本。
- 如有必要,请更新softMC固件。 有关说明,请参阅本文档的附录B和/或联系技术支持。
(5E) 如果以前没有使用培训系统,请转到步骤6。
- 如果以前已经使用过培训系统,则必须首先清除所有程序行的config.prg程序。 请联系技术支持以获取说明。
(6) 创建一个配置器项目
Configurator 在线
(6A) 打开配置器
- 通过访问: Tools > softMC Configurator
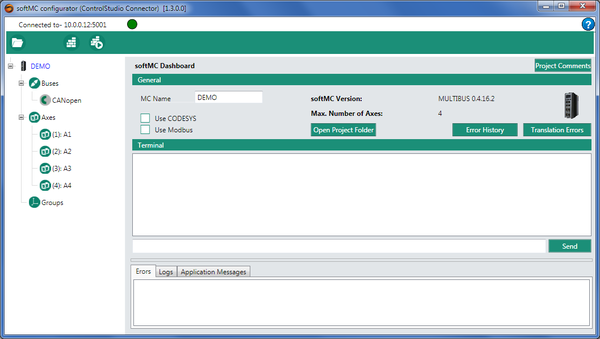
- 如果使用CANopen网络,配置器在线屏幕将如下所示:
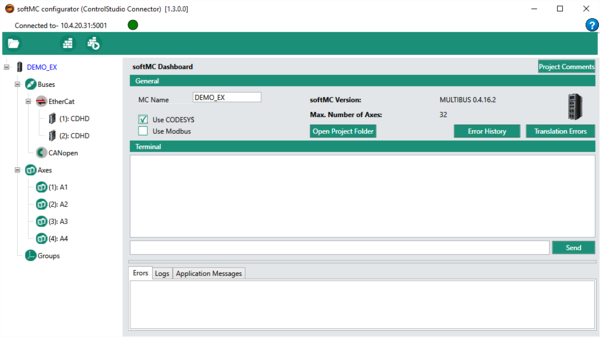
- 如果使用EtherCAT网络, 配置器在线屏幕将如下所示:
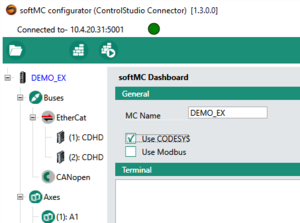
- 如果使用EtherCAT网络,请选择该选项: Use CODESYS
(6B) 可选项: 可选:在“MC名称”字段中,输入softMC的名称; 例如, DEMO_EX
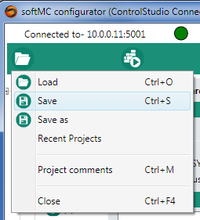
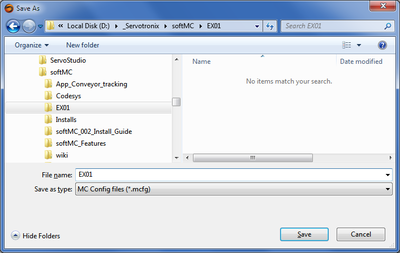
(6C) 通过将文件保存到之前创建的softMC文件夹中,创建 一个配置程序项目 (称为EX01)(步骤3)
(6D) 在ControlStudio(在线)中,转到屏幕底部的“File Manager”窗格。
- 选择左窗格中的文件夹EX01,然后查看中间窗格。
- I如果文件不出现,请右键单击中间窗格>Refresh List
- 您会看到一个名为EX01.mcfg= 配置工程文件
(7) 定义轴A1配置设置
Configurator 在线
(7A) 定义轴A1.
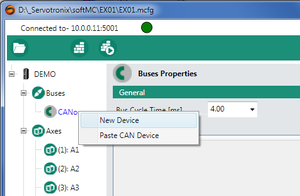
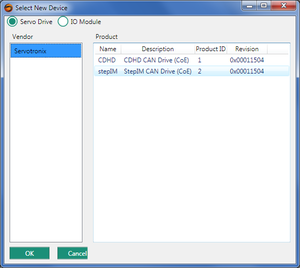
(7B) 如果使用CANopen 设备/驱动器, 选择Servotronix > stepIM或CDHD.
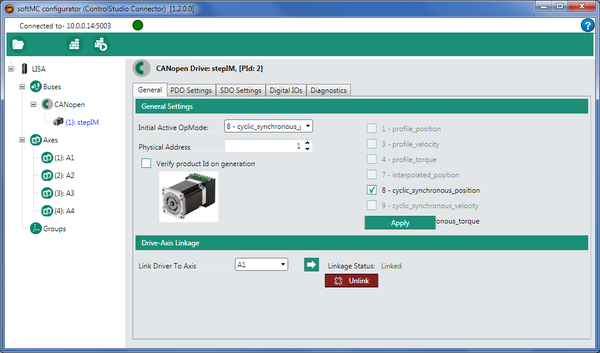
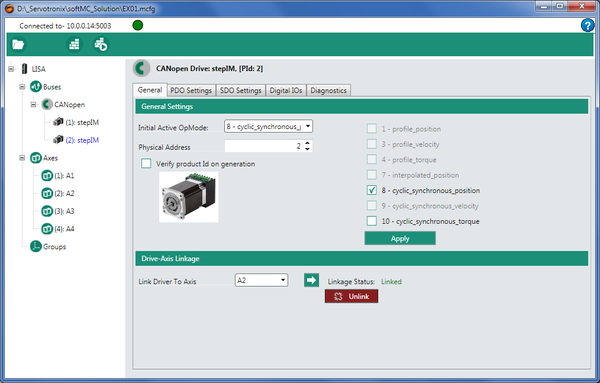
(7C) 根据所选设备,stepIM或CDHD将显示在总线的导航窗格里。
- 选择一个驱动器(stepIM或CDHD)。所选设备以蓝色文本显示。
- 输入如下所示的设置。
- Initial Active OpMode = 8-Cyclic synchronous position
- Physical Address = 1
- 点击Apply.
- Link Drive to Axis = A1.
- 点击Link箭头.
- Note: 为了正常运行, Initial Active OpMode必须设置为 8-Cyclic synchronous position
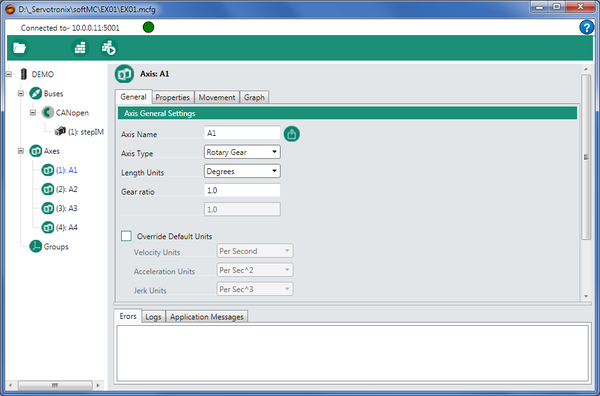
(7D) 配置器在屏幕中显示 Axis:A1 。
- 屏幕有四个选项卡: General, Properties, Movement and Graph.
- 在General 选项卡中, 输入如下所示的设置。
- Axis Type = Rotary Gear
- Length Units = Degrees (default)
- Gear Ratio = 1.0
注意: 齿轮比值通常在10-160范围内。 当使用Servotronix演示套件时,齿轮比值= 1。
(7E) 指南
大多数机器人应用程序以 度/秒 为单位进行编程 , 即360度 = 1 转。因此:
- 6 deg/sec = 1 rpm
- 120 deg/sec = 20 rpm
- 360 deg/sec = 60 rpm
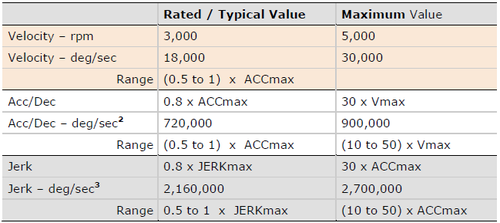
- 本文档中的说明使用以下计算和值,这是无刷直流电机的典型值:
- 对加速和减速都使用相同的值。 但是,如果负载电动机惯量比小于10(最佳LMJR值),则可以使用更高的加速度。
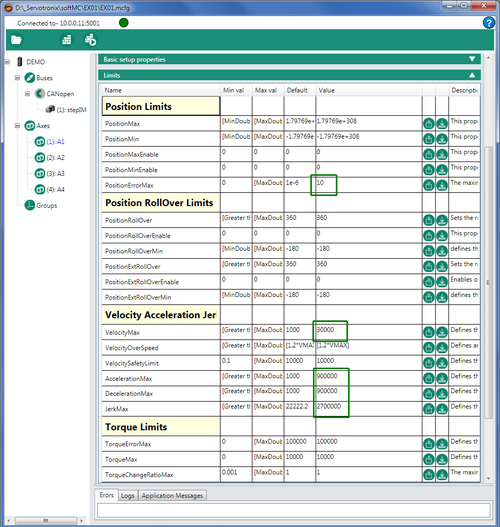
(7F)在Properties 选项中, 点击Limits栏以访问限制参数。
- 更改以下参数的值:
- Position Error Max = 10
- Velocity Max = 30000
- Acceleration Max = 900000
- Deceleration Max = 900000
- Jerk Max = 2700000
- 输入值后,一定要按Enter键。
(7G) Save Configurator project (EX01.mcfg)
(8) 定义轴A2配置设置
Configurator在线
(8A) 重复步骤 7中的步骤来定义 Axis A2的参数。
(8B) 保存 Configurator project (EX01.mcfg)
(9) 编译项目文件并将配置发送到softMC
Configurator在线
(9A) 在配置器菜单栏中,单击Build & Run按钮.
(9B) 将配置器在PC上生成文件发送到softMC。
(9C) 保存 Configurator project (EX01)
(9D) ControlStudio 在线
- 注意: Configurator生成一个名为 EX01.APJ的ControlStudio项目文件。
配置器生成EXO1_Files文件夹
- 在ControlStudio, 转到屏幕底部的 File Manager 窗格。
- 选择左窗格中的文件夹EX01, 然后查看中间窗格。
- 如果文件不出现,请右键单击中间窗格> Refresh List
- 注意: 右窗格中的文件在softMC中。 不要点击这些文件,或尝试操作它们。
- 如果使用EtherCAT网络并选择了Use CODESYS选项,EX01_Files 文件夹将包含一个名为softmc.devdesc.xml的附加文件
(10) 通过移动轴验证配置
Configurator在线
(10A) 选择轴 A1, 并打开 Movement选项卡.
(10B) 请参阅 Step 7中的运动选项卡中的单位。
- 更改以下参数的值:
- Set Target = 360 (1 revolution)
- Set Velocity = 120
- Set Acceleration and Deceleration = 720000
- Set Jerk = 2160000
- Make sure Absolute option is not selected.
- 将开关更改为Enabled.
- 点击Run按钮.
- 观察电机1负载的圆盘 - 它将旋转一圈。
- 使能 Absolute选项。
- 设置 Target为 0.
- 点击Run.
- 当电机停止, 注意Actual Position. 将会显示 0.000
(10C) 选择轴A2,在Movement选项卡中, 输入与上述相同的设置。
- 点击Run按钮。
- 观察电机2负载的圆盘 – 它将旋转一圈。
- 使能Round Trip选项。
- 点击Run。
- 观察电机1负载的圆盘 – 它将在每个方向旋转一圈。
(10D) 两个轴下使能。
(10E) 保存配置器项目。
(11) 记录运动
Configurator在线
(11A) 选择轴A1, 打开Movement选项卡。
(11B) 更改以下参数的值:
- Target = 360 (1 revolution)
- Velocity = 360 (60 rpm)
- Acc/Dec = 720000 deg/sec
- Jerk = 2160000 deg/sec
- 清除Absolute选项
- 清除 Round Trip选项
- 使能 Display Graph After Recording
- 选择变量: VCMD and VFB.
- 清除其他所有变量.
- 确保驱动器 Enabled.
- 点击Record &Move按钮
(11C) 在一段时间内,记录的曲线出现在 Graph选项卡中。
- 注意: 记录的曲线保存在临时文件夹中的A1.rec(A2.rec)文件中。 最后一次记录的曲线总是覆盖之前的记录曲线。
配置器记录功能仅用于提供轴配置的初始确认。 要进行完整的测试和调整,请使用ControlStudio中的记录功能。
(11D) 在Movement选项卡中, 下使能轴。
(11E) 保存配置器项目
- 退出配置器
(12) 通过终端处理softMC控制器
ControlStudio 在线 (12A) 如果softMC已经重新上电,则需要执行此步骤。在终端窗格中,输入命令reset all。
- 注意: 命令reset all执行以下操作:
- 从控制器RAM中删除所有系统变量和任务。
- 从控制器RAM中删除所有文件。
- 运行CONFIG.PRG任务
(12B) 如果softMC已经重新上电,则需要执行此步骤。 否则跳到步骤12C。
- 在终端窗格中,输入命令load startprg.prg
- 注意: 命令 load startprg.prg 命令load sta tprg.prg将所有配置数据从控制器Flash(非易失性)存储器加载到RAM。 数据保留在闪存中。
- 查看消息日志窗格中的消息。
- 系统现在可以接收命令。
(12C) 在终端窗格中, 使能轴。
使能 axis 1:
- -->a1.en=1
- 使能 axis 2:
- -->a2.en=1
- 轻轻抓住电机负载盘,并尝试移动它们。 强阻力表示电机已使能。
(12D) 注意: Move 将执行从单个轴或一组轴的当前位置到目标位置的点对点移动。
- 注意:使用 F3作为重复输入的最后一个命令的快捷方式。
- 在终端中, 执行Move命令, 观察电机响应
- 将A1和A2移动到绝对位置PFB 0::
- -->move a1 0 abs=1
- -->move a2 0 abs=1
- 将A1和A2移动到绝对位置PFB 3600(从0转到10圈):
- -->move a1 3600 abs=1
- -->move a2 3600 abs=1
- 逆时针移动A1一圈:
- -->move a1 -360 abs=0
- 顺时针方向移动A2两圈:
- -->move a2 720
- 将A1和A2以不同的速度移动到绝对位置PFB 7200:
- -->move a1 7200 abs=1 vcruise=720
- -->move a2 7200 abs=1 vcruise=240
(12E) 注意: Jog以恒定的速度移动轴。
- 使用Stop命令停止点动运动。
- 在终端窗格中, 执行Jog命令,观察电机的响应:
- -->jog a1 720
- -->jog a2 240
- 允许两台电机同时运行。
- 停止运动:
- -->stop a1
- -->stop a2
- 轴下使能:
(13) 编写并运行程序
ControlStudio在线
(13A) 开始为运动应用程序编写程序:在ControlStudio中,选择: File > New > File
(13B)在New对话框中, 执行以下操作:
- 选择Motion Controller Program File.
- 输入您的程序的名称 (例如, MYPROG1).
- 注意: 程序名称不能超过8个字符。
- 浏览并选择包含应用程序文件的路径/文件夹(例如, EX01)
(13C) 在ControlStudio打开 Program Editor 窗格
(13D) 将光标插入program下面的行
- 输入以下程序行:
- program
- attach a1
- attach a2
- a1.En=1
- a2.En =1
- move a1 720 abs=1 vcruise= 360
- move a2 1440 abs=1 vcruise= 360
- delay a1 1000
- delay a2 1000
- move a1 0 abs=1 vcruise=360
- move a2 0 abs=1 vcruise= 360
- delay a1 10
- delay a2 10
- a1.En=0
- a2.En=0
- detach a1
- detach a2
- Print "End of MYPROG1"
- end program
(13E) 保存: File > Save
(13F) 发送程序MYPROG1到控制器
(13G) 运行程序.
(13H) 一次运行一行程序。
- 继续点击并观察两台电机的运动。
附录
附录A: 卸载之前安装的ControlStudio
Windows
(A1) 卸载所有以前安装的softMC程序。
- 您可以根据发布商名称: Servotronix来识别和卸载要删除的程序:Servotronix。
- 注意: 不要通过Servotronix卸载ServoStudio。
附录B: 更新softMC固件
ControlStudio 在线
(B1) 更新固件:
- Tools > Firmware Update
(B2) 在提示下,单击 Update.
(B3) 浏览到包含固件 zip文件的文件夹。
- 选择文件,然后单击Open。
(B4) 按照提示进行
- 在固件更新期间,控制器自动重新上电。
- 通信状态指示变为黄色。
- 等待Demo Kit前面的黄色LED熄灭。
- 要重新建立通信,请使用控制器监视器窗格中的 Reset Communication按钮。(或Ctrl+D)
(B5) 完成后,再次检查版本
- 如果看起来未更新,请关闭控制器,然后重新打开。
- 确保通信状态指示已连接。

