Difference between revisions of "Getting Started with MC-Basic and ControlStudio/zh-hans"
(BackToTop button) |
|||
| (3 intermediate revisions by one other user not shown) | |||
| Line 1: | Line 1: | ||
| − | {{Languages}} | + | {{Languages|Getting_Started_with_MC-Basic_and_ControlStudio}} |
| + | <div id="BackToTop" class="noprint" style="background-color:; position:fixed; bottom:32px; left:95%; z-index:9999; padding:0; margin:0;"> | ||
| + | <span style="color:blue; font-size:8pt; font-face:verdana,sans-serif; border:0.2em outset:#ceebf7; padding:0.1em; font-weight:bolder; -moz-border-radius:8px; "> | ||
| + | [[Image:TOP2.png|50px|link=#top]] </span></div> | ||
| + | |||
= 概述 = | = 概述 = | ||
本教程是一个快速介绍,可帮助您使用MC-Basic语言和ControlStudio软件开始运行softMC。 | 本教程是一个快速介绍,可帮助您使用MC-Basic语言和ControlStudio软件开始运行softMC。 | ||
| Line 27: | Line 31: | ||
* 用户(共享)库 | * 用户(共享)库 | ||
* 在MC-Basic中收集经常使用的子程序和功能。 | * 在MC-Basic中收集经常使用的子程序和功能。 | ||
| − | * | + | * 库中的子程序和函数可以由任务和其他库调用。 |
| − | * | + | * 如果从config.prg或命令'''loadglobal'''加载库,则为全局库; |
| − | * | + | * 如果通过命令'''load''',库是局部的。 |
| − | * | + | * 全局库中的公共函数可以从任何地方调用,而不需要显式导入; |
| − | * | + | * 局部库中的公共函数可以从其他库和程序调用,但需要命令导入 (参见 wiki: MC-Basic:IMPORT). |
'''Configuration (config.prg)''' | '''Configuration (config.prg)''' | ||
| − | + | 参考加载Config.prg章节。 | |
| − | * | + | * 主要用于声明全局对象并加载所有全局库。 |
| − | * | + | * 如果变量'''system.dipswitch.6 = 1''',则自动加载并运行一次。 (参见wiki:MC-Basic:SYSTEM.DIPSWITCH)。 |
| − | * | + | * 当执行命令'''reset all'''时运行。 |
'''Autoexecute (autoexec.prg)''' | '''Autoexecute (autoexec.prg)''' | ||
| − | * | + | * 用于启动应用程序任务。 |
| − | * | + | * 如果变量'''system.dipswitch.6 = 1''',则自动加载并运行一次。 (参见wiki:MC-Basic:SYSTEM.DIPSWITCH)。 |
'''Reset all''' | '''Reset all''' | ||
| − | : | + | :命令'''reset all'''清除系统内存中的所有任务和变量,并加载并运行CONFIG.PRG。 |
| − | : | + | :在启动softMC之后,必须先从终端执行全部重置,以便首先加载配置文件。 |
'''Queries''' | '''Queries''' | ||
| − | : | + | :查询前缀有字符? |
| − | : | + | :以下是查询的几个例子及其产生的响应。 |
<!-- | <!-- | ||
| Line 75: | Line 79: | ||
<td width="359" valign="top"> | <td width="359" valign="top"> | ||
<p> | <p> | ||
| − | + | 可能返回: | |
<br/> | <br/> | ||
| − | 0 = | + | 0 = 驱动器下使能 |
<br/> | <br/> | ||
| − | 1 = | + | 1 = 驱动器使能 |
</p> | </p> | ||
</td> | </td> | ||
| Line 94: | Line 98: | ||
<td width="359" valign="top"> | <td width="359" valign="top"> | ||
<p> | <p> | ||
| − | + | 返回位置命令 | |
</p> | </p> | ||
</td> | </td> | ||
| Line 109: | Line 113: | ||
<td width="359" valign="top"> | <td width="359" valign="top"> | ||
<p> | <p> | ||
| − | + | 返回电机的实际位置 | |
</p> | </p> | ||
</td> | </td> | ||
| Line 124: | Line 128: | ||
<td width="359" valign="top"> | <td width="359" valign="top"> | ||
<p> | <p> | ||
| − | + | 返回速度命令 | |
</p> | </p> | ||
</td> | </td> | ||
| Line 139: | Line 143: | ||
<td width="359" valign="top"> | <td width="359" valign="top"> | ||
<p> | <p> | ||
| − | + | 返回轴的实际速度 | |
</p> | </p> | ||
</td> | </td> | ||
| Line 151: | Line 155: | ||
<td width="359" valign="top"> | <td width="359" valign="top"> | ||
<p> | <p> | ||
| − | + | 可能返回值: | |
<br/> | <br/> | ||
| − | 0 = | + | 0 = 未运动 |
<br/> | <br/> | ||
| − | 1 = | + | 1 = 加速 |
<br/> | <br/> | ||
| − | 2 = | + | 2 = 巡航速度 |
<br/> | <br/> | ||
| − | 3 = | + | 3 = 减速 |
</p> | </p> | ||
</td> | </td> | ||
| Line 171: | Line 175: | ||
<td width="359" valign="top"> | <td width="359" valign="top"> | ||
<p> | <p> | ||
| − | + | 显示系统中现有轴的名称。 | |
</p> | </p> | ||
</td> | </td> | ||
| Line 183: | Line 187: | ||
<td width="359" valign="top"> | <td width="359" valign="top"> | ||
<p> | <p> | ||
| − | + | 显示系统中当前任务的列表及其状态。 | |
| − | |||
</p> | </p> | ||
</td> | </td> | ||
| Line 196: | Line 199: | ||
<td width="359" valign="top"> | <td width="359" valign="top"> | ||
<p> | <p> | ||
| − | + | 显示有关系统的基本信息。 | |
</p> | </p> | ||
</td> | </td> | ||
| Line 203: | Line 206: | ||
| − | == | + | == 加载Config.prg == |
| − | + | 此处显示了一个示例CONFIG.PRG文件。 它包含一个最小的配置,它定义了系统中四个轴的数量和名称。 | |
| − | # | + | #在ControlStudio中, 选择 File > '''Open''' 以打开为本次培训提供的Config.prg文件。 <br/>其内容显示在屏幕底部的程序编辑器窗格中。 参见图1。 |
| − | # | + | # 点击工具栏中的 '''Load'''按钮。 |
<br/> | <br/> | ||
:[[File:CS-Load-config.png|500px]] | :[[File:CS-Load-config.png|500px]] | ||
| Line 241: | Line 244: | ||
== Opening, Loading and Running a Task == | == Opening, Loading and Running a Task == | ||
| − | # | + | # 在ControlStudio中, 选择File > '''Open'''. |
| − | # | + | # 选择一个MC-Basic程序,如'''MOVE_2AX.PRG'''. <br/>其内容显示在程序编辑器窗格中。 参见图2。 |
| − | # | + | # 点击工具栏'''Load'''按钮。 <br/>该任务现在列在任务管理器中,状态为“Ready”。 |
| − | # | + | # 点击'''Run'''按钮执行任务。 |
<br/> | <br/> | ||
| Line 251: | Line 254: | ||
== Monitoring Variables == | == Monitoring Variables == | ||
| − | + | ControlStudio提供了几种监控系统和收集数据的方法。 | |
| − | |||
<br/> | <br/> | ||
==== Terminal ==== | ==== Terminal ==== | ||
| − | + | 使用'''Terminal'''窗格使用MC-Basic命令查询一个或多个参数; 例如: | |
<pre> | <pre> | ||
?X_AXIS.EN | ?X_AXIS.EN | ||
| Line 266: | Line 268: | ||
| − | ==== | + | ==== 观察变量 ==== |
| − | + | 使用'''Watch'''变量窗格. | |
| − | # | + | # 选择View > '''Watch'''. |
| − | # | + | # 在第一行中输入变量的名称。 <br/>其值将不断更新和显示。 |
<br/> | <br/> | ||
::[[File:CS-GS-2.png|200px]] | ::[[File:CS-GS-2.png|200px]] | ||
| Line 277: | Line 279: | ||
<br/> | <br/> | ||
| − | ==== | + | ==== 信号记录 ==== |
| − | + | 使用'''Signal Recorder'''. | |
| − | # | + | # 选择View > '''Signal Recorder'''。参见图4。 |
| − | # | + | # 单击第一行,并使用向上/向下箭头定义要记录的信号数。 |
| − | # | + | # 单击每个信号编号行,并输入要记录的变量的名称。 |
| − | # | + | # 参数数据点决定记录的长度。 |
| − | # | + | # 要开始记录,请点击'''Play'''按钮。 <br/>请注意,点击停止按钮会中止记录,不会产生任何结果。 |
| − | # | + | # 记录完成后,结果将显示在编辑器窗格的新选项卡中。该标题为'''default.rcv'''<br/>参见图5和图6。 |
<br/> | <br/> | ||
::[[File:CS-GS-3.png|300px]] | ::[[File:CS-GS-3.png|300px]] | ||
| Line 300: | Line 302: | ||
<br/> | <br/> | ||
| − | ==== | + | ==== 实时显示 ==== |
| − | + | 使用'''Realtime Display''' | |
| − | # | + | # 选择View > '''Signal Recorder'''. |
| − | # | + | # 输入要监视的变量,例如轴的位置。 |
| − | # | + | # 点击'''Play'''按钮 |
| − | + | 参考图7. | |
<br/> | <br/> | ||
::[[File:CS-GS-6.png|600px]] | ::[[File:CS-GS-6.png|600px]] | ||
| Line 312: | Line 314: | ||
<br/> | <br/> | ||
| − | ==== | + | ==== 调试 ==== |
| − | + | 在ControlStudio中,您可以加载程序并通过设置断点并逐步执行代码行进行调试。 | |
| − | + | 只有在加载程序后才能设置断点,并显示在新的选项卡中。 | |
| − | + | 将闪烁的光标放在您希望程序停止的行中。 | |
| − | + | 在工具栏中点击 '''Insert/Remove Breakpoint'''按钮。 | |
| − | + | 或者,按F9切换断点。 | |
<br/> | <br/> | ||
::[[File:CS-toolbar-breakpoints_add-remove.jpg|150px]] | ::[[File:CS-toolbar-breakpoints_add-remove.jpg|150px]] | ||
::'''Figure 8. Insert/Remove Breakpoint button''' | ::'''Figure 8. Insert/Remove Breakpoint button''' | ||
<br/> | <br/> | ||
| − | + | 也可以从程序的第一行逐步运行程序。 加载任务后,黄色箭头指向程序的第一行。要逐行运行程序,请使用工具栏上的 '''Step Over''', '''Step In'''to and '''Step Out'''按钮。 | |
| − | + | 参考图 9. | |
<br/> | <br/> | ||
::[[File:CS-GS-7.png|600px]] | ::[[File:CS-GS-7.png|600px]] | ||
| Line 330: | Line 332: | ||
<br/> | <br/> | ||
| − | = | + | = 示例程序:移动2轴 = |
| − | + | 文件'''MOVE_2AX.PRG'''由程序,函数和子程序组成。 | |
| − | + | 这个例子说明了MC-Basic程序如何循和无限地将两个轴移动到三个不同的目标位置。 | |
| − | + | 注意程序中的“BOOKMARK”注释。 这些代码块在程序之后的章节中进行了说明。 | |
<pre> | <pre> | ||
| Line 542: | Line 544: | ||
| − | === | + | === 附加 === |
| − | + | 必须将任务关联到轴上才能控制轴。 这是通过命令'''ATTACH'''执行的。 | |
(BOOKMARK: '''ATTACH'''). | (BOOKMARK: '''ATTACH'''). | ||
<br/> | <br/> | ||
| − | === | + | === 轴设置子程序 === |
| − | + | 一旦将任务关联到轴上,任务将根据特定的运动曲线设置轴运动的参数。这通过子程序AXESSETUP(Axis Name)设置。 | |
(BOOKMARK: '''AXESSETUP'''). | (BOOKMARK: '''AXESSETUP'''). | ||
| Line 555: | Line 557: | ||
<br/> | <br/> | ||
| − | ==== | + | ==== 位置因子 ==== |
(BOOKMARK: '''POSITION FACTOR'''). | (BOOKMARK: '''POSITION FACTOR'''). | ||
| − | + | 位置因子指定用户的位置单位和内部单位(编码器计数)之间的转换因子。 | |
| − | + | 在此示例中,编码器30000个计数每周期将转换为直径为100 mm的轴的转动一圈的周期; 结果是以毫米为单位的位置因子。例如, 当发出目标位置1000的移动命令时, 电机将转动确切的转数,以产生1000 mm的切线运动。 | |
<br/> | <br/> | ||
| − | ==== | + | ==== 速度, 加速度和加加速度因子 ==== |
| − | '''VMax''' – | + | '''VMax''' – 轴最大允许速度。 由于某些命令(例如速度倍率)可能将轴加速超过其巡航速度,永远不会超过'''VMax'''设置最大值。 |
| − | '''VOspd''' – | + | '''VOspd''' – 速度超速。 如果以超出'''VOspd'''的速度向轴发出命令,则会产生错误并立即停止轴。 |
| − | '''VCruise''' – | + | '''VCruise''' – 正常移动或点动命令的巡航速度。 |
| − | '''Acc, Dec''' – | + | '''Acc, Dec''' – 轴的加速度和减速度。 |
| − | '''Amax, DMax''' – | + | '''Amax, DMax''' – 加速和减速的最大允许值。 |
| − | '''DecStop''' – | + | '''DecStop''' – 当向轴发出停止命令时将使用的减速度值。 |
| − | '''JMax''' | + | '''JMax''' –加加速度最大允许值 |
<br/> | <br/> | ||
| − | ==== | + | ==== 定位 ==== |
| − | '''Absolute''' – | + | '''Absolute''' – 定义移动命令的目标位置是绝对的还是相对于轴的当前位置。 |
| − | '''PEMax''' – | + | '''PEMax''' – PCMD和PFB之间允许的最大误差。 如果错误超过此值,则会产生错误并立即停止轴。 |
<br/> | <br/> | ||
| − | ==== | + | ==== 运行模式 ==== |
| − | '''OpMode''' – | + | '''OpMode''' – 轴的运行模式:位置,速度或转矩。 |
<br/> | <br/> | ||
| − | ==== | + | ==== 模拟轴或实轴 ==== |
| − | '''Simulated''' - | + | '''Simulated''' - 定义轴是模拟还是实际的。 |
<br/> | <br/> | ||
| − | === | + | === 轴使能 === |
| − | + | 定义轴的属性后,必须使能两个轴才能允许运动 | |
| − | + | 这是通过调用函数'''Enable_Disable_Drive''' (ax as generic axis, byval EnDes as long) as long. | |
(BOOKMARK: '''ENABLE'''). | (BOOKMARK: '''ENABLE'''). | ||
| Line 607: | Line 609: | ||
<br/> | <br/> | ||
| − | === | + | === 移动命令 === |
| − | + | 一个简单的Move命令包括轴名称和目标位置作为参数。 它可能会更复杂。 | |
| − | + | 无限'''while循环'''发出命令到轴,并等待他们完成,然后发出一个新的命令移动到不同的目标位置。 | |
| − | + | 参数'''IsMoving'''表示轴是移动还是停止,以便可以发出下一个Move命令。 | |
(BOOKMARK: '''MOVE'''). | (BOOKMARK: '''MOVE'''). | ||
| Line 620: | Line 622: | ||
<br/> | <br/> | ||
| − | = | + | = 示例程序:主从轴 = |
| − | + | 文件''' MAS_SLAV.PRG'''类似于前面的MOVE_2AX.PRG。它有一个附加的子程序,它将一个轴设置为另一个轴位置命令(PCMD)的从动轴。 移动命令只发送到主轴,从轴不带显式命令。 | |
| − | + | 由于两个轴必须具有相同的运动曲线,所以两轴的轴设置相同。 | |
| − | + | 定义轴属性后,将调用子程序''' SetMasterSlave''' (GenMaster as generic axis, GenSlave as generic axis),并将SlaveAxis设置为MasterAxis的PCMD的从动轴。 | |
| − | + | 程序的其余部分是一样的。 | |
<pre> | <pre> | ||
Latest revision as of 06:07, 10 August 2017
| 语言: | English • 中文(简体) |
|---|

Contents
概述
本教程是一个快速介绍,可帮助您使用MC-Basic语言和ControlStudio软件开始运行softMC。
MC-Basic (Motion Control BASIC) 是由Servotronix开发的用于softMC的专有编程语言。 它基于标准的BASIC编程语言,全面增强多任务和运动控制功能。 ControlStudio中的终端窗格可让您访问MC Basic环境。
ControlStudio是基于PC的图形用户界面,用于开发,运行和测试由softMC控制和/或协调的运动应用程序。 ControlStudio包含编程编辑器,数据记录器,调试器和监视工具。 一旦应用程序完成,PC可以被移除,并且softMC控制器可以独立运行或在网络内运行。
有关softMC硬件和软件系统的下载和更多信息,请使用Servotronix网站上提供的资源。
本培训手册中使用了三个文件。 应将它们提供在压缩文件中,并将其提取到用户PC上的文件夹中。
- CONFIG.PRG
- MOVE_2AX.PRG
- MAS_SLAV.PRG
MC-Basic 基础
使用MC-Basic,您可以向softMC发出命令并从中检索数据。这些操作可以从在softMC中加载和运行的程序执行,或者通过ControlStudio中的终端窗口将命令直接输入到softMC。
通用任务 (*.prg)
- 用户程序。
- 定义运动控制器要执行的工作。
- 与其他任务同时运行,并独立运行。
通用库(*.lib)
- 用户(共享)库
- 在MC-Basic中收集经常使用的子程序和功能。
- 库中的子程序和函数可以由任务和其他库调用。
- 如果从config.prg或命令loadglobal加载库,则为全局库;
- 如果通过命令load,库是局部的。
- 全局库中的公共函数可以从任何地方调用,而不需要显式导入;
- 局部库中的公共函数可以从其他库和程序调用,但需要命令导入 (参见 wiki: MC-Basic:IMPORT).
Configuration (config.prg) 参考加载Config.prg章节。
- 主要用于声明全局对象并加载所有全局库。
- 如果变量system.dipswitch.6 = 1,则自动加载并运行一次。 (参见wiki:MC-Basic:SYSTEM.DIPSWITCH)。
- 当执行命令reset all时运行。
Autoexecute (autoexec.prg)
- 用于启动应用程序任务。
- 如果变量system.dipswitch.6 = 1,则自动加载并运行一次。 (参见wiki:MC-Basic:SYSTEM.DIPSWITCH)。
Reset all
- 命令reset all清除系统内存中的所有任务和变量,并加载并运行CONFIG.PRG。
- 在启动softMC之后,必须先从终端执行全部重置,以便首先加载配置文件。
Queries
- 查询前缀有字符?
- 以下是查询的几个例子及其产生的响应。
|
?<axis>.En ?<axis>.Enable |
可能返回:
|
|
?<axis>.PCMD ?<axis>.PositionCommand |
返回位置命令 |
|
?<axis>.PFB ?<axis>.PositionFeedback |
返回电机的实际位置 |
|
?<axis>.VCMD ?<axis>.VelocityCommand |
返回速度命令 |
|
?<axis>.VFB ?<axis>.VelocityFeedback |
返回轴的实际速度 |
|
?<axis>.IsMoving |
可能返回值:
|
|
?axislist |
显示系统中现有轴的名称。 |
|
?tasklist |
显示系统中当前任务的列表及其状态。 |
|
?system.information |
显示有关系统的基本信息。 |
加载Config.prg
此处显示了一个示例CONFIG.PRG文件。 它包含一个最小的配置,它定义了系统中四个轴的数量和名称。
- 在ControlStudio中, 选择 File > Open 以打开为本次培训提供的Config.prg文件。
其内容显示在屏幕底部的程序编辑器窗格中。 参见图1。 - 点击工具栏中的 Load按钮。
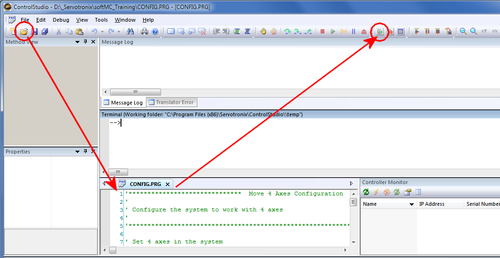
- Figure 1. Open and Load Config.prg

'***************************  Move 4 Axes Configuration  **********************************
'
' Configure the system to work with 4 axes
'
'******************************************************************************************

' Set 4 axes in the system
System.NumberAxes = 4

'''Program'''

	sys.DoubleFormat=1
	sys.nomotion = 1

	' Set axes names
	A1.AxisName = X_AXIS
	A2.AxisName = Y_AXIS

	A3.AxisName = MasterAxis
	A4.AxisName = SlaveAxis

	Print "MC Training - 4 Axes system"

'''End program'''
/pre>

<br/>

== Opening, Loading and Running a Task  ==
# 在ControlStudio中, 选择File > '''Open'''.
# 选择一个MC-Basic程序,如'''MOVE_2AX.PRG'''. <br/>其内容显示在程序编辑器窗格中。 参见图2。
# 点击工具栏'''Load'''按钮。 <br/>该任务现在列在任务管理器中,状态为“Ready”。
# 点击'''Run'''按钮执行任务。

<br/>
'''Figure 2. 	Load and Run Task File '''
<br/>

== Monitoring Variables ==
ControlStudio提供了几种监控系统和收集数据的方法。
<br/>


==== Terminal ====
使用'''Terminal'''窗格使用MC-Basic命令查询一个或多个参数; 例如:
<pre>
?X_AXIS.EN
?X_AXIS.PFB, Y_AXIS.PFB
观察变量
使用Watch变量窗格.
- 选择View > Watch.
- 在第一行中输入变量的名称。
其值将不断更新和显示。
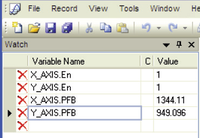
- Figure 3. Watch Variables pane

信号记录
使用Signal Recorder.
- 选择View > Signal Recorder。参见图4。
- 单击第一行,并使用向上/向下箭头定义要记录的信号数。
- 单击每个信号编号行,并输入要记录的变量的名称。
- 参数数据点决定记录的长度。
- 要开始记录,请点击Play按钮。
请注意,点击停止按钮会中止记录,不会产生任何结果。 - 记录完成后,结果将显示在编辑器窗格的新选项卡中。该标题为default.rcv
参见图5和图6。
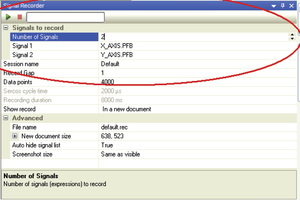
- Figure 4. Signal Recorder pane

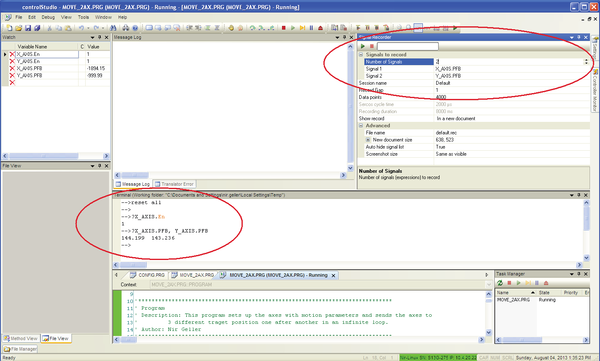
- Figure 5. Watch Variables and Signal Recorder

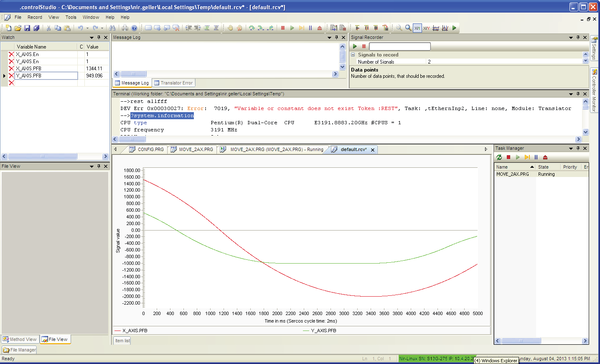
- Figure 6. Plot of recording is automatically displayed

实时显示
使用Realtime Display
- 选择View > Signal Recorder.
- 输入要监视的变量,例如轴的位置。
- 点击Play按钮
参考图7.

Figure 7. Realtime display of variable values
调试
在ControlStudio中,您可以加载程序并通过设置断点并逐步执行代码行进行调试。
只有在加载程序后才能设置断点,并显示在新的选项卡中。
将闪烁的光标放在您希望程序停止的行中。
在工具栏中点击 Insert/Remove Breakpoint按钮。
或者,按F9切换断点。
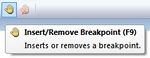
- Figure 8. Insert/Remove Breakpoint button

也可以从程序的第一行逐步运行程序。 加载任务后,黄色箭头指向程序的第一行。要逐行运行程序,请使用工具栏上的 Step Over, Step Into and Step Out按钮。
参考图 9.

Figure 9. Debugging, breakpoints, stepping buttons
示例程序:移动2轴
文件MOVE_2AX.PRG由程序,函数和子程序组成。
这个例子说明了MC-Basic程序如何循和无限地将两个轴移动到三个不同的目标位置。
注意程序中的“BOOKMARK”注释。 这些代码块在程序之后的章节中进行了说明。
'******************************  Move 2 Axes Program  *************************************
'
' This application will move 2 simulated axes to 3 different positions in an infinite loop
'
'******************************************************************************************


'****************************************************************************
' Program
' Description: This program sets up the axes with motion parameters and sends the axes to
'		 3 different traget position one after another in an infinite loop.
' Author: Nir Geller
'****************************************************************************
Program

    dim retVal as long = 0


' BOOKMARK: ATTACH
	attach X_AXIS
	attach Y_AXIS


' BOOKMARK:	AXESSETUP
	' Setup Axes motion parameters
	call AxisSetup(X_AXIS)
	call AxisSetup(Y_AXIS)


' BOOKMARK:	ENABLE
	' Enable Axes
	retVal = Enable_Disable_Drive(X_AXIS, ON)
	if retVal = -1 then
		goto PROGRAM_ERROR
	end if

	retVal = Enable_Disable_Drive(Y_AXIS, ON)
	if retVal = -1 then
		goto PROGRAM_ERROR
	end if

	while 1

' BOOKMARK:	MOVE
		' Move axes to first waypoint (2000, 1000)
		Move X_AXIS 2000
		Move Y_AXIS 1000

		sleep 5

' BOOKMARK:	ISMOVING
		' Wait for axes to reach first waypoint
		while X_AXIS.IsMoving <> 0
			sleep 5
		end while

		while Y_AXIS.IsMoving <> 0
			sleep 5
		end while
		' *****************************************

		' Move axes to second waypoint  (-2000, -1000)
		Move X_AXIS -2000
		Move Y_AXIS -1000

		sleep 5

		' Wait for axes to reach second waypoint
		while X_AXIS.IsMoving <> 0
			sleep 5
		end while

		while Y_AXIS.IsMoving <> 0
			sleep 5
		end while
		' *****************************************

		' Move axes to third waypoint  (0,0)
		Move X_AXIS 0
		Move Y_AXIS 0

		sleep 5

		' Wait for axes to reach third waypoint
		while X_AXIS.IsMoving <> 0
			sleep 5
		end while

		while Y_AXIS.IsMoving <> 0
			sleep 5
		end while
		' *****************************************

	end while  '   an infinite loop


PROGRAM_ERROR:

	' Disable Axes
	retVal = Enable_Disable_Drive(X_AXIS, OFF)
	retVal = Enable_Disable_Drive(Y_AXIS, OFF)

	detach X_AXIS
	detach Y_AXIS

End Program


'****************************************************************************
' Subroutine Name: AxisSetup
' Description: This subroutine sets all the axis parameters according to the desired
'              motion profile (e.g. Cruise Velocity, Acceleration...)
' Called From: Program
' Author: Nir Geller
' Input Parameters: Name of an axis
' Output Parameters: None
' Return Value: None
'****************************************************************************
Sub AxisSetup(GenAxis as generic axis)

    dim sercos_cycle_time as long = 0.004
    dim ohmega as long = 0

	ohmega = 12 '0.899999*pi/(5 * sercos_cycle_time)

    with GenAxis

        en = 0
' BOOKMARK:	POSITION FACTOR
        pfac = 30000/100/pi 'mm
        vfac = pfac/1000     'work in mm
        afac = vfac/1e3      'accel in mm per second
        jfac = afac/1e3      'jerk in mm per second squared

        vmax = 3000
        vospd = 1.2 * vmax
        vcruise = 1500

        amax = 200
        dmax = amax
        acc = amax

        dec = dmax

        decstop = dec

        jmax = ohmega * amax
        smoothfactor = -1

        starttype = GCom
        proceedtype = cmot

        PEDel = 1
        absolute = 1

        pemax=10000

        velocitysafetylimit = 10000
        opmode = positionmode

		Simulated = 1 ' Axis is simulated

    end with

end Sub

'****************************************************************************
' Function Name: Enable_Disable_Drive
' Description: Enable or disable a drive according to CW bits
' Called From: Program
' Author: Nir Geller
' Input Parameters: generic axis
'                    Enable/Disable flag
' Output Parameters: None
' Return Value: 0 on success, -1 if failed
' Algorithm:
' Global Variables Used:
' Revisions:
'****************************************************************************
Function Enable_Disable_Drive(ax as generic axis, byval EnDes as long) as long

    dim counter as long = 0

    Enable_Disable_Drive = 0

    ax.en = EnDes
    counter = 0

    while EnDes <> ax.en AND counter < 10
        sleep 1
        counter = counter + 1
    end while

    if ax.en <> EnDes then
        'throw ec_slave_home_err_enable 'failed to enable axis
        Enable_Disable_Drive = -1
    end if

End Function
附加
必须将任务关联到轴上才能控制轴。 这是通过命令ATTACH执行的。 (BOOKMARK: ATTACH).
轴设置子程序
一旦将任务关联到轴上,任务将根据特定的运动曲线设置轴运动的参数。这通过子程序AXESSETUP(Axis Name)设置。
(BOOKMARK: AXESSETUP).
位置因子
(BOOKMARK: POSITION FACTOR).
位置因子指定用户的位置单位和内部单位(编码器计数)之间的转换因子。
在此示例中,编码器30000个计数每周期将转换为直径为100 mm的轴的转动一圈的周期; 结果是以毫米为单位的位置因子。例如, 当发出目标位置1000的移动命令时, 电机将转动确切的转数,以产生1000 mm的切线运动。
速度, 加速度和加加速度因子
VMax – 轴最大允许速度。 由于某些命令(例如速度倍率)可能将轴加速超过其巡航速度,永远不会超过VMax设置最大值。
VOspd – 速度超速。 如果以超出VOspd的速度向轴发出命令,则会产生错误并立即停止轴。
VCruise – 正常移动或点动命令的巡航速度。
Acc, Dec – 轴的加速度和减速度。
Amax, DMax – 加速和减速的最大允许值。
DecStop – 当向轴发出停止命令时将使用的减速度值。
JMax –加加速度最大允许值
定位
Absolute – 定义移动命令的目标位置是绝对的还是相对于轴的当前位置。
PEMax – PCMD和PFB之间允许的最大误差。 如果错误超过此值,则会产生错误并立即停止轴。
运行模式
OpMode – 轴的运行模式:位置,速度或转矩。
模拟轴或实轴
Simulated - 定义轴是模拟还是实际的。
轴使能
定义轴的属性后,必须使能两个轴才能允许运动
这是通过调用函数Enable_Disable_Drive (ax as generic axis, byval EnDes as long) as long.
(BOOKMARK: ENABLE).
移动命令
一个简单的Move命令包括轴名称和目标位置作为参数。 它可能会更复杂。
无限while循环发出命令到轴,并等待他们完成,然后发出一个新的命令移动到不同的目标位置。
参数IsMoving表示轴是移动还是停止,以便可以发出下一个Move命令。
(BOOKMARK: MOVE).
(BOOKMARK: ISMOVING).
示例程序:主从轴
文件 MAS_SLAV.PRG类似于前面的MOVE_2AX.PRG。它有一个附加的子程序,它将一个轴设置为另一个轴位置命令(PCMD)的从动轴。 移动命令只发送到主轴,从轴不带显式命令。
由于两个轴必须具有相同的运动曲线,所以两轴的轴设置相同。
定义轴属性后,将调用子程序 SetMasterSlave (GenMaster as generic axis, GenSlave as generic axis),并将SlaveAxis设置为MasterAxis的PCMD的从动轴。
程序的其余部分是一样的。
'******************************  Mater Slave Program  *************************************
'
' This application will set one axis as a master, and another axis as a slave of the
' position command of the first axis.
'
'******************************************************************************************


'****************************************************************************
' Program
' Description: This program sets up the axes with motion parameters and sends the axes to
'		 3 different traget position one after another in an infinite loop.
' Author: Nir Geller
'****************************************************************************
Program

    dim retVal as long = 0

	attach MasterAxis
	attach SlaveAxis

	' Setup Axes motion parameters
	call AxisSetup(MasterAxis)
	call AxisSetup(SlaveAxis)

	' Set master-slave relations
	call SetMasterSlave(MasterAxis, SlaveAxis)

	' Enable Axes
	retVal = Enable_Disable_Drive(MasterAxis, ON)
	if retVal = -1 then
		goto PROGRAM_ERROR
	end if

	retVal = Enable_Disable_Drive(SlaveAxis, ON)
	if retVal = -1 then
		goto PROGRAM_ERROR
	end if

	while 1

		' Move axes to first waypoint (5000)
		Move MasterAxis 5000

		sleep 5

		' Wait for axes to reach first waypoint
		while MasterAxis.IsMoving <> 0
			sleep 5
		end while
		' *****************************************


		' Move axes to second waypoint  (-4000)
		Move MasterAxis -4000

		sleep 5

		' Wait for axes to reach first waypoint
		while MasterAxis.IsMoving <> 0
			sleep 5
		end while
		' *****************************************


		' Move axes to third waypoint  (0)
		Move MasterAxis 0

		sleep 5

		' Wait for axes to reach first waypoint
		while MasterAxis.IsMoving <> 0
			sleep 5
		end while
		' *****************************************

	end while  '   an infinite loop

PROGRAM_ERROR:

	' Disable Axes
	retVal = Enable_Disable_Drive(MasterAxis, OFF)
	retVal = Enable_Disable_Drive(SlaveAxis, OFF)

	detach MasterAxis
	detach SlaveAxis

End Program

'****************************************************************************
' Subroutine Name: AxisSetup
' Description: This subroutine sets all the axis parameters according to the desired
'              motion profile (e.g. Cruise Velocity, Acceleration...)
' Called From: Program
' Author: Nir Geller
' Input Parameters: Name of an axis
' Output Parameters: None
' Return Value: None
'****************************************************************************
Sub AxisSetup(GenAxis as generic axis)

    dim sercos_cycle_time as long = 0.004
    dim ohmega as long = 0

	ohmega = 12 '0.899999*pi/(5 * sercos_cycle_time)

    with GenAxis

        en = 0
        pfac = 30000/100/pi 'mm
        vfac = pfac/1000     'work in mm
        afac = vfac/1e3      'accel in mm per second
        jfac = afac/1e3      'jerk in mm per second squared

        vmax = 3000
        vospd = 1.2 * vmax
        vcruise = 1500

        amax = 200
        dmax = amax
        acc = amax

        dec = dmax

        decstop = dec

        jmax = ohmega * amax
        smoothfactor = -1

        starttype = GCom
        proceedtype = cmot

        PEDel = 1
        absolute = 1

        pemax=10000

        velocitysafetylimit = 10000
        opmode = positionmode

		Simulated = 1 ' Axis is simulated

    end with

end Sub

'****************************************************************************
' Function Name: Enable_Disable_Drive
' Description: Enable or disable a drive according to CW bits
' Called From: Program
' Author: Nir Geller
' Input Parameters: generic axis
'                    Enable/Disable flag
' Output Parameters: None
' Return Value: 0 on success, -1 if failed
' Algorithm:
' Global Variables Used:
' Revisions:
'****************************************************************************

Function Enable_Disable_Drive(ax as generic axis, byval EnDes as long) as long

    dim counter as long = 0

    Enable_Disable_Drive = 0

    ax.en = EnDes
    counter = 0

    while EnDes <> ax.en AND counter < 10
        sleep 1
        counter = counter + 1
    end while

    if ax.en <> EnDes then
        'throw ec_slave_home_err_enable 'failed to enable axis
        Enable_Disable_Drive = -1
    end if

End Function

'****************************************************************************
' Function Name: SetMasterSlave
' Description: Set GenSlave as a slave of the PCMD of GenMaster
' Called From: Program
' Author: Nir Geller
' Input Parameters: Slave axis, Master axis
' Output Parameters: None
' Return Value: None
'****************************************************************************
sub SetMasterSlave(GenMaster as generic axis, GenSlave as generic axis)

	GenSlave.MasterSource = GenMaster.Pcmd
	GenSlave.slave = GEAR

end sub