Difference between revisions of "Getting Started with MC-Basic and ControlStudio/zh-hans"
| Line 34: | Line 34: | ||
'''Configuration (config.prg)''' | '''Configuration (config.prg)''' | ||
| − | + | 参考加载Config.prg章节。 | |
| − | * | + | * 主要用于声明全局对象并加载所有全局库。 |
| − | * | + | * 如果变量'''system.dipswitch.6 = 1''',则自动加载并运行一次。 (参见wiki:MC-Basic:SYSTEM.DIPSWITCH)。 |
| − | * | + | * 当执行命令'''reset all'''时运行。 |
'''Autoexecute (autoexec.prg)''' | '''Autoexecute (autoexec.prg)''' | ||
| − | * | + | * 用于启动应用程序任务。 |
| − | * | + | * 如果变量'''system.dipswitch.6 = 1''',则自动加载并运行一次。 (参见wiki:MC-Basic:SYSTEM.DIPSWITCH)。 |
'''Reset all''' | '''Reset all''' | ||
| − | : | + | :命令'''reset all'''清除系统内存中的所有任务和变量,并加载并运行CONFIG.PRG。 |
| − | : | + | :在启动softMC之后,必须先从终端执行全部重置,以便首先加载配置文件。 |
'''Queries''' | '''Queries''' | ||
| − | : | + | :查询前缀有字符? |
| − | : | + | :以下是查询的几个例子及其产生的响应。 |
<!-- | <!-- | ||
| Line 75: | Line 75: | ||
<td width="359" valign="top"> | <td width="359" valign="top"> | ||
<p> | <p> | ||
| − | + | 可能返回: | |
<br/> | <br/> | ||
| − | 0 = | + | 0 = 驱动器下使能 |
<br/> | <br/> | ||
| − | 1 = | + | 1 = 驱动器使能 |
</p> | </p> | ||
</td> | </td> | ||
| Line 94: | Line 94: | ||
<td width="359" valign="top"> | <td width="359" valign="top"> | ||
<p> | <p> | ||
| − | + | 返回位置命令 | |
</p> | </p> | ||
</td> | </td> | ||
| Line 109: | Line 109: | ||
<td width="359" valign="top"> | <td width="359" valign="top"> | ||
<p> | <p> | ||
| − | + | 返回电机的实际位置 | |
</p> | </p> | ||
</td> | </td> | ||
| Line 124: | Line 124: | ||
<td width="359" valign="top"> | <td width="359" valign="top"> | ||
<p> | <p> | ||
| − | + | 返回速度命令 | |
</p> | </p> | ||
</td> | </td> | ||
| Line 139: | Line 139: | ||
<td width="359" valign="top"> | <td width="359" valign="top"> | ||
<p> | <p> | ||
| − | + | 返回轴的实际速度 | |
</p> | </p> | ||
</td> | </td> | ||
| Line 151: | Line 151: | ||
<td width="359" valign="top"> | <td width="359" valign="top"> | ||
<p> | <p> | ||
| − | + | 可能返回值: | |
<br/> | <br/> | ||
| − | 0 = | + | 0 = 未运动 |
<br/> | <br/> | ||
| − | 1 = | + | 1 = 加速 |
<br/> | <br/> | ||
| − | 2 = | + | 2 = 巡航速度 |
<br/> | <br/> | ||
| − | 3 = | + | 3 = 减速 |
</p> | </p> | ||
</td> | </td> | ||
| Line 171: | Line 171: | ||
<td width="359" valign="top"> | <td width="359" valign="top"> | ||
<p> | <p> | ||
| − | + | 显示系统中现有轴的名称。 | |
</p> | </p> | ||
</td> | </td> | ||
| Line 183: | Line 183: | ||
<td width="359" valign="top"> | <td width="359" valign="top"> | ||
<p> | <p> | ||
| − | + | 显示系统中当前任务的列表及其状态。 | |
| − | |||
</p> | </p> | ||
</td> | </td> | ||
| Line 196: | Line 195: | ||
<td width="359" valign="top"> | <td width="359" valign="top"> | ||
<p> | <p> | ||
| − | + | 显示有关系统的基本信息。 | |
</p> | </p> | ||
</td> | </td> | ||
| Line 203: | Line 202: | ||
| − | == | + | == 加载Config.prg == |
| − | + | 此处显示了一个示例CONFIG.PRG文件。 它包含一个最小的配置,它定义了系统中四个轴的数量和名称。 | |
| − | # | + | #在ControlStudio中, 选择 File > '''Open''' 以打开为本次培训提供的Config.prg文件。 <br/>其内容显示在屏幕底部的程序编辑器窗格中。 参见图1。 |
| − | # | + | # 点击工具栏中的 '''Load'''按钮。 |
<br/> | <br/> | ||
:[[File:CS-Load-config.png|500px]] | :[[File:CS-Load-config.png|500px]] | ||
| Line 241: | Line 240: | ||
== Opening, Loading and Running a Task == | == Opening, Loading and Running a Task == | ||
| − | # | + | # 在ControlStudio中, 选择File > '''Open'''. |
| − | # | + | # 选择一个MC-Basic程序,如'''MOVE_2AX.PRG'''. <br/>其内容显示在程序编辑器窗格中。 参见图2。 |
| − | # | + | # 点击工具栏'''Load'''按钮。 <br/>该任务现在列在任务管理器中,状态为“Ready”。 |
| − | # | + | # 点击'''Run'''按钮执行任务。 |
<br/> | <br/> | ||
| Line 251: | Line 250: | ||
== Monitoring Variables == | == Monitoring Variables == | ||
| − | + | ControlStudio提供了几种监控系统和收集数据的方法。 | |
| − | |||
<br/> | <br/> | ||
==== Terminal ==== | ==== Terminal ==== | ||
| − | + | 使用'''Terminal'''窗格使用MC-Basic命令查询一个或多个参数; 例如: | |
<pre> | <pre> | ||
?X_AXIS.EN | ?X_AXIS.EN | ||
| Line 266: | Line 264: | ||
| − | ==== | + | ==== 观察变量 ==== |
| − | + | 使用'''Watch'''变量窗格. | |
| − | # | + | # 选择View > '''Watch'''. |
| − | # | + | # 在第一行中输入变量的名称。 <br/>其值将不断更新和显示。 |
<br/> | <br/> | ||
::[[File:CS-GS-2.png|200px]] | ::[[File:CS-GS-2.png|200px]] | ||
| Line 277: | Line 275: | ||
<br/> | <br/> | ||
| − | ==== | + | ==== 信号记录 ==== |
| − | + | 使用'''Signal Recorder'''. | |
| − | # | + | # 选择View > '''Signal Recorder'''。参见图4。 |
| − | # | + | # 单击第一行,并使用向上/向下箭头定义要记录的信号数。 |
| − | # | + | # 单击每个信号编号行,并输入要记录的变量的名称。 |
| − | # | + | # 参数数据点决定记录的长度。 |
| − | # | + | # 要开始记录,请点击'''Play'''按钮。 <br/>请注意,点击停止按钮会中止记录,不会产生任何结果。 |
| − | # | + | # 记录完成后,结果将显示在编辑器窗格的新选项卡中。该标题为'''default.rcv'''<br/>参见图5和图6。 |
<br/> | <br/> | ||
::[[File:CS-GS-3.png|300px]] | ::[[File:CS-GS-3.png|300px]] | ||
| Line 300: | Line 298: | ||
<br/> | <br/> | ||
| − | ==== | + | ==== 实时显示 ==== |
| − | + | 使用'''Realtime Display''' | |
| − | # | + | # 选择View > '''Signal Recorder'''. |
| − | # | + | # 输入要监视的变量,例如轴的位置。 |
| − | # | + | # 点击'''Play'''按钮 |
| − | + | 参考图7. | |
<br/> | <br/> | ||
::[[File:CS-GS-6.png|600px]] | ::[[File:CS-GS-6.png|600px]] | ||
| Line 312: | Line 310: | ||
<br/> | <br/> | ||
| − | ==== | + | ==== 调试 ==== |
| − | + | 在ControlStudio中,您可以加载程序并通过设置断点并逐步执行代码行进行调试。 | |
| − | + | 只有在加载程序后才能设置断点,并显示在新的选项卡中。 | |
| − | + | 将闪烁的光标放在您希望程序停止的行中。 | |
| − | + | 在工具栏中点击 '''Insert/Remove Breakpoint'''按钮。 | |
| − | + | 或者,按F9切换断点。 | |
<br/> | <br/> | ||
::[[File:CS-toolbar-breakpoints_add-remove.jpg|150px]] | ::[[File:CS-toolbar-breakpoints_add-remove.jpg|150px]] | ||
::'''Figure 8. Insert/Remove Breakpoint button''' | ::'''Figure 8. Insert/Remove Breakpoint button''' | ||
<br/> | <br/> | ||
| − | + | 也可以从程序的第一行逐步运行程序。 加载任务后,黄色箭头指向程序的第一行。要逐行运行程序,请使用工具栏上的 '''Step Over''', '''Step In'''to and '''Step Out'''按钮。 | |
| − | + | 参考图 9. | |
<br/> | <br/> | ||
::[[File:CS-GS-7.png|600px]] | ::[[File:CS-GS-7.png|600px]] | ||
| Line 330: | Line 328: | ||
<br/> | <br/> | ||
| − | = | + | = 示例程序:移动2轴 = |
| − | + | 文件'''MOVE_2AX.PRG''由程序,函数和子程序组成。 | |
| − | + | 这个例子说明了MC-Basic程序如何循和无限地将两个轴移动到三个不同的目标位置。 | |
| − | + | 注意程序中的“BOOKMARK”注释。 这些代码块在程序之后的章节中进行了说明。 | |
<pre> | <pre> | ||
Revision as of 06:56, 12 May 2017
| 语言: | [[::Getting Started with MC-Basic and ControlStudio|English]] • [[::Getting Started with MC-Basic and ControlStudio/zh-hans|中文(简体)]] |
|---|
概述
本教程是一个快速介绍,可帮助您使用MC-Basic语言和ControlStudio软件开始运行softMC。
MC-Basic (Motion Control BASIC) 是由Servotronix开发的用于softMC的专有编程语言。 它基于标准的BASIC编程语言,全面增强多任务和运动控制功能。 ControlStudio中的终端窗格可让您访问MC Basic环境。
ControlStudio是基于PC的图形用户界面,用于开发,运行和测试由softMC控制和/或协调的运动应用程序。 ControlStudio包含编程编辑器,数据记录器,调试器和监视工具。 一旦应用程序完成,PC可以被移除,并且softMC控制器可以独立运行或在网络内运行。
有关softMC硬件和软件系统的下载和更多信息,请使用Servotronix网站上提供的资源。
本培训手册中使用了三个文件。 应将它们提供在压缩文件中,并将其提取到用户PC上的文件夹中。
- CONFIG.PRG
- MOVE_2AX.PRG
- MAS_SLAV.PRG
MC-Basic 基础
使用MC-Basic,您可以向softMC发出命令并从中检索数据。这些操作可以从在softMC中加载和运行的程序执行,或者通过ControlStudio中的终端窗口将命令直接输入到softMC。
通用任务 (*.prg)
- 用户程序。
- 定义运动控制器要执行的工作。
- 与其他任务同时运行,并独立运行。
通用库(*.lib)
- 用户(共享)库
- 在MC-Basic中收集经常使用的子程序和功能。
- 库中的子程序和函数可以由任务和其他库调用。
- 如果从config.prg或命令loadglobal加载库,则为全局库;
- 如果通过命令load,库是局部的。
- 全局库中的公共函数可以从任何地方调用,而不需要显式导入;
- 局部库中的公共函数可以从其他库和程序调用,但需要命令导入 (参见 wiki: MC-Basic:IMPORT).
Configuration (config.prg) 参考加载Config.prg章节。
- 主要用于声明全局对象并加载所有全局库。
- 如果变量system.dipswitch.6 = 1,则自动加载并运行一次。 (参见wiki:MC-Basic:SYSTEM.DIPSWITCH)。
- 当执行命令reset all时运行。
Autoexecute (autoexec.prg)
- 用于启动应用程序任务。
- 如果变量system.dipswitch.6 = 1,则自动加载并运行一次。 (参见wiki:MC-Basic:SYSTEM.DIPSWITCH)。
Reset all
- 命令reset all清除系统内存中的所有任务和变量,并加载并运行CONFIG.PRG。
- 在启动softMC之后,必须先从终端执行全部重置,以便首先加载配置文件。
Queries
- 查询前缀有字符?
- 以下是查询的几个例子及其产生的响应。
|
?<axis>.En ?<axis>.Enable |
可能返回:
|
|
?<axis>.PCMD ?<axis>.PositionCommand |
返回位置命令 |
|
?<axis>.PFB ?<axis>.PositionFeedback |
返回电机的实际位置 |
|
?<axis>.VCMD ?<axis>.VelocityCommand |
返回速度命令 |
|
?<axis>.VFB ?<axis>.VelocityFeedback |
返回轴的实际速度 |
|
?<axis>.IsMoving |
可能返回值:
|
|
?axislist |
显示系统中现有轴的名称。 |
|
?tasklist |
显示系统中当前任务的列表及其状态。 |
|
?system.information |
显示有关系统的基本信息。 |
加载Config.prg
此处显示了一个示例CONFIG.PRG文件。 它包含一个最小的配置,它定义了系统中四个轴的数量和名称。
- 在ControlStudio中, 选择 File > Open 以打开为本次培训提供的Config.prg文件。
其内容显示在屏幕底部的程序编辑器窗格中。 参见图1。 - 点击工具栏中的 Load按钮。
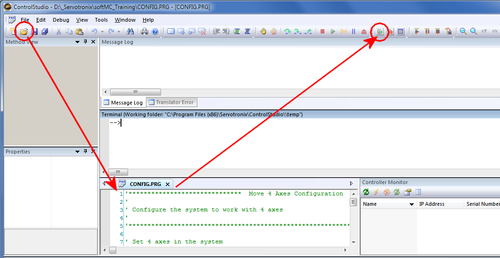
- Figure 1. Open and Load Config.prg

'***************************  Move 4 Axes Configuration  **********************************
'
' Configure the system to work with 4 axes
'
'******************************************************************************************

' Set 4 axes in the system
System.NumberAxes = 4

'''Program'''

	sys.DoubleFormat=1
	sys.nomotion = 1

	' Set axes names
	A1.AxisName = X_AXIS
	A2.AxisName = Y_AXIS

	A3.AxisName = MasterAxis
	A4.AxisName = SlaveAxis

	Print "MC Training - 4 Axes system"

'''End program'''
/pre>

<br/>

== Opening, Loading and Running a Task  ==
# 在ControlStudio中, 选择File > '''Open'''.
# 选择一个MC-Basic程序,如'''MOVE_2AX.PRG'''. <br/>其内容显示在程序编辑器窗格中。 参见图2。
# 点击工具栏'''Load'''按钮。 <br/>该任务现在列在任务管理器中,状态为“Ready”。
# 点击'''Run'''按钮执行任务。

<br/>
'''Figure 2. 	Load and Run Task File '''
<br/>

== Monitoring Variables ==
ControlStudio提供了几种监控系统和收集数据的方法。
<br/>


==== Terminal ====
使用'''Terminal'''窗格使用MC-Basic命令查询一个或多个参数; 例如:
<pre>
?X_AXIS.EN
?X_AXIS.PFB, Y_AXIS.PFB
观察变量
使用Watch变量窗格.
- 选择View > Watch.
- 在第一行中输入变量的名称。
其值将不断更新和显示。
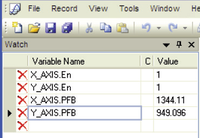
- Figure 3. Watch Variables pane

信号记录
使用Signal Recorder.
- 选择View > Signal Recorder。参见图4。
- 单击第一行,并使用向上/向下箭头定义要记录的信号数。
- 单击每个信号编号行,并输入要记录的变量的名称。
- 参数数据点决定记录的长度。
- 要开始记录,请点击Play按钮。
请注意,点击停止按钮会中止记录,不会产生任何结果。 - 记录完成后,结果将显示在编辑器窗格的新选项卡中。该标题为default.rcv
参见图5和图6。
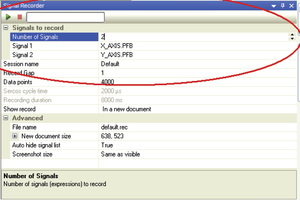
- Figure 4. Signal Recorder pane

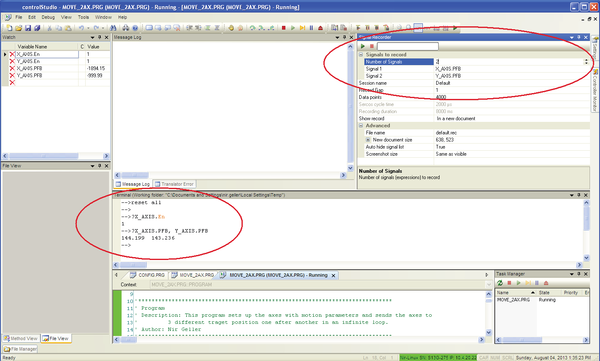
- Figure 5. Watch Variables and Signal Recorder

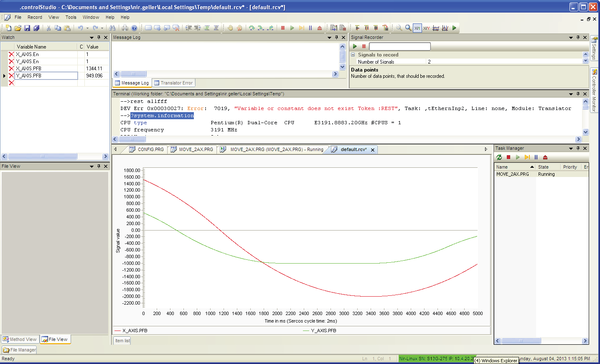
- Figure 6. Plot of recording is automatically displayed

实时显示
使用Realtime Display
- 选择View > Signal Recorder.
- 输入要监视的变量,例如轴的位置。
- 点击Play按钮
参考图7.

Figure 7. Realtime display of variable values
调试
在ControlStudio中,您可以加载程序并通过设置断点并逐步执行代码行进行调试。
只有在加载程序后才能设置断点,并显示在新的选项卡中。
将闪烁的光标放在您希望程序停止的行中。
在工具栏中点击 Insert/Remove Breakpoint按钮。
或者,按F9切换断点。
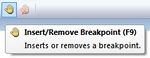
- Figure 8. Insert/Remove Breakpoint button

也可以从程序的第一行逐步运行程序。 加载任务后,黄色箭头指向程序的第一行。要逐行运行程序,请使用工具栏上的 Step Over, Step Into and Step Out按钮。
参考图 9.

Figure 9. Debugging, breakpoints, stepping buttons
示例程序:移动2轴
文件'MOVE_2AX.PRG由程序,函数和子程序组成。
这个例子说明了MC-Basic程序如何循和无限地将两个轴移动到三个不同的目标位置。
注意程序中的“BOOKMARK”注释。 这些代码块在程序之后的章节中进行了说明。
'******************************  Move 2 Axes Program  *************************************
'
' This application will move 2 simulated axes to 3 different positions in an infinite loop
'
'******************************************************************************************


'****************************************************************************
' Program
' Description: This program sets up the axes with motion parameters and sends the axes to
'		 3 different traget position one after another in an infinite loop.
' Author: Nir Geller
'****************************************************************************
Program

    dim retVal as long = 0


' BOOKMARK: ATTACH
	attach X_AXIS
	attach Y_AXIS


' BOOKMARK:	AXESSETUP
	' Setup Axes motion parameters
	call AxisSetup(X_AXIS)
	call AxisSetup(Y_AXIS)


' BOOKMARK:	ENABLE
	' Enable Axes
	retVal = Enable_Disable_Drive(X_AXIS, ON)
	if retVal = -1 then
		goto PROGRAM_ERROR
	end if

	retVal = Enable_Disable_Drive(Y_AXIS, ON)
	if retVal = -1 then
		goto PROGRAM_ERROR
	end if

	while 1

' BOOKMARK:	MOVE
		' Move axes to first waypoint (2000, 1000)
		Move X_AXIS 2000
		Move Y_AXIS 1000

		sleep 5

' BOOKMARK:	ISMOVING
		' Wait for axes to reach first waypoint
		while X_AXIS.IsMoving <> 0
			sleep 5
		end while

		while Y_AXIS.IsMoving <> 0
			sleep 5
		end while
		' *****************************************

		' Move axes to second waypoint  (-2000, -1000)
		Move X_AXIS -2000
		Move Y_AXIS -1000

		sleep 5

		' Wait for axes to reach second waypoint
		while X_AXIS.IsMoving <> 0
			sleep 5
		end while

		while Y_AXIS.IsMoving <> 0
			sleep 5
		end while
		' *****************************************

		' Move axes to third waypoint  (0,0)
		Move X_AXIS 0
		Move Y_AXIS 0

		sleep 5

		' Wait for axes to reach third waypoint
		while X_AXIS.IsMoving <> 0
			sleep 5
		end while

		while Y_AXIS.IsMoving <> 0
			sleep 5
		end while
		' *****************************************

	end while  '   an infinite loop


PROGRAM_ERROR:

	' Disable Axes
	retVal = Enable_Disable_Drive(X_AXIS, OFF)
	retVal = Enable_Disable_Drive(Y_AXIS, OFF)

	detach X_AXIS
	detach Y_AXIS

End Program


'****************************************************************************
' Subroutine Name: AxisSetup
' Description: This subroutine sets all the axis parameters according to the desired
'              motion profile (e.g. Cruise Velocity, Acceleration...)
' Called From: Program
' Author: Nir Geller
' Input Parameters: Name of an axis
' Output Parameters: None
' Return Value: None
'****************************************************************************
Sub AxisSetup(GenAxis as generic axis)

    dim sercos_cycle_time as long = 0.004
    dim ohmega as long = 0

	ohmega = 12 '0.899999*pi/(5 * sercos_cycle_time)

    with GenAxis

        en = 0
' BOOKMARK:	POSITION FACTOR
        pfac = 30000/100/pi 'mm
        vfac = pfac/1000     'work in mm
        afac = vfac/1e3      'accel in mm per second
        jfac = afac/1e3      'jerk in mm per second squared

        vmax = 3000
        vospd = 1.2 * vmax
        vcruise = 1500

        amax = 200
        dmax = amax
        acc = amax

        dec = dmax

        decstop = dec

        jmax = ohmega * amax
        smoothfactor = -1

        starttype = GCom
        proceedtype = cmot

        PEDel = 1
        absolute = 1

        pemax=10000

        velocitysafetylimit = 10000
        opmode = positionmode

		Simulated = 1 ' Axis is simulated

    end with

end Sub

'****************************************************************************
' Function Name: Enable_Disable_Drive
' Description: Enable or disable a drive according to CW bits
' Called From: Program
' Author: Nir Geller
' Input Parameters: generic axis
'                    Enable/Disable flag
' Output Parameters: None
' Return Value: 0 on success, -1 if failed
' Algorithm:
' Global Variables Used:
' Revisions:
'****************************************************************************
Function Enable_Disable_Drive(ax as generic axis, byval EnDes as long) as long

    dim counter as long = 0

    Enable_Disable_Drive = 0

    ax.en = EnDes
    counter = 0

    while EnDes <> ax.en AND counter < 10
        sleep 1
        counter = counter + 1
    end while

    if ax.en <> EnDes then
        'throw ec_slave_home_err_enable 'failed to enable axis
        Enable_Disable_Drive = -1
    end if

End Function
Attach
The task must be attached to an axis in order to control the axis. This is performed by means of the command ATTACH. (BOOKMARK: ATTACH).
Axes Setup Subroutine
Once the task is attached to the axes, the task sets the parameters for axis motion according to a particular motion profile. This is performed by means of the subroutine AXESSETUP (Axis Name).
(BOOKMARK: AXESSETUP).
Position Factor
(BOOKMARK: POSITION FACTOR).
The position factor specifies the conversion factor between the user’s position units and the internal units (encoder counts).
In this example, 30000 counts per one encoder cycle are converted into one cycle of an axis whose diameter is 100 mm; this results in position units in millimeters. For example, when a Move command to target position 1000 is issued, the motor will turn the exact number of times to yield a tangential movement of 1000 mm.
Velocity, Acceleration and Jerk Factors
VMax – The maximum allowed axis velocity. Since some commands, such as velocity override, may accelerate the axis beyond its cruise velocity, VMax sets a maximum value can never be exceeded.
VOspd – Velocity overspeed. If a command is issued to the axis to move at a speed that exceeds Vospd, an error is generated and the axis is brought to an immediate stop.
VCruise – The cruise velocity of a normal Move or Jog command.
Acc, Dec – The acceleration and deceleration of the axis.
Amax, DMax – The maximum allowed values for acceleration and deceleration.
DecStop – The deceleration value that will be used when a Stop command is issued to the axis.
JMax – The maximum allowed value of Jerk.
Positioning
Absolute – Defines whether a Move command’s target position is absolute, or relative to the current position of the axis.
PEMax – The maximum allowed error between the PCMD and the PFB. If the error exceeds this value, an error is generated and the axis is brought to an immediate stop.
Operation Mode
OpMode – The operation mode of the axis: position, velocity or torque.
Simulation or Actual Axes
Simulated - Defines whether the axis is simulated or real.
Enable Axes
After the axes’ properties are defined, both axes must be enabled to allow motion.
This is done by invoking the function Enable_Disable_Drive (ax as generic axis, byval EnDes as long) as long.
(BOOKMARK: ENABLE).
Move Command
A simple Move command includes an axis name and a target position as arguments. It may be more complex.
The infinite while loop issues Move commands to the axes, and waits for them to settle before issuing a new command to move to different target positions.
The parameter IsMoving indicates whether an axis is moving or stopped, so that the next Move command can be issued.
(BOOKMARK: MOVE).
(BOOKMARK: ISMOVING).
Sample Program: Master Slave
The file MAS_SLAV.PRG is similar to the previous file, MOVE_2AX.PRG. It has an additional subroutine, which sets one axis as a slave of the other axis’ position command (PCMD). Move commands are issued to the master axis only, and the slave axis follows without an explicit command.
Since the two axes must have identical motion profiles, the axis setup is the same for both axes.
After the axes’ properties are defined, the subroutine SetMasterSlave (GenMaster as generic axis, GenSlave as generic axis) is invoked, and sets SlaveAxis as slave of the PCMD of MasterAxis.
The rest of the program is the same.
'******************************  Mater Slave Program  *************************************
'
' This application will set one axis as a master, and another axis as a slave of the
' position command of the first axis.
'
'******************************************************************************************


'****************************************************************************
' Program
' Description: This program sets up the axes with motion parameters and sends the axes to
'		 3 different traget position one after another in an infinite loop.
' Author: Nir Geller
'****************************************************************************
Program

    dim retVal as long = 0

	attach MasterAxis
	attach SlaveAxis

	' Setup Axes motion parameters
	call AxisSetup(MasterAxis)
	call AxisSetup(SlaveAxis)

	' Set master-slave relations
	call SetMasterSlave(MasterAxis, SlaveAxis)

	' Enable Axes
	retVal = Enable_Disable_Drive(MasterAxis, ON)
	if retVal = -1 then
		goto PROGRAM_ERROR
	end if

	retVal = Enable_Disable_Drive(SlaveAxis, ON)
	if retVal = -1 then
		goto PROGRAM_ERROR
	end if

	while 1

		' Move axes to first waypoint (5000)
		Move MasterAxis 5000

		sleep 5

		' Wait for axes to reach first waypoint
		while MasterAxis.IsMoving <> 0
			sleep 5
		end while
		' *****************************************


		' Move axes to second waypoint  (-4000)
		Move MasterAxis -4000

		sleep 5

		' Wait for axes to reach first waypoint
		while MasterAxis.IsMoving <> 0
			sleep 5
		end while
		' *****************************************


		' Move axes to third waypoint  (0)
		Move MasterAxis 0

		sleep 5

		' Wait for axes to reach first waypoint
		while MasterAxis.IsMoving <> 0
			sleep 5
		end while
		' *****************************************

	end while  '   an infinite loop

PROGRAM_ERROR:

	' Disable Axes
	retVal = Enable_Disable_Drive(MasterAxis, OFF)
	retVal = Enable_Disable_Drive(SlaveAxis, OFF)

	detach MasterAxis
	detach SlaveAxis

End Program

'****************************************************************************
' Subroutine Name: AxisSetup
' Description: This subroutine sets all the axis parameters according to the desired
'              motion profile (e.g. Cruise Velocity, Acceleration...)
' Called From: Program
' Author: Nir Geller
' Input Parameters: Name of an axis
' Output Parameters: None
' Return Value: None
'****************************************************************************
Sub AxisSetup(GenAxis as generic axis)

    dim sercos_cycle_time as long = 0.004
    dim ohmega as long = 0

	ohmega = 12 '0.899999*pi/(5 * sercos_cycle_time)

    with GenAxis

        en = 0
        pfac = 30000/100/pi 'mm
        vfac = pfac/1000     'work in mm
        afac = vfac/1e3      'accel in mm per second
        jfac = afac/1e3      'jerk in mm per second squared

        vmax = 3000
        vospd = 1.2 * vmax
        vcruise = 1500

        amax = 200
        dmax = amax
        acc = amax

        dec = dmax

        decstop = dec

        jmax = ohmega * amax
        smoothfactor = -1

        starttype = GCom
        proceedtype = cmot

        PEDel = 1
        absolute = 1

        pemax=10000

        velocitysafetylimit = 10000
        opmode = positionmode

		Simulated = 1 ' Axis is simulated

    end with

end Sub

'****************************************************************************
' Function Name: Enable_Disable_Drive
' Description: Enable or disable a drive according to CW bits
' Called From: Program
' Author: Nir Geller
' Input Parameters: generic axis
'                    Enable/Disable flag
' Output Parameters: None
' Return Value: 0 on success, -1 if failed
' Algorithm:
' Global Variables Used:
' Revisions:
'****************************************************************************

Function Enable_Disable_Drive(ax as generic axis, byval EnDes as long) as long

    dim counter as long = 0

    Enable_Disable_Drive = 0

    ax.en = EnDes
    counter = 0

    while EnDes <> ax.en AND counter < 10
        sleep 1
        counter = counter + 1
    end while

    if ax.en <> EnDes then
        'throw ec_slave_home_err_enable 'failed to enable axis
        Enable_Disable_Drive = -1
    end if

End Function

'****************************************************************************
' Function Name: SetMasterSlave
' Description: Set GenSlave as a slave of the PCMD of GenMaster
' Called From: Program
' Author: Nir Geller
' Input Parameters: Slave axis, Master axis
' Output Parameters: None
' Return Value: None
'****************************************************************************
sub SetMasterSlave(GenMaster as generic axis, GenSlave as generic axis)

	GenSlave.MasterSource = GenMaster.Pcmd
	GenSlave.slave = GEAR

end sub