Difference between revisions of "Getting Started with MC-Basic and ControlStudio"
m (→Realtime Display) |
(BackToTop button) |
||
| (35 intermediate revisions by 3 users not shown) | |||
| Line 1: | Line 1: | ||
| + | {{Languages|Getting_Started_with_MC-Basic_and_ControlStudio}} | ||
| + | <div id="BackToTop" class="noprint" style="background-color:; position:fixed; bottom:32px; left:95%; z-index:9999; padding:0; margin:0;"> | ||
| + | <span style="color:blue; font-size:8pt; font-face:verdana,sans-serif; border:0.2em outset:#ceebf7; padding:0.1em; font-weight:bolder; -moz-border-radius:8px; "> | ||
| + | [[Image:TOP2.png|50px|link=#top]] </span></div> | ||
=Overview = | =Overview = | ||
This tutorial is a quick introduction to help you begin operating the softMC using the MC-Basic language and ControlStudio software. | This tutorial is a quick introduction to help you begin operating the softMC using the MC-Basic language and ControlStudio software. | ||
| Line 14: | Line 18: | ||
<br/> | <br/> | ||
| − | + | ||
= MC-Basic Fundamentals = | = MC-Basic Fundamentals = | ||
Using MC-Basic you can issue commands to the softMC and retrieve data from it. These operations can be executed from a program that is loaded and run in the softMC, or by entering commands directly to the softMC by means of the Terminal pane in ControlStudio. | Using MC-Basic you can issue commands to the softMC and retrieve data from it. These operations can be executed from a program that is loaded and run in the softMC, or by entering commands directly to the softMC by means of the Terminal pane in ControlStudio. | ||
| Line 49: | Line 53: | ||
:Following are a few examples of queries and the responses they produce. | :Following are a few examples of queries and the responses they produce. | ||
| + | <!-- | ||
{| class="wikitable" | {| class="wikitable" | ||
|- | |- | ||
| Line 59: | Line 64: | ||
<br/> | <br/> | ||
| + | --> | ||
| + | |||
| + | <table border="1" cellspacing="0" cellpadding="2"> | ||
| + | <tr> | ||
| + | <td width="212" valign="top"> | ||
| + | <p> | ||
| + | ?<axis>.En | ||
| + | </p> | ||
| + | <p> | ||
| + | ?<axis>.Enable | ||
| + | </p> | ||
| + | </td> | ||
| + | <td width="359" valign="top"> | ||
| + | <p> | ||
| + | Possible responses: | ||
| + | <br/> | ||
| + | 0 = drive disabled | ||
| + | <br/> | ||
| + | 1 = drive enabled | ||
| + | </p> | ||
| + | </td> | ||
| + | </tr> | ||
| + | <tr> | ||
| + | <td width="212" valign="top"> | ||
| + | <p> | ||
| + | ?<axis>.PCMD | ||
| + | </p> | ||
| + | <p> | ||
| + | ?<axis>.PositionCommand | ||
| + | </p> | ||
| + | </td> | ||
| + | <td width="359" valign="top"> | ||
| + | <p> | ||
| + | Returns the position command | ||
| + | </p> | ||
| + | </td> | ||
| + | </tr> | ||
| + | <tr> | ||
| + | <td width="212" valign="top"> | ||
| + | <p> | ||
| + | ?<axis>.PFB | ||
| + | </p> | ||
| + | <p> | ||
| + | ?<axis>.PositionFeedback | ||
| + | </p> | ||
| + | </td> | ||
| + | <td width="359" valign="top"> | ||
| + | <p> | ||
| + | Returns the actual position of the motor | ||
| + | </p> | ||
| + | </td> | ||
| + | </tr> | ||
| + | <tr> | ||
| + | <td width="212" valign="top"> | ||
| + | <p> | ||
| + | ?<axis>.VCMD | ||
| + | </p> | ||
| + | <p> | ||
| + | ?<axis>.VelocityCommand | ||
| + | </p> | ||
| + | </td> | ||
| + | <td width="359" valign="top"> | ||
| + | <p> | ||
| + | Returns the velocity command | ||
| + | </p> | ||
| + | </td> | ||
| + | </tr> | ||
| + | <tr> | ||
| + | <td width="212" valign="top"> | ||
| + | <p> | ||
| + | ?<axis>.VFB | ||
| + | </p> | ||
| + | <p> | ||
| + | ?<axis>.VelocityFeedback | ||
| + | </p> | ||
| + | </td> | ||
| + | <td width="359" valign="top"> | ||
| + | <p> | ||
| + | Returns the actual velocity of the axis | ||
| + | </p> | ||
| + | </td> | ||
| + | </tr> | ||
| + | <tr> | ||
| + | <td width="212" valign="top"> | ||
| + | <p> | ||
| + | ?<axis>.IsMoving | ||
| + | </p> | ||
| + | </td> | ||
| + | <td width="359" valign="top"> | ||
| + | <p> | ||
| + | Possible responses: | ||
| + | <br/> | ||
| + | 0 = not moving | ||
| + | <br/> | ||
| + | 1 = accelerating | ||
| + | <br/> | ||
| + | 2 = cruise velocity | ||
| + | <br/> | ||
| + | 3 = decelerating | ||
| + | </p> | ||
| + | </td> | ||
| + | </tr> | ||
| + | <tr> | ||
| + | <td width="212" valign="top"> | ||
| + | <p> | ||
| + | ?axislist | ||
| + | </p> | ||
| + | </td> | ||
| + | <td width="359" valign="top"> | ||
| + | <p> | ||
| + | Displays the names of the existing axes in the system. | ||
| + | </p> | ||
| + | </td> | ||
| + | </tr> | ||
| + | <tr> | ||
| + | <td width="212" valign="top"> | ||
| + | <p> | ||
| + | ?tasklist | ||
| + | </p> | ||
| + | </td> | ||
| + | <td width="359" valign="top"> | ||
| + | <p> | ||
| + | Displays a list of the current tasks in the system and | ||
| + | their status. | ||
| + | </p> | ||
| + | </td> | ||
| + | </tr> | ||
| + | <tr> | ||
| + | <td width="212" valign="top"> | ||
| + | <p> | ||
| + | ?system.information | ||
| + | </p> | ||
| + | </td> | ||
| + | <td width="359" valign="top"> | ||
| + | <p> | ||
| + | Displays basic information about the system. | ||
| + | </p> | ||
| + | </td> | ||
| + | </tr> | ||
| + | </table> | ||
| Line 65: | Line 210: | ||
# In ControlStudio, select File > '''Open''' to open the Config.prg file provided for this training. <br/>Its contents are displayed in the Program Editor pane at the bottom of the screen. Refer to Figure 1. | # In ControlStudio, select File > '''Open''' to open the Config.prg file provided for this training. <br/>Its contents are displayed in the Program Editor pane at the bottom of the screen. Refer to Figure 1. | ||
# Click the '''Load''' button in the toolbar. | # Click the '''Load''' button in the toolbar. | ||
| − | + | <br/> | |
| − | + | :[[File:CS-Load-config.png|500px]] | |
| − | '''Figure 1. Open and Load Config.prg''' | + | :'''Figure 1. Open and Load Config.prg''' |
| − | + | <br/> | |
| − | < | + | <pre> |
'*************************** Move 4 Axes Configuration ********************************** | '*************************** Move 4 Axes Configuration ********************************** | ||
' | ' | ||
| Line 94: | Line 239: | ||
'''End program''' | '''End program''' | ||
| − | </ | + | </pre> |
| + | |||
| + | <br/> | ||
== Opening, Loading and Running a Task == | == Opening, Loading and Running a Task == | ||
| Line 108: | Line 255: | ||
== Monitoring Variables == | == Monitoring Variables == | ||
ControlStudio provides several methods for monitoring the system and collecting data. | ControlStudio provides several methods for monitoring the system and collecting data. | ||
| + | |||
| + | <br/> | ||
| + | |||
==== Terminal ==== | ==== Terminal ==== | ||
Use the '''Terminal''' pane to query one or more parameters using an MC-Basic command; for example: | Use the '''Terminal''' pane to query one or more parameters using an MC-Basic command; for example: | ||
| − | < | + | <pre> |
| − | ?X_AXIS.PFB, Y_AXIS.PFB</ | + | ?X_AXIS.EN |
| + | ?X_AXIS.PFB, Y_AXIS.PFB | ||
| + | </pre> | ||
| + | |||
| + | <br/> | ||
| + | |||
==== Watch Variables ==== | ==== Watch Variables ==== | ||
| Line 118: | Line 273: | ||
# Select View > '''Watch'''. | # Select View > '''Watch'''. | ||
# In the first row, enter the name of a variable in the first row. <br/>Its value will be continuously updated and displayed. | # In the first row, enter the name of a variable in the first row. <br/>Its value will be continuously updated and displayed. | ||
| − | + | <br/> | |
| − | '''Figure 3. Watch Variables pane''' | + | ::[[File:CS-GS-2.png|200px]] |
| + | ::'''Figure 3. Watch Variables pane''' | ||
| + | <br/> | ||
<br/> | <br/> | ||
| Line 126: | Line 283: | ||
Use the '''Signal Recorder'''. | Use the '''Signal Recorder'''. | ||
# Select View > '''Signal Recorder'''. Refer to Figure 4. | # Select View > '''Signal Recorder'''. Refer to Figure 4. | ||
| − | |||
# Click in the first row, and use the up/down arrows to define the Number of signals to be recorded. | # Click in the first row, and use the up/down arrows to define the Number of signals to be recorded. | ||
# Click in each Signal number row, and enter the names of the variables to be recorded. | # Click in each Signal number row, and enter the names of the variables to be recorded. | ||
# The parameter Data Points determines the length of the recording. | # The parameter Data Points determines the length of the recording. | ||
# To start recording, click the '''Play''' button. <br/> Note that clicking the Stop button aborts the recording and produces no results. | # To start recording, click the '''Play''' button. <br/> Note that clicking the Stop button aborts the recording and produces no results. | ||
| − | # After the recording is completed, the results are displayed in a new tab in the Editor pane. The tab is named '''default.rcv.''' | + | # After the recording is completed, the results are displayed in a new tab in the Editor pane. The tab is named '''default.rcv.'''<br/>Refer to Figure 5 and Figure 6. |
| − | Refer to Figure 5 and Figure 6. | + | <br/> |
| − | + | ::[[File:CS-GS-3.png|300px]] | |
| − | '''Figure 4. Signal Recorder pane''' | + | ::'''Figure 4. Signal Recorder pane''' |
| − | + | <br/> | |
| − | '''Figure 5. Watch Variables and Signal Recorder''' | + | <br/> |
| − | + | ::[[File:CS-GS-4.png|600px]] | |
| − | '''Figure 6. Plot of recording is automatically displayed''' | + | ::'''Figure 5. Watch Variables and Signal Recorder''' |
| + | <br/> | ||
| + | <br/> | ||
| + | ::[[File:CS-GS-5.png|600px]] | ||
| + | ::'''Figure 6. Plot of recording is automatically displayed''' | ||
| + | <br/> | ||
<br/> | <br/> | ||
| Line 148: | Line 309: | ||
# Click the '''Play''' button. | # Click the '''Play''' button. | ||
Refer to Figure 7. | Refer to Figure 7. | ||
| + | <br/> | ||
| + | ::[[File:CS-GS-6.png|600px]] | ||
| + | '''Figure 7. Realtime display of variable values''' | ||
| − | |||
<br/> | <br/> | ||
| Line 158: | Line 321: | ||
Press the '''Insert/Remove Breakpoint''' button on the toolbar. | Press the '''Insert/Remove Breakpoint''' button on the toolbar. | ||
Alternately, press F9 to toggle the breakpoint. | Alternately, press F9 to toggle the breakpoint. | ||
| − | + | <br/> | |
| − | '''Figure 8. Insert/Remove Breakpoint button''' | + | ::[[File:CS-toolbar-breakpoints_add-remove.jpg|150px]] |
| + | ::'''Figure 8. Insert/Remove Breakpoint button''' | ||
| + | <br/> | ||
It is also possible to run the program step-by-step from the first line of the program. After loading the task a yellow arrow points to the first line of the program. To run the program line by line, use the '''Step Over''', '''Step In'''to and '''Step Out''' buttons on the toolbar. | It is also possible to run the program step-by-step from the first line of the program. After loading the task a yellow arrow points to the first line of the program. To run the program line by line, use the '''Step Over''', '''Step In'''to and '''Step Out''' buttons on the toolbar. | ||
Refer to Figure 9. | Refer to Figure 9. | ||
| − | + | <br/> | |
| + | ::[[File:CS-GS-7.png|600px]] | ||
'''Figure 9. Debugging, breakpoints, stepping buttons''' | '''Figure 9. Debugging, breakpoints, stepping buttons''' | ||
| + | <br/> | ||
| + | <br/> | ||
= Sample Program: Move 2 Axes = | = Sample Program: Move 2 Axes = | ||
| Line 172: | Line 340: | ||
Note the “BOOKMARK” comments within the program. These blocks of code are explained in the sections following the program. | Note the “BOOKMARK” comments within the program. These blocks of code are explained in the sections following the program. | ||
| − | < | + | <pre> |
'****************************** Move 2 Axes Program ************************************* | '****************************** Move 2 Axes Program ************************************* | ||
' | ' | ||
| Line 371: | Line 539: | ||
end if | end if | ||
| − | End Function</ | + | End Function |
| + | </pre> | ||
| + | |||
| + | <br/> | ||
| + | |||
=== Attach === | === Attach === | ||
The task must be attached to an axis in order to control the axis. This is performed by means of the command '''ATTACH'''. | The task must be attached to an axis in order to control the axis. This is performed by means of the command '''ATTACH'''. | ||
(BOOKMARK: '''ATTACH'''). | (BOOKMARK: '''ATTACH'''). | ||
| + | |||
| + | <br/> | ||
=== Axes Setup Subroutine === | === Axes Setup Subroutine === | ||
Once the task is attached to the axes, the task sets the parameters for axis motion according to a particular motion profile. This is performed by means of the subroutine AXESSETUP (Axis Name). | Once the task is attached to the axes, the task sets the parameters for axis motion according to a particular motion profile. This is performed by means of the subroutine AXESSETUP (Axis Name). | ||
| + | |||
(BOOKMARK: '''AXESSETUP'''). | (BOOKMARK: '''AXESSETUP'''). | ||
| − | + | ||
| + | <br/> | ||
==== Position Factor ==== | ==== Position Factor ==== | ||
(BOOKMARK: '''POSITION FACTOR'''). | (BOOKMARK: '''POSITION FACTOR'''). | ||
| + | |||
The position factor specifies the conversion factor between the user’s position units and the internal units (encoder counts). | The position factor specifies the conversion factor between the user’s position units and the internal units (encoder counts). | ||
| + | |||
In this example, 30000 counts per one encoder cycle are converted into one cycle of an axis whose diameter is 100 mm; this results in position units in millimeters. For example, when a Move command to target position 1000 is issued, the motor will turn the exact number of times to yield a tangential movement of 1000 mm. | In this example, 30000 counts per one encoder cycle are converted into one cycle of an axis whose diameter is 100 mm; this results in position units in millimeters. For example, when a Move command to target position 1000 is issued, the motor will turn the exact number of times to yield a tangential movement of 1000 mm. | ||
| + | |||
| + | <br/> | ||
==== Velocity, Acceleration and Jerk Factors ==== | ==== Velocity, Acceleration and Jerk Factors ==== | ||
'''VMax''' – The maximum allowed axis velocity. Since some commands, such as velocity override, may accelerate the axis beyond its cruise velocity, '''VMax''' sets a maximum value can never be exceeded. | '''VMax''' – The maximum allowed axis velocity. Since some commands, such as velocity override, may accelerate the axis beyond its cruise velocity, '''VMax''' sets a maximum value can never be exceeded. | ||
| + | |||
'''VOspd''' – Velocity overspeed. If a command is issued to the axis to move at a speed that exceeds '''Vospd''', an error is generated and the axis is brought to an immediate stop. | '''VOspd''' – Velocity overspeed. If a command is issued to the axis to move at a speed that exceeds '''Vospd''', an error is generated and the axis is brought to an immediate stop. | ||
| + | |||
'''VCruise''' – The cruise velocity of a normal Move or Jog command. | '''VCruise''' – The cruise velocity of a normal Move or Jog command. | ||
| + | |||
'''Acc, Dec''' – The acceleration and deceleration of the axis. | '''Acc, Dec''' – The acceleration and deceleration of the axis. | ||
| + | |||
'''Amax, DMax''' – The maximum allowed values for acceleration and deceleration. | '''Amax, DMax''' – The maximum allowed values for acceleration and deceleration. | ||
| + | |||
'''DecStop''' – The deceleration value that will be used when a Stop command is issued to the axis. | '''DecStop''' – The deceleration value that will be used when a Stop command is issued to the axis. | ||
| + | |||
'''JMax''' – The maximum allowed value of Jerk. | '''JMax''' – The maximum allowed value of Jerk. | ||
| + | |||
| + | <br/> | ||
==== Positioning ==== | ==== Positioning ==== | ||
'''Absolute''' – Defines whether a Move command’s target position is absolute, or relative to the current position of the axis. | '''Absolute''' – Defines whether a Move command’s target position is absolute, or relative to the current position of the axis. | ||
| + | |||
'''PEMax''' – The maximum allowed error between the PCMD and the PFB. If the error exceeds this value, an error is generated and the axis is brought to an immediate stop. | '''PEMax''' – The maximum allowed error between the PCMD and the PFB. If the error exceeds this value, an error is generated and the axis is brought to an immediate stop. | ||
| + | |||
| + | <br/> | ||
==== Operation Mode ==== | ==== Operation Mode ==== | ||
'''OpMode''' – The operation mode of the axis: position, velocity or torque. | '''OpMode''' – The operation mode of the axis: position, velocity or torque. | ||
| + | |||
| + | <br/> | ||
==== Simulation or Actual Axes ==== | ==== Simulation or Actual Axes ==== | ||
'''Simulated''' - Defines whether the axis is simulated or real. | '''Simulated''' - Defines whether the axis is simulated or real. | ||
| + | |||
| + | <br/> | ||
=== Enable Axes === | === Enable Axes === | ||
| − | After the axes’ properties are defined, both axes must be enabled to allow motion. | + | After the axes’ properties are defined, both axes must be enabled to allow motion. |
| + | |||
This is done by invoking the function '''Enable_Disable_Drive''' (ax as generic axis, byval EnDes as long) as long. | This is done by invoking the function '''Enable_Disable_Drive''' (ax as generic axis, byval EnDes as long) as long. | ||
| + | |||
(BOOKMARK: '''ENABLE'''). | (BOOKMARK: '''ENABLE'''). | ||
| + | |||
| + | <br/> | ||
=== Move Command === | === Move Command === | ||
A simple Move command includes an axis name and a target position as arguments. It may be more complex. | A simple Move command includes an axis name and a target position as arguments. It may be more complex. | ||
| + | |||
The infinite '''while loop''' issues Move commands to the axes, and waits for them to settle before issuing a new command to move to different target positions. | The infinite '''while loop''' issues Move commands to the axes, and waits for them to settle before issuing a new command to move to different target positions. | ||
| + | |||
The parameter '''IsMoving''' indicates whether an axis is moving or stopped, so that the next Move command can be issued. | The parameter '''IsMoving''' indicates whether an axis is moving or stopped, so that the next Move command can be issued. | ||
| + | |||
(BOOKMARK: '''MOVE'''). | (BOOKMARK: '''MOVE'''). | ||
| + | |||
(BOOKMARK: '''ISMOVING'''). | (BOOKMARK: '''ISMOVING'''). | ||
| − | + | <br/> | |
| + | |||
| + | = Sample Program: Master Slave = | ||
The file''' MAS_SLAV.PRG''' is similar to the previous file, MOVE_2AX.PRG. It has an additional subroutine, which sets one axis as a slave of the other axis’ position command (PCMD). Move commands are issued to the master axis only, and the slave axis follows without an explicit command. | The file''' MAS_SLAV.PRG''' is similar to the previous file, MOVE_2AX.PRG. It has an additional subroutine, which sets one axis as a slave of the other axis’ position command (PCMD). Move commands are issued to the master axis only, and the slave axis follows without an explicit command. | ||
| Line 424: | Line 629: | ||
After the axes’ properties are defined, the subroutine''' SetMasterSlave''' (GenMaster as generic axis, GenSlave as generic axis) is invoked, and sets SlaveAxis as slave of the PCMD of MasterAxis. | After the axes’ properties are defined, the subroutine''' SetMasterSlave''' (GenMaster as generic axis, GenSlave as generic axis) is invoked, and sets SlaveAxis as slave of the PCMD of MasterAxis. | ||
| + | |||
The rest of the program is the same. | The rest of the program is the same. | ||
| − | < | + | <pre> |
'****************************** Mater Slave Program ************************************* | '****************************** Mater Slave Program ************************************* | ||
' | ' | ||
| Line 626: | Line 832: | ||
end sub | end sub | ||
| − | </ | + | </pre> |
| + | <br/> | ||
Latest revision as of 06:07, 10 August 2017
| Language: | English • 中文(简体) |
|---|

Contents
Overview
This tutorial is a quick introduction to help you begin operating the softMC using the MC-Basic language and ControlStudio software.
MC-Basic (Motion Control BASIC) is a proprietary programming language developed by Servotronix for use with the softMC. It is based on standard BASIC programming language, with extensive enhancements for multi-tasking and motion control functionalities. The Terminal pane in ControlStudio gives you access to the MC Basic environment.
ControlStudio is a PC-based graphical user interface for developing, running, and testing motion applications that will be controlled and/or coordinated by the softMC. ControlStudio contains a programming editor, data recorder, debugger and monitoring tools. Once the application programs are completed, the PC can be removed and the softMC controller can operate standalone or within a network.
For downloads and more information about the softMC hardware and software systems, use the resources available on the Servotronix website.
Three files are used in the procedures in this training manual. They should be supplied in a compressed file, and extracted to a folder on the user’s PC.
- CONFIG.PRG
- MOVE_2AX.PRG
- MAS_SLAV.PRG
MC-Basic Fundamentals
Using MC-Basic you can issue commands to the softMC and retrieve data from it. These operations can be executed from a program that is loaded and run in the softMC, or by entering commands directly to the softMC by means of the Terminal pane in ControlStudio.
General Purpose Tasks (*.prg)
- User program.
- Defines the work to be performed by the motion controller.
- Runs simultaneously with, and independently of, other tasks.
General Purpose Libraries (*.lib)
- User (shared) libraries.
- Collection of frequently used subroutines and functions in MC-Basic.
- Subroutines and function in libraries can be called by tasks and other libraries.
- Libraries are global if loaded from config.prg or by command loadglobal;
- libraries are local if loaded by command load.
- Public functions in global libraries can be called from anywhere , without explicit import;
- Public functions in local libraries can be called from other libraries and programs, but require command import (see wiki: MC-Basic:IMPORT).
Configuration (config.prg) Refer to the section Loading Config.prg.
- Used primarily to declare global objects and load all global libraries.
- Automatically loads and runs once at power up if variable system.dipswitch.6 = 1. (see wiki: MC-Basic:SYSTEM.DIPSWITCH).
- Runs whenever command reset all is executed.
Autoexecute (autoexec.prg)
- Used to start the application tasks.
- Loads and runs automatically once at power up if variable system.dipswitch.6 = 1. (see wiki: MC-Basic:SYSTEM.DIPSWITCH).
Reset all
- The command reset all clears all tasks and variables from system memory, and loads and runs CONFIG.PRG.
- After powering up the softMC, you must execute reset all from the terminal in order to load the configuration file for the first time.
Queries
- Queries are prefixed with the character ?.
- Following are a few examples of queries and the responses they produce.
|
?<axis>.En ?<axis>.Enable |
Possible responses:
|
|
?<axis>.PCMD ?<axis>.PositionCommand |
Returns the position command |
|
?<axis>.PFB ?<axis>.PositionFeedback |
Returns the actual position of the motor |
|
?<axis>.VCMD ?<axis>.VelocityCommand |
Returns the velocity command |
|
?<axis>.VFB ?<axis>.VelocityFeedback |
Returns the actual velocity of the axis |
|
?<axis>.IsMoving |
Possible responses:
|
|
?axislist |
Displays the names of the existing axes in the system. |
|
?tasklist |
Displays a list of the current tasks in the system and their status. |
|
?system.information |
Displays basic information about the system. |
Loading Config.prg
A sample CONFIG.PRG file is shown here. It contains a minimal configuration, which defines the number and name of four axes in a system.
- In ControlStudio, select File > Open to open the Config.prg file provided for this training.
Its contents are displayed in the Program Editor pane at the bottom of the screen. Refer to Figure 1. - Click the Load button in the toolbar.
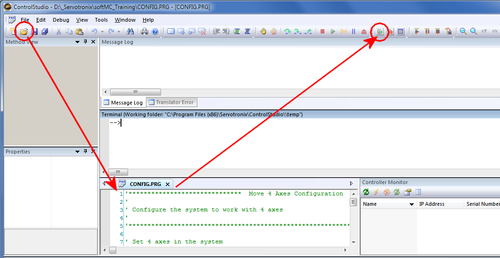
- Figure 1. Open and Load Config.prg

'***************************  Move 4 Axes Configuration  **********************************
'
' Configure the system to work with 4 axes
'
'******************************************************************************************

' Set 4 axes in the system
System.NumberAxes = 4

'''Program'''

	sys.DoubleFormat=1
	sys.nomotion = 1

	' Set axes names
	A1.AxisName = X_AXIS
	A2.AxisName = Y_AXIS

	A3.AxisName = MasterAxis
	A4.AxisName = SlaveAxis

	Print "MC Training - 4 Axes system"

'''End program'''
Opening, Loading and Running a Task
- In ControlStudio, select File > Open.
- Select an MC-Basic program, such as MOVE_2AX.PRG.
Its contents are displayed in the Program Editor pane. Refer to Figure 2. - Click the Load button in the toolbar.
The task is now listed in the Task Manager, in the state Ready. - Click the Run button to execute the task.
Figure 2. Load and Run Task File
Monitoring Variables
ControlStudio provides several methods for monitoring the system and collecting data.
Terminal
Use the Terminal pane to query one or more parameters using an MC-Basic command; for example:
?X_AXIS.EN
?X_AXIS.PFB, Y_AXIS.PFB
Watch Variables
Use the Watch Variables pane.
- Select View > Watch.
- In the first row, enter the name of a variable in the first row.
Its value will be continuously updated and displayed.
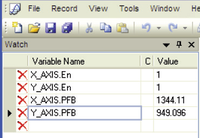
- Figure 3. Watch Variables pane

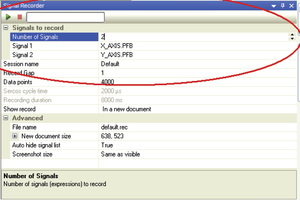
Signal Recorder
Use the Signal Recorder.
- Select View > Signal Recorder. Refer to Figure 4.
- Click in the first row, and use the up/down arrows to define the Number of signals to be recorded.
- Click in each Signal number row, and enter the names of the variables to be recorded.
- The parameter Data Points determines the length of the recording.
- To start recording, click the Play button.
Note that clicking the Stop button aborts the recording and produces no results. - After the recording is completed, the results are displayed in a new tab in the Editor pane. The tab is named default.rcv.
Refer to Figure 5 and Figure 6.
- Figure 4. Signal Recorder pane

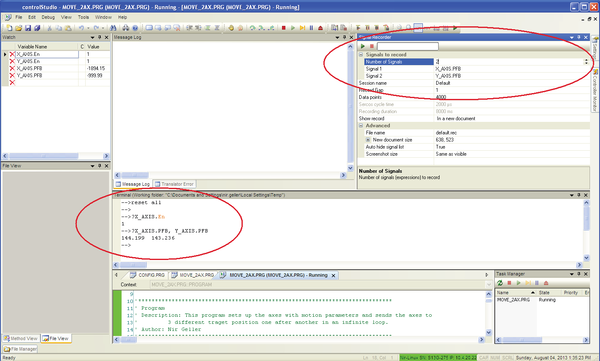
- Figure 5. Watch Variables and Signal Recorder

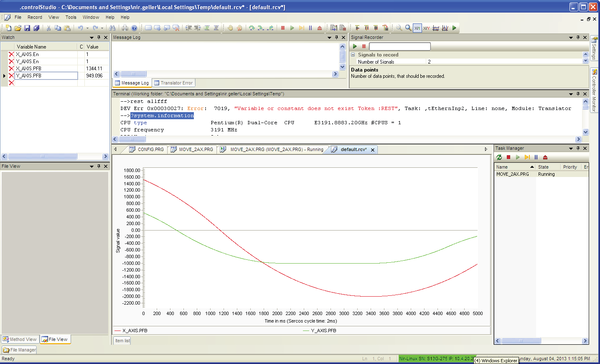
- Figure 6. Plot of recording is automatically displayed

Realtime Display
Use the Realtime Display
- Select View > Signal Recorder.
- Enter the variables you want to monitor, such as the positions of axes.
- Click the Play button.
Refer to Figure 7.

Figure 7. Realtime display of variable values
Debugging
In ControlStudio you can load a program and debug it by setting breakpoints and stepping through code lines.
A breakpoint can be set only after a program is loaded and appears in a new tab.
Place the blinking cursor in the line at which you want the program to stop.
Press the Insert/Remove Breakpoint button on the toolbar.
Alternately, press F9 to toggle the breakpoint.
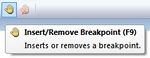
- Figure 8. Insert/Remove Breakpoint button

It is also possible to run the program step-by-step from the first line of the program. After loading the task a yellow arrow points to the first line of the program. To run the program line by line, use the Step Over, Step Into and Step Out buttons on the toolbar.
Refer to Figure 9.

Figure 9. Debugging, breakpoints, stepping buttons
Sample Program: Move 2 Axes
The file MOVE_2AX.PRG consists of a program, a function and a subroutine.
This examples shows how an MC-Basic program cyclically and infinitely moves two axes to three different target position.
Note the “BOOKMARK” comments within the program. These blocks of code are explained in the sections following the program.
'******************************  Move 2 Axes Program  *************************************
'
' This application will move 2 simulated axes to 3 different positions in an infinite loop
'
'******************************************************************************************


'****************************************************************************
' Program
' Description: This program sets up the axes with motion parameters and sends the axes to
'		 3 different traget position one after another in an infinite loop.
' Author: Nir Geller
'****************************************************************************
Program

    dim retVal as long = 0


' BOOKMARK: ATTACH
	attach X_AXIS
	attach Y_AXIS


' BOOKMARK:	AXESSETUP
	' Setup Axes motion parameters
	call AxisSetup(X_AXIS)
	call AxisSetup(Y_AXIS)


' BOOKMARK:	ENABLE
	' Enable Axes
	retVal = Enable_Disable_Drive(X_AXIS, ON)
	if retVal = -1 then
		goto PROGRAM_ERROR
	end if

	retVal = Enable_Disable_Drive(Y_AXIS, ON)
	if retVal = -1 then
		goto PROGRAM_ERROR
	end if

	while 1

' BOOKMARK:	MOVE
		' Move axes to first waypoint (2000, 1000)
		Move X_AXIS 2000
		Move Y_AXIS 1000

		sleep 5

' BOOKMARK:	ISMOVING
		' Wait for axes to reach first waypoint
		while X_AXIS.IsMoving <> 0
			sleep 5
		end while

		while Y_AXIS.IsMoving <> 0
			sleep 5
		end while
		' *****************************************

		' Move axes to second waypoint  (-2000, -1000)
		Move X_AXIS -2000
		Move Y_AXIS -1000

		sleep 5

		' Wait for axes to reach second waypoint
		while X_AXIS.IsMoving <> 0
			sleep 5
		end while

		while Y_AXIS.IsMoving <> 0
			sleep 5
		end while
		' *****************************************

		' Move axes to third waypoint  (0,0)
		Move X_AXIS 0
		Move Y_AXIS 0

		sleep 5

		' Wait for axes to reach third waypoint
		while X_AXIS.IsMoving <> 0
			sleep 5
		end while

		while Y_AXIS.IsMoving <> 0
			sleep 5
		end while
		' *****************************************

	end while  '   an infinite loop


PROGRAM_ERROR:

	' Disable Axes
	retVal = Enable_Disable_Drive(X_AXIS, OFF)
	retVal = Enable_Disable_Drive(Y_AXIS, OFF)

	detach X_AXIS
	detach Y_AXIS

End Program


'****************************************************************************
' Subroutine Name: AxisSetup
' Description: This subroutine sets all the axis parameters according to the desired
'              motion profile (e.g. Cruise Velocity, Acceleration...)
' Called From: Program
' Author: Nir Geller
' Input Parameters: Name of an axis
' Output Parameters: None
' Return Value: None
'****************************************************************************
Sub AxisSetup(GenAxis as generic axis)

    dim sercos_cycle_time as long = 0.004
    dim ohmega as long = 0

	ohmega = 12 '0.899999*pi/(5 * sercos_cycle_time)

    with GenAxis

        en = 0
' BOOKMARK:	POSITION FACTOR
        pfac = 30000/100/pi 'mm
        vfac = pfac/1000     'work in mm
        afac = vfac/1e3      'accel in mm per second
        jfac = afac/1e3      'jerk in mm per second squared

        vmax = 3000
        vospd = 1.2 * vmax
        vcruise = 1500

        amax = 200
        dmax = amax
        acc = amax

        dec = dmax

        decstop = dec

        jmax = ohmega * amax
        smoothfactor = -1

        starttype = GCom
        proceedtype = cmot

        PEDel = 1
        absolute = 1

        pemax=10000

        velocitysafetylimit = 10000
        opmode = positionmode

		Simulated = 1 ' Axis is simulated

    end with

end Sub

'****************************************************************************
' Function Name: Enable_Disable_Drive
' Description: Enable or disable a drive according to CW bits
' Called From: Program
' Author: Nir Geller
' Input Parameters: generic axis
'                    Enable/Disable flag
' Output Parameters: None
' Return Value: 0 on success, -1 if failed
' Algorithm:
' Global Variables Used:
' Revisions:
'****************************************************************************
Function Enable_Disable_Drive(ax as generic axis, byval EnDes as long) as long

    dim counter as long = 0

    Enable_Disable_Drive = 0

    ax.en = EnDes
    counter = 0

    while EnDes <> ax.en AND counter < 10
        sleep 1
        counter = counter + 1
    end while

    if ax.en <> EnDes then
        'throw ec_slave_home_err_enable 'failed to enable axis
        Enable_Disable_Drive = -1
    end if

End Function
Attach
The task must be attached to an axis in order to control the axis. This is performed by means of the command ATTACH. (BOOKMARK: ATTACH).
Axes Setup Subroutine
Once the task is attached to the axes, the task sets the parameters for axis motion according to a particular motion profile. This is performed by means of the subroutine AXESSETUP (Axis Name).
(BOOKMARK: AXESSETUP).
Position Factor
(BOOKMARK: POSITION FACTOR).
The position factor specifies the conversion factor between the user’s position units and the internal units (encoder counts).
In this example, 30000 counts per one encoder cycle are converted into one cycle of an axis whose diameter is 100 mm; this results in position units in millimeters. For example, when a Move command to target position 1000 is issued, the motor will turn the exact number of times to yield a tangential movement of 1000 mm.
Velocity, Acceleration and Jerk Factors
VMax – The maximum allowed axis velocity. Since some commands, such as velocity override, may accelerate the axis beyond its cruise velocity, VMax sets a maximum value can never be exceeded.
VOspd – Velocity overspeed. If a command is issued to the axis to move at a speed that exceeds Vospd, an error is generated and the axis is brought to an immediate stop.
VCruise – The cruise velocity of a normal Move or Jog command.
Acc, Dec – The acceleration and deceleration of the axis.
Amax, DMax – The maximum allowed values for acceleration and deceleration.
DecStop – The deceleration value that will be used when a Stop command is issued to the axis.
JMax – The maximum allowed value of Jerk.
Positioning
Absolute – Defines whether a Move command’s target position is absolute, or relative to the current position of the axis.
PEMax – The maximum allowed error between the PCMD and the PFB. If the error exceeds this value, an error is generated and the axis is brought to an immediate stop.
Operation Mode
OpMode – The operation mode of the axis: position, velocity or torque.
Simulation or Actual Axes
Simulated - Defines whether the axis is simulated or real.
Enable Axes
After the axes’ properties are defined, both axes must be enabled to allow motion.
This is done by invoking the function Enable_Disable_Drive (ax as generic axis, byval EnDes as long) as long.
(BOOKMARK: ENABLE).
Move Command
A simple Move command includes an axis name and a target position as arguments. It may be more complex.
The infinite while loop issues Move commands to the axes, and waits for them to settle before issuing a new command to move to different target positions.
The parameter IsMoving indicates whether an axis is moving or stopped, so that the next Move command can be issued.
(BOOKMARK: MOVE).
(BOOKMARK: ISMOVING).
Sample Program: Master Slave
The file MAS_SLAV.PRG is similar to the previous file, MOVE_2AX.PRG. It has an additional subroutine, which sets one axis as a slave of the other axis’ position command (PCMD). Move commands are issued to the master axis only, and the slave axis follows without an explicit command.
Since the two axes must have identical motion profiles, the axis setup is the same for both axes.
After the axes’ properties are defined, the subroutine SetMasterSlave (GenMaster as generic axis, GenSlave as generic axis) is invoked, and sets SlaveAxis as slave of the PCMD of MasterAxis.
The rest of the program is the same.
'******************************  Mater Slave Program  *************************************
'
' This application will set one axis as a master, and another axis as a slave of the
' position command of the first axis.
'
'******************************************************************************************


'****************************************************************************
' Program
' Description: This program sets up the axes with motion parameters and sends the axes to
'		 3 different traget position one after another in an infinite loop.
' Author: Nir Geller
'****************************************************************************
Program

    dim retVal as long = 0

	attach MasterAxis
	attach SlaveAxis

	' Setup Axes motion parameters
	call AxisSetup(MasterAxis)
	call AxisSetup(SlaveAxis)

	' Set master-slave relations
	call SetMasterSlave(MasterAxis, SlaveAxis)

	' Enable Axes
	retVal = Enable_Disable_Drive(MasterAxis, ON)
	if retVal = -1 then
		goto PROGRAM_ERROR
	end if

	retVal = Enable_Disable_Drive(SlaveAxis, ON)
	if retVal = -1 then
		goto PROGRAM_ERROR
	end if

	while 1

		' Move axes to first waypoint (5000)
		Move MasterAxis 5000

		sleep 5

		' Wait for axes to reach first waypoint
		while MasterAxis.IsMoving <> 0
			sleep 5
		end while
		' *****************************************


		' Move axes to second waypoint  (-4000)
		Move MasterAxis -4000

		sleep 5

		' Wait for axes to reach first waypoint
		while MasterAxis.IsMoving <> 0
			sleep 5
		end while
		' *****************************************


		' Move axes to third waypoint  (0)
		Move MasterAxis 0

		sleep 5

		' Wait for axes to reach first waypoint
		while MasterAxis.IsMoving <> 0
			sleep 5
		end while
		' *****************************************

	end while  '   an infinite loop

PROGRAM_ERROR:

	' Disable Axes
	retVal = Enable_Disable_Drive(MasterAxis, OFF)
	retVal = Enable_Disable_Drive(SlaveAxis, OFF)

	detach MasterAxis
	detach SlaveAxis

End Program

'****************************************************************************
' Subroutine Name: AxisSetup
' Description: This subroutine sets all the axis parameters according to the desired
'              motion profile (e.g. Cruise Velocity, Acceleration...)
' Called From: Program
' Author: Nir Geller
' Input Parameters: Name of an axis
' Output Parameters: None
' Return Value: None
'****************************************************************************
Sub AxisSetup(GenAxis as generic axis)

    dim sercos_cycle_time as long = 0.004
    dim ohmega as long = 0

	ohmega = 12 '0.899999*pi/(5 * sercos_cycle_time)

    with GenAxis

        en = 0
        pfac = 30000/100/pi 'mm
        vfac = pfac/1000     'work in mm
        afac = vfac/1e3      'accel in mm per second
        jfac = afac/1e3      'jerk in mm per second squared

        vmax = 3000
        vospd = 1.2 * vmax
        vcruise = 1500

        amax = 200
        dmax = amax
        acc = amax

        dec = dmax

        decstop = dec

        jmax = ohmega * amax
        smoothfactor = -1

        starttype = GCom
        proceedtype = cmot

        PEDel = 1
        absolute = 1

        pemax=10000

        velocitysafetylimit = 10000
        opmode = positionmode

		Simulated = 1 ' Axis is simulated

    end with

end Sub

'****************************************************************************
' Function Name: Enable_Disable_Drive
' Description: Enable or disable a drive according to CW bits
' Called From: Program
' Author: Nir Geller
' Input Parameters: generic axis
'                    Enable/Disable flag
' Output Parameters: None
' Return Value: 0 on success, -1 if failed
' Algorithm:
' Global Variables Used:
' Revisions:
'****************************************************************************

Function Enable_Disable_Drive(ax as generic axis, byval EnDes as long) as long

    dim counter as long = 0

    Enable_Disable_Drive = 0

    ax.en = EnDes
    counter = 0

    while EnDes <> ax.en AND counter < 10
        sleep 1
        counter = counter + 1
    end while

    if ax.en <> EnDes then
        'throw ec_slave_home_err_enable 'failed to enable axis
        Enable_Disable_Drive = -1
    end if

End Function

'****************************************************************************
' Function Name: SetMasterSlave
' Description: Set GenSlave as a slave of the PCMD of GenMaster
' Called From: Program
' Author: Nir Geller
' Input Parameters: Slave axis, Master axis
' Output Parameters: None
' Return Value: None
'****************************************************************************
sub SetMasterSlave(GenMaster as generic axis, GenSlave as generic axis)

	GenSlave.MasterSource = GenMaster.Pcmd
	GenSlave.slave = GEAR

end sub