Difference between revisions of "Control Studio"
m (→Procedure) |
m (→Procedure) |
||
| Line 62: | Line 62: | ||
#Chose either one of the options: <br><br /> | #Chose either one of the options: <br><br /> | ||
#:(A) Select the option '''Obtain an IP address automatically''' to connect to an IP address that the network provides, and press Apply. | #:(A) Select the option '''Obtain an IP address automatically''' to connect to an IP address that the network provides, and press Apply. | ||
| − | #:You can press Show Config to view the | + | #:You can press Show Config to view the IP address details.<br><br /> |
#:[[image: IP_12.png|250px]] <br><br /> | #:[[image: IP_12.png|250px]] <br><br /> | ||
#:(B) Select the option '''Static IP address''' to configure a user-defined address (defined in Step 4), enter the required info in the fields, and press Apply.<br><br /> | #:(B) Select the option '''Static IP address''' to configure a user-defined address (defined in Step 4), enter the required info in the fields, and press Apply.<br><br /> | ||
Revision as of 10:28, 7 May 2018
| Language: | [[::Control Studio|English]] • [[::Control Studio/zh-hans|中文(简体)]] |
|---|

Contents
ControlStudio Overview
ControlStudio software is a development tool for motion applications. It contains a programming editor, data recorder, debugger and monitoring tools.
- ControlStudio is the integrated development environment (IDE) for the softMC.
- Used to write programs (tasks), debug tasks, record data.
- Graphical user interface.
- Provides a command line interface (terminal) to the softMC

IP Configurator
IP Configurator Introduction
The IP Configurator tool helps you define a new (static) IP address, or determine an unknown IP address of the softMC.
To use the IP Configurator, the following are required:
- Computer running ControlStudio
- sofMC 3 | softMC 7 | softMC 703
- Ethernet cable for connection between your network and the softMC
- Serial cable for connection between the softMC and the host computer
- DC power supply for the softMC
Note: The host PC’s IP address must be in the same subnet as the addresses in the ControlStudio IP pool
Procedure
To configure a static IP address for the softMC, perform the following procedure.
- Make sure the softMC is connected to the power supply, to the network (Ethernet cable), and to the computer COM port (serial cable from softMC COM1 port).
- Activate ControlStudio.
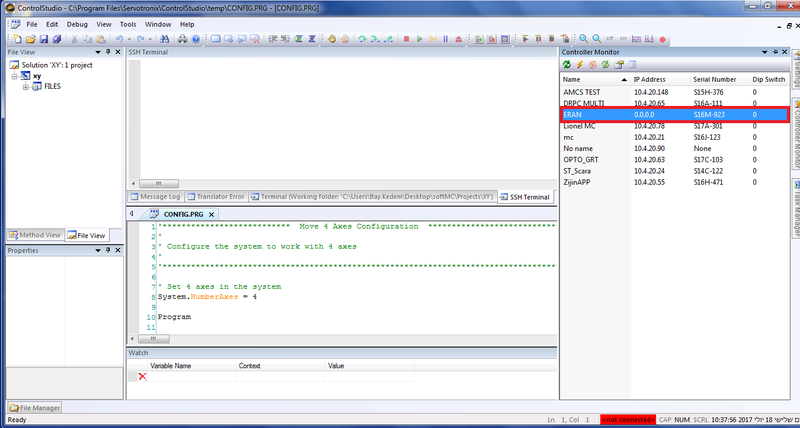
- In ControlStudio, open the Controller Monitor pane at the right side of the screen.
- The pane displays a list of devices connected to your network and their IP addresses.
- 0.0.0.0 in the IP Address column indicates that the IP address of the softMC is not configured, or cannot be detected.
- Determine a suitable IP address in your network for the softMC configuration.
- Check with the network manager of your site for a usable IP address.
- Also get the details for Subnet Mask and Default Geteway.
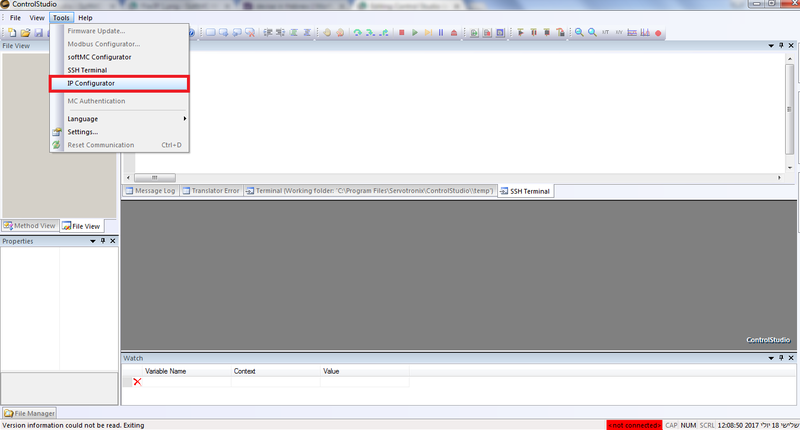
- In ControlStudio, open the Tools menu, and select IP Configurator.
- The IP Configurator prompt appears.
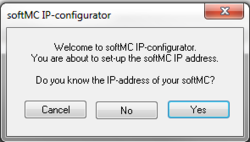
- If you know the IP address of the softMC, press Yes.
- (If you do not know the IP address, skip to Step 7.)
- The Connect via Network dialog box opens.
- Enter the required information in all 3 fields, and press Connect.
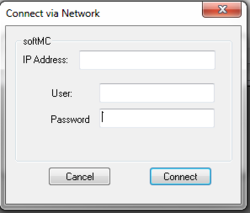
- The softMC will now appear in the Controller Monitor pane with the new IP address, ready for connection.
- Continue at Step 8 - Set IP dialog box.
- (If you do not know the IP address, skip to Step 7.)
- If you do not know the IP address of the softMC, press No.
- The Connect via COM dialog box opens, and prompts you to connect the softMC COM1 port to the computer.
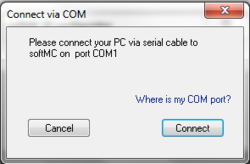
- If you cannot identify the COM1 port, press Where is my COM port? The software will display image to help you locate the correct port.
- If the softMC is connected properly, press Connect.
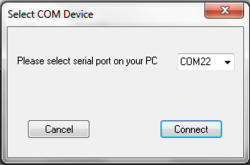
- The Select COM Device dialog box opens, and prompts you to select the serial port on your PC that is connected to the softMC.
- Select the correct serial port, and press Connect.
- The Connect via COM dialog box opens, and prompts you to connect the softMC COM1 port to the computer.
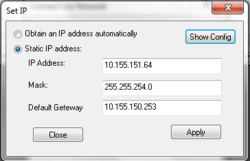
- The Set IP dialog box opens.
- Chose either one of the options:
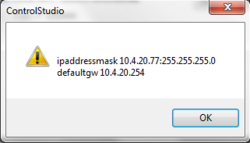
- (A) Select the option Obtain an IP address automatically to connect to an IP address that the network provides, and press Apply.
- You can press Show Config to view the IP address details.
- (B) Select the option Static IP address to configure a user-defined address (defined in Step 4), enter the required info in the fields, and press Apply.


—————————————————————————————
Step 1 - Connect your softMC to the power supply, the network - with the Ethernet cable, and to the computer - from COM1 (as shown), with the serial cable.

run ControlStudio and turn on your softMC.
Step 2 - In the ControlStudio, go to controller Monitor menu at the right side of the screen. There you will see the devices which connect to your network, without any information about your new unknown softMC or with device that doesn't have IP address:
Step 3 - According to your network properties - choose an IP address or get one from your network manager.
You can check the address availability by using windows command tool (CMD), with ping command as shown here in yellow:

Additional information about your address will be found in the same window, using the ipconfig command:

The information that required to us is the Subnet Mask and the default Geteway:

Step 4 - In the ControlStudio, at the menu bar - choose Tools → IP Configurator.
Step 5 - New window will open.
- In case you already know the device IP address - choose Yes button. A Connect Via Network window will pop-up - fill the blank spaces with the correct information and press the Connect button.
You will find your sofMC, with the known IP address, at the controller Monitor menu ready to connect.
- In case you don't know softMC IP address - choose No button. A Connect Via COM window will pop-up. In this window you will be asked about the connection between the softMC and your PC - the COM1 port. If you don't sure how to locate it - press Where is my COM port? link or go back to Step 1 for the picture. If the softMC connected properly - choose the Connect button.
Step 6 - New window will open - Select COM Device. In this window you'll have to choose the serial port in your PC that attached to the softMC
After the right port as been selected - press the Connect button.
step 7 - The Set IP window will open.
- In case you know that your softMC has modified and already have an IP address - you can choose Obtain an IP address automatically option to use the former address, and press the Apply button. The details of the IP address will show up when you press the Show Config button.
Now you can find and connect to the softMC with the same IP address in the controller Monitor menu at the right, and close the IP Configurator.

- In case you don't know any former information about the IP address, you should choose Static IP address option, and fill the blank spaces with the information you gain at Step 3 - the IP address you choose, subnet mask and default geteway - now choose Apply button.
You can find and connect to the softMC with the new IP address in the controller Monitor on the right, and close the IP Configurator.

| NOTE | |
| After setting the new data about the IP address, the IP Configurator will ask you to reboot the softMC - approve that to ratify the new setting |

SSH Terminal
Description
Getting Started
| NOTE | |
| This manual is under the assumption that the ControlStudio already connected to a robot or a simulator. |
step 1 - At the menu bar, under the Tools tab - choose the SSH Terminal button.

step 2 - A new window will be opened. In this window you need to confirm the folowing:
- IP address that belong to your robot/simulator.
- Your username and password to access your robot/simulator.

step 3 - Back to the menu bar, under the view tab - choose the SSH Terminal button.

step 4 - The SSH Terminal interface will be opend, ready for yout commands.

Example
In this example we use the ls command - that provide list of files in the current working directory.
| NOTE | |
| The SSH Terminal operated by Linux commands. |
Step 1 - In the SSH terminal window add the command you want to activated, and press the enter button.

Step 2 - In the same window, you will get the information you asked for.

MC Authentication
Description
softMC Authentication provide you a security and safety tool, which define password to working softMC. This system prevent situation that while working with system controlled by softMC and ControlStudio, someone else connect to your system and move it. Duplicate connection can cause in some scenario serious accident or injury, and can prevent using this manual.
Authentication Set-Up
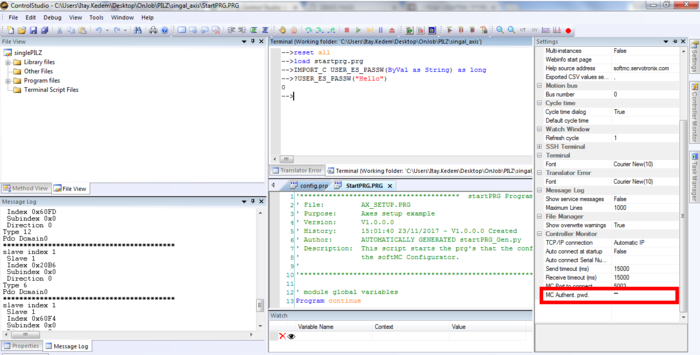
To activate Authentication system you should import "C" subroutine called USER_ES_PASSW as shown bellow.
After import the subroutine you can define password for your softMC by using - ?USER_ES_PASSW("*****").
Replace ***** with your own password, in String format.
Step to set-up:
At your ControlStudio terminal send the following commands:
-->reset all
-->load startprg.prg                                'can be also AUTOEXEC.PRG
-->IMPORT_C USER_ES_PASSW(ByVal as String) as long  'activated the subroutine
-->?USER_ES_PASSW("Hello")                          'define new password
| NOTE | |
| If you receive back "0" from softMC (at terminal) - new password definition complete. In case of an error you will receive an error message. |
In this case we define new password ("Hello") for our softMC. Now it's necessary to define the chosen password to ControlStudio:
- At ControlStudio open Settings window.
- Under Controller Monitor label you will find MC Authent. pwd.. Put your new password at the right side of the parameter. Step out of the setting window
- At the bar menu go to: Tools → MC Authentication, and press the button.
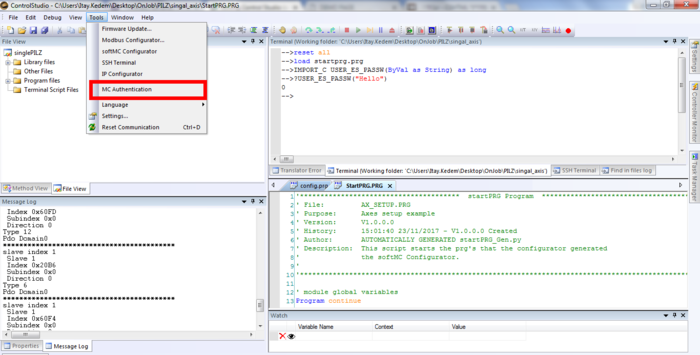
- Now your softMC protected with a password which you choose.


From now on users which connect to your softMC and want to send any commands to your system using ControlStudio, needs to put the right password the way explained to make any change.
Not Allowed Users
Not allowed users will receive the following message:
DEV Err 0x00030027: Error: 5053, "Password authentication required", Task: ,tEthernInp0, Line: none, Module: Entry_Station
In this situation the user will be able to get information about the system like positions, velocities, system parameters etc. But won't be able to rewrite any system parameter.
For example:

In this example user get information about axis status, but can't change this status.