Difference between revisions of "6-Axis Puma robot Setup/zh-hans"
| Line 1: | Line 1: | ||
| − | {{Languages}} | + | {{Languages|6-Axis_Puma_robot_Setup}} |
这是一个使用配置器设置6轴PUMA机器人的教程。 <br /> | 这是一个使用配置器设置6轴PUMA机器人的教程。 <br /> | ||
---------------------------------------------------------------------------------------------------------------------------------------------- | ---------------------------------------------------------------------------------------------------------------------------------------------- | ||
| Line 36: | Line 36: | ||
首先,您需要配置驱动器和轴。<br /> | 首先,您需要配置驱动器和轴。<br /> | ||
在项目窗口中,左窗格显示识别的驱动器和轴。 <br /> | 在项目窗口中,左窗格显示识别的驱动器和轴。 <br /> | ||
| − | + | 注意: 只有EtherCAT驱动器可以自动识别, CANopen驱动器需要手动添加。 <br /> | |
| − | + | 注意: 如果配置一个模拟的机器人,忽略驱动器配置部分。<br /> | |
<br /> | <br /> | ||
| − | ''' | + | '''驱动器''' <br /> |
| − | + | 点击第一个驱动器,其配置窗口将显示: <br /> | |
| − | + | 最低要求: <br /> | |
| − | 1. | + | 1. 选择"Initial Active OpMode"。选择: "8 - cyclic_synchronous_position". <br /> |
| − | 2. | + | 2. 连接驱动器对应的轴。 在"Link Driver To Axis"选择正确的轴。 <br /> |
| − | 3. | + | 3. 最后, 点击"Apply"按钮 <br /> |
| − | + | 对每个使用的驱动器重复以上步骤。 <br /> | |
[[File:drive_configuration.png]]<br /> | [[File:drive_configuration.png]]<br /> | ||
<br /> | <br /> | ||
| − | ''' | + | '''轴''' <br /> |
| − | + | 点击第一个轴,其配置窗口将显示: <br /> | |
| − | + | 最低要求: <br /> | |
| − | 1. | + | 1. 选择 "Axis Type". 选择: "Rotary Gear" 用于PUMA机器人。 <br /> |
| − | 2. | + | 2. 将减速比值设置为正确的值。 <br /> |
| − | + | 对每个使用的轴重复以上步骤。 <br /> | |
[[File:axis_configuration.png]]<br /> | [[File:axis_configuration.png]]<br /> | ||
<br /> | <br /> | ||
| − | + | 轴的配置窗口有很少的选项卡。<br /> | |
| − | + | "Properties" 选项卡允许设置轴属性。 请根据需求和制造说明,适当地设定各轴的性能。 <br /> | |
| − | + | 注意: 如果配置一个模拟的机器人, 将所有轴 "Simulated Axis" 属性更改为 "True"。<br /> | |
<br /> | <br /> | ||
| − | == | + | == 配置PUMA机器人 == |
| − | + | 右键单击左窗格中的 "Groups"图标, 然后选择 "Add Group".<br /> | |
[[File:add_group.png]]<br /> | [[File:add_group.png]]<br /> | ||
| − | + | 在弹出窗口中,按照以下步骤操作: <br /> | |
| − | 1. | + | 1. 选择 "Robot" <br /> |
| − | 2. | + | 2. 设置"Group name" (在该示例中名称为PUMA) <br /> |
| − | 3. | + | 3. 选择 "puma xyzypr" 机器人 <br /> |
| − | 4. | + | 4. 双击添加相应轴到 "Assigned Axes"列表。 当轴组选择正确时, the "Assigned Axes"框将变为绿色。<br /> |
| − | 5. | + | 5.点击OK按钮 <br /> |
[[File:add_group_instructions.png]] <br /> | [[File:add_group_instructions.png]] <br /> | ||
<br /> | <br /> | ||
| − | + | 现在,将显示机器人/组配置窗口。 有一些选项卡: | |
=== General tab === | === General tab === | ||
| − | + | 此选项卡允许切换连接到组的轴,并更改轴属性 <br /> | |
=== Coupling tab === | === Coupling tab === | ||
| − | + | 此选项卡允许设置: <br /> | |
| − | 1. | + | 1. 机器人的耦合矩阵(puma机器人通常不改变)。 <br /> |
| − | 2. | + | 2. 关节位置限制。 <br /> |
[[File:puma_coupling_tab.png]] <br /> | [[File:puma_coupling_tab.png]] <br /> | ||
=== Properties tab === | === Properties tab === | ||
| − | + | 此选项卡允许设置机器人属性,如:位置限制,速度限制,加速限制等。 <br /> | |
[[File:puma_properties_tab.png]] <br /> | [[File:puma_properties_tab.png]] <br /> | ||
=== Configuration tab === | === Configuration tab === | ||
| − | + | 此选项卡有3个子选项卡: <br /> | |
| − | ==== 1. DH Parameters | + | ==== 1. DH Parameters 选项卡 ==== |
| − | + | 此选项卡允许设置PUMA机器人的DH参数。 请与此选项卡中提供的图纸对应设置的这些值。 <br /> | |
[[File:puma_DH_parameters_tab.png]] <br /> | [[File:puma_DH_parameters_tab.png]] <br /> | ||
| − | ==== 2. Frames/Locations | + | ==== 2. Frames/Locations 选项卡 ==== |
| − | + | 此选项卡允许设置PUMA机器人位置向量,例如机器人基座所在的位置或工具相对于第六关节坐标系的位置。 <br /> | |
[[File:puma_DH_parameters_tab.png]] <br /> | [[File:puma_DH_parameters_tab.png]] <br /> | ||
| − | ==== 3. Theta Parameters | + | ==== 3. Theta Parameters 选项卡 ==== |
| − | + | 此选项卡允许设置PUMA零位置。 PUMA机器人的默认零位置如左图所示。 <br /> | |
| − | + | 您可以为零位置选择其他选项- 只需按所需的图像将此配置设置为零位置即可。 <br /> | |
| − | + | 您还可以为每个轴定义一个定制的位移,以便设置自定义的零位置。 <br /> | |
[[File:puma_theta_parameters_tab.png]] <br /> | [[File:puma_theta_parameters_tab.png]] <br /> | ||
| − | === Motion | + | === Motion 选项卡 === |
| − | + | 此选项卡允许移动机器人并测试配置。 GUI类似于TP GUI。 <br /> | |
[[File:puma_motion_tab.png]] <br /> | [[File:puma_motion_tab.png]] <br /> | ||
<br /> | <br /> | ||
| − | == | + | == 生成并运行安装文件 == |
| − | + | 最后,配置完成后,您可以通过按"Build & Configure"图标(见图),生成安装文件并在MC上运行它们。<br /> | |
[[File:build_and_configure_icon.png]] <br /> | [[File:build_and_configure_icon.png]] <br /> | ||
<br /> | <br /> | ||
| − | + | 生成的文件是: <br /> | |
[[File:configurator_generated_files.png]] <br /> | [[File:configurator_generated_files.png]] <br /> | ||
| − | + | 当点击"Build & Configure"图标, ,这些文件将自动发送到MC并执行。 现在,MC装载了您的配置,机器人可以使用。 <br /> | |
| − | + | 在关闭或复位MC之后,为了加载配置,您需要执行的所有操作是在Control Studio的终端发送: "reset all" 和"load startprg.prg"。 <br /> | |
| − | == | + | == 机器人程序示例 == |
| − | + | 现在你已经准备好运行机器人程序了。<br /> | |
| − | + | 要了解Control Studio和MC-Basic,请访问: [[Getting_Started_with_MC-Basic_and_ControlStudio|Getting Started with MC-Basic and ControlStudio]]. <br /> | |
| − | + | 要了解一些基本的机器人程序, 请访问: [[Program_Examples_-_Robot_Pick_and_Place_(P%26P)|Robot Pick & Place]], [[Program_Examples:Robot_Circle_Command|Robot Circle]], [[Program_Examples_-_Robot_Helix_motion|Robot Helix]]<br /> | |
| − | + | 更多运动程序示例, 请访问 [[Program_Examples#Motion_Examples|Motion Examples]] | |
Latest revision as of 07:36, 11 May 2017
| 语言: | English • 中文(简体) |
|---|
这是一个使用配置器设置6轴PUMA机器人的教程。
Contents
创建并运行CONFIG.PRG文件
配置器不生成CONFIG.PRG文件,但这是必需的文件。
最简单的CONFIG.PRG的文件如下所示:
Sys.NumberAxes = 6
program
    Sys.Name = "MC_NAME"
    Print "system is running  -  " ; Sys.Name
end program
注意: 重要的是,由于puma机器为6轴,Sys.NumberAxes将至少为6。
在打开配置器之前,请将CONFIG.PRG文件上传到MC并在终端中的发送"reset all"。
打开配置器
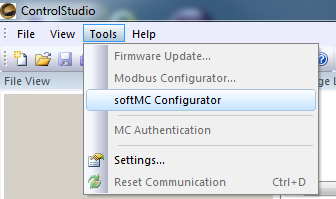
首先,您需要打开配置器。 一个选项是通过Control Studio打开配置器。
转到: tool -> softMC Configurator.
如果Control Studio已经连接到MC,那么您将看到以下窗口。
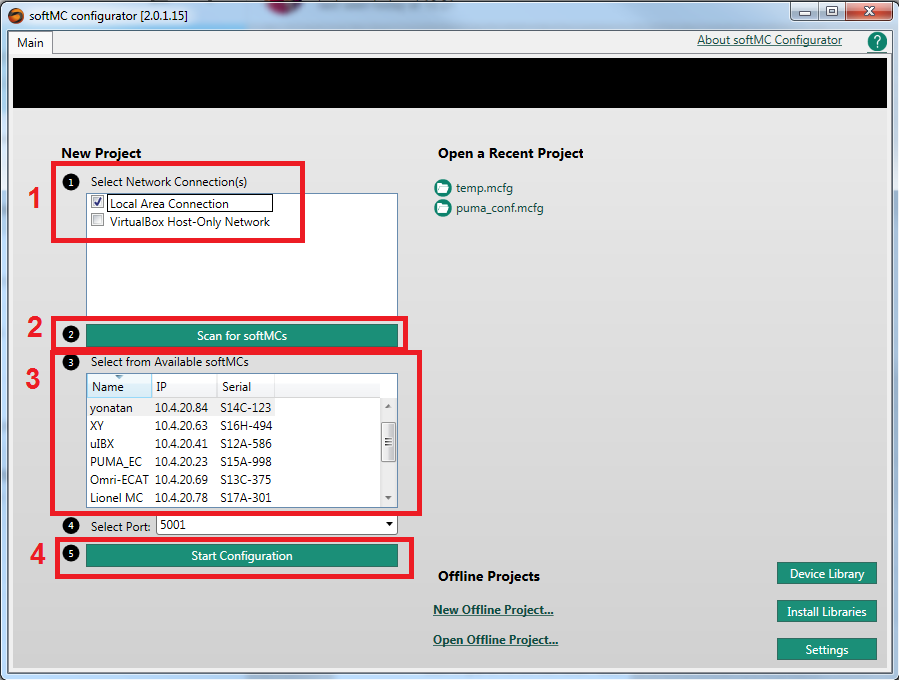
选择New Project选项卡,然后选择MC上的softMC版本。

如果Control Studio没有连接到MC,则会显示下一个窗口。
1. 选择网络连接的类型
2. 点击"Scan for softMCs"
3. 选择您的MC
4. 点击 "start configuration"按钮
然后你会得到前面说明的窗口。 按照前面的说明设置。
配置驱动器和轴
首先,您需要配置驱动器和轴。
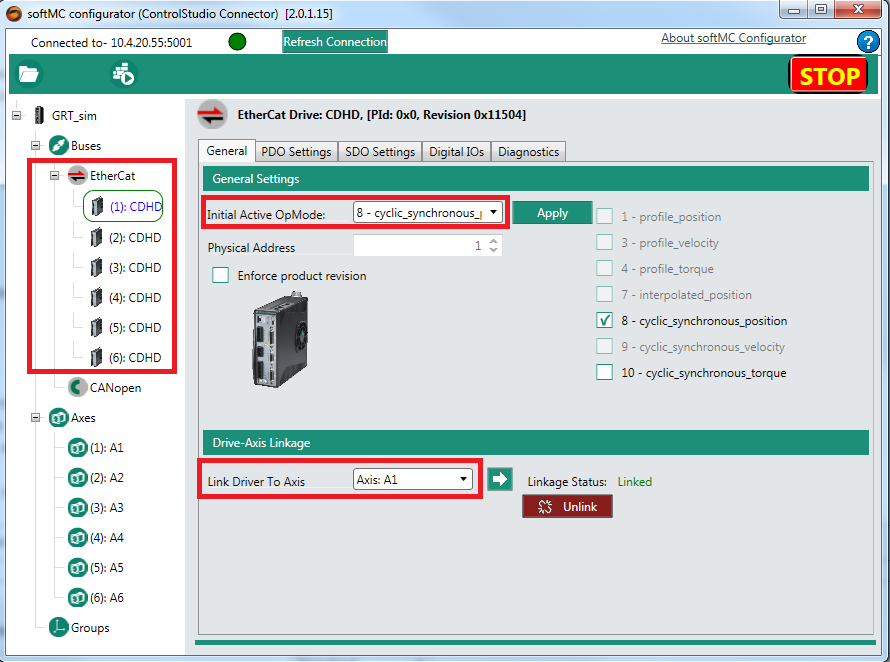
在项目窗口中,左窗格显示识别的驱动器和轴。
注意: 只有EtherCAT驱动器可以自动识别, CANopen驱动器需要手动添加。
注意: 如果配置一个模拟的机器人,忽略驱动器配置部分。
驱动器
点击第一个驱动器,其配置窗口将显示:
最低要求:
1. 选择"Initial Active OpMode"。选择: "8 - cyclic_synchronous_position".
2. 连接驱动器对应的轴。 在"Link Driver To Axis"选择正确的轴。
3. 最后, 点击"Apply"按钮
对每个使用的驱动器重复以上步骤。
轴
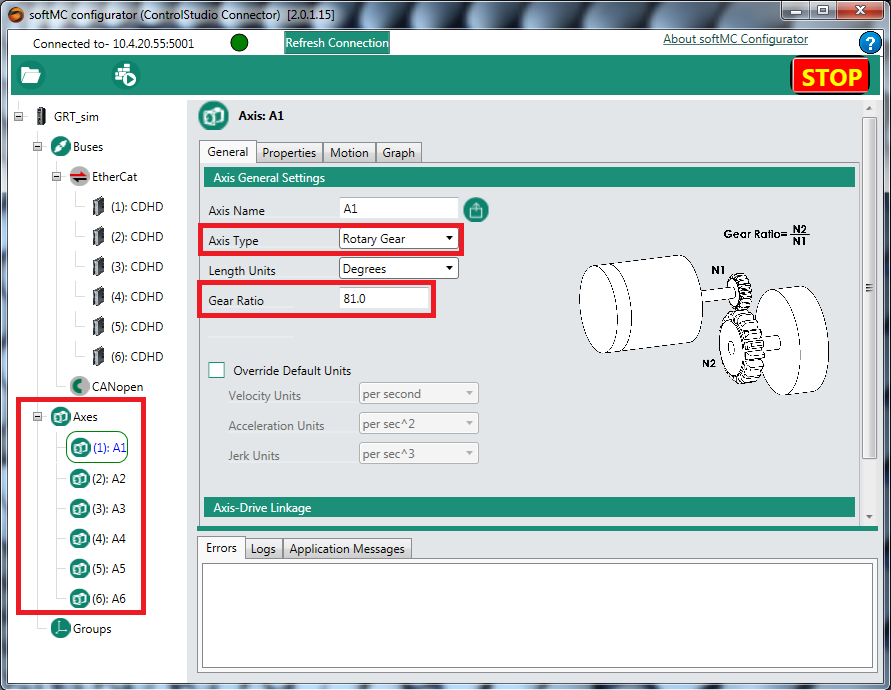
点击第一个轴,其配置窗口将显示:
最低要求:
1. 选择 "Axis Type". 选择: "Rotary Gear" 用于PUMA机器人。
2. 将减速比值设置为正确的值。
对每个使用的轴重复以上步骤。
轴的配置窗口有很少的选项卡。
"Properties" 选项卡允许设置轴属性。 请根据需求和制造说明,适当地设定各轴的性能。
注意: 如果配置一个模拟的机器人, 将所有轴 "Simulated Axis" 属性更改为 "True"。
配置PUMA机器人
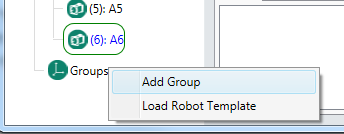
右键单击左窗格中的 "Groups"图标, 然后选择 "Add Group".
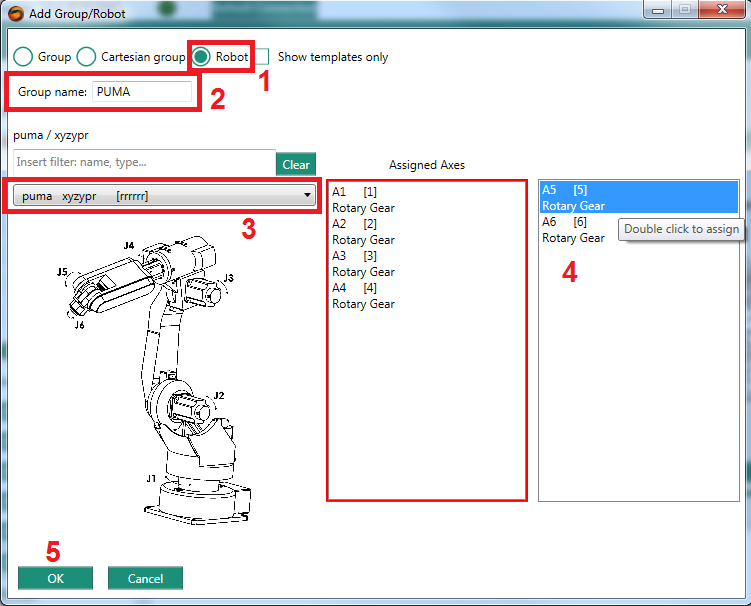
在弹出窗口中,按照以下步骤操作:
1. 选择 "Robot"
2. 设置"Group name" (在该示例中名称为PUMA)
3. 选择 "puma xyzypr" 机器人
4. 双击添加相应轴到 "Assigned Axes"列表。 当轴组选择正确时, the "Assigned Axes"框将变为绿色。
5.点击OK按钮
现在,将显示机器人/组配置窗口。 有一些选项卡:
General tab
此选项卡允许切换连接到组的轴,并更改轴属性
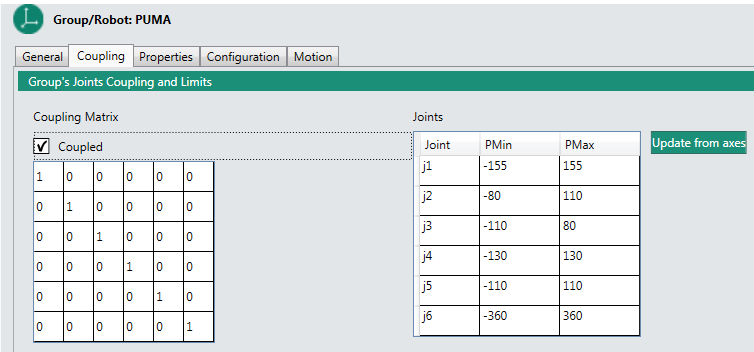
Coupling tab
此选项卡允许设置:
1. 机器人的耦合矩阵(puma机器人通常不改变)。
2. 关节位置限制。
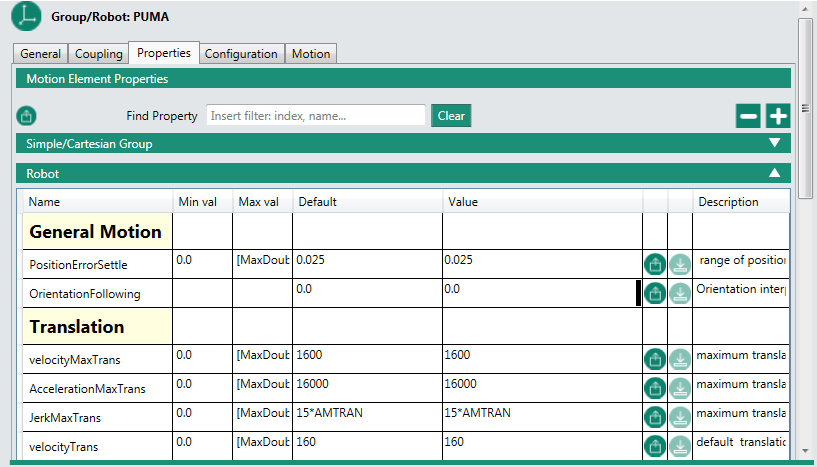
Properties tab
此选项卡允许设置机器人属性,如:位置限制,速度限制,加速限制等。
Configuration tab
此选项卡有3个子选项卡:
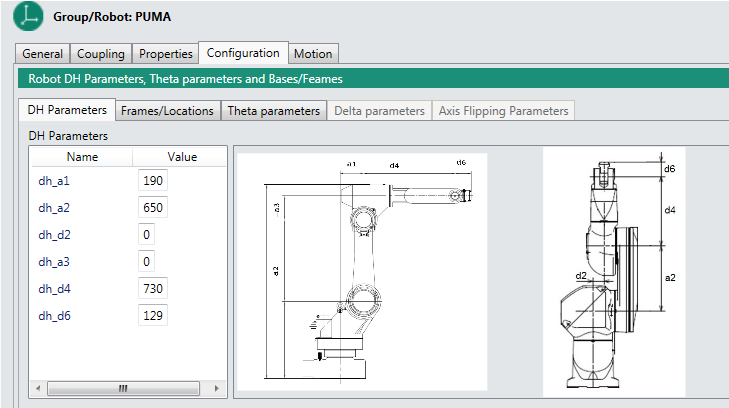
1. DH Parameters 选项卡
此选项卡允许设置PUMA机器人的DH参数。 请与此选项卡中提供的图纸对应设置的这些值。
2. Frames/Locations 选项卡
此选项卡允许设置PUMA机器人位置向量,例如机器人基座所在的位置或工具相对于第六关节坐标系的位置。

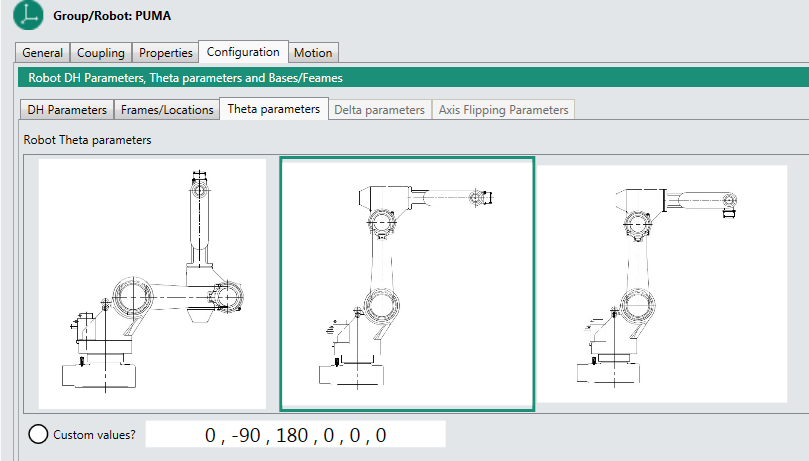
3. Theta Parameters 选项卡
此选项卡允许设置PUMA零位置。 PUMA机器人的默认零位置如左图所示。
您可以为零位置选择其他选项- 只需按所需的图像将此配置设置为零位置即可。
您还可以为每个轴定义一个定制的位移,以便设置自定义的零位置。
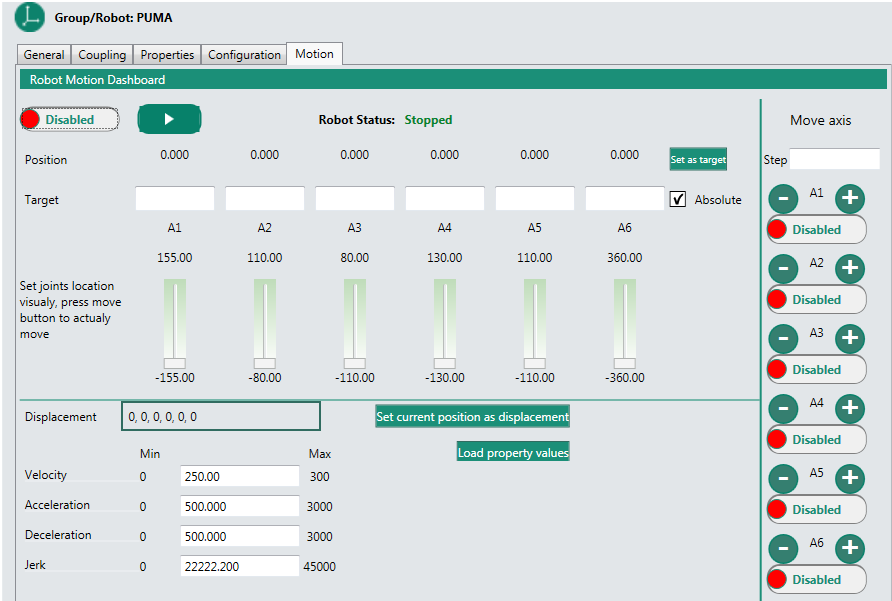
Motion 选项卡
此选项卡允许移动机器人并测试配置。 GUI类似于TP GUI。
生成并运行安装文件
最后,配置完成后,您可以通过按"Build & Configure"图标(见图),生成安装文件并在MC上运行它们。
![]()
生成的文件是:
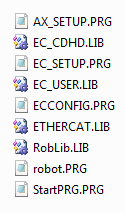
当点击"Build & Configure"图标, ,这些文件将自动发送到MC并执行。 现在,MC装载了您的配置,机器人可以使用。
在关闭或复位MC之后,为了加载配置,您需要执行的所有操作是在Control Studio的终端发送: "reset all" 和"load startprg.prg"。
机器人程序示例
现在你已经准备好运行机器人程序了。
要了解Control Studio和MC-Basic,请访问: Getting Started with MC-Basic and ControlStudio.
要了解一些基本的机器人程序, 请访问: Robot Pick & Place, Robot Circle, Robot Helix
更多运动程序示例, 请访问 Motion Examples