Difference between revisions of "softMI HMI Getting started/zh-hans"
(Created page with "{{Languages}} This is a tutorial for first configuration of SoftMC with SoftMI thru HMIStudio <br /> ------------------------------------------------------------------------...") |
|||
| (3 intermediate revisions by 2 users not shown) | |||
| Line 1: | Line 1: | ||
| − | {{Languages}} | + | {{Languages|softMI_HMI_Getting_started}} |
| − | + | 这对于具有SoftMI的SoftMC的第一次通过HMIStudio的配置教程。 | |
| − | ---- | + | ---- |
| − | |||
| − | + | == 创建项目并添加网络组件 == | |
| − | |||
| − | + | 打开新项目:<br/> | |
| + | 在左侧栏 - "Graph Element Window"中选择HMI选项卡,然后选择HMI类型。 | ||
| − | + | | |
| − | + | [[File:HMI2.png|RTENOTITLE]] | |
| − | |||
| − | + | 在左侧栏 - "Graph Element Window" 中选择PLC选项卡,并选择控制器/ PLC类型。<br/> 拖放在中心窗口中: | |
| − | + | [[File:HMI3.png|RTENOTITLE]] | |
| − | |||
| − | |||
| − | + | 在左侧栏 - "Graph Element Window"中选择“Connector”选项卡,并选择通信类型。<br/> 在这个例子中,我们选择以太网(TCP)<br/> 拖放在中心窗口中: | |
| − | + | [[File:HMI4.png|RTENOTITLE]] | |
| − | |||
| − | + | 在弹出的窗口 - "Network Device Setting"点击"Add"。<br/> 设置HMI IP,并选择正确的通讯协议: | |
| − | + | [[File:HMI5.png|RTENOTITLE]] | |
| − | + | 再次按"Add",并设置SoftMC IP和通讯协议: | |
| − | + | [[File:HMI6.png|RTENOTITLE]] | |
| − | + | A在添加HMI和PLC之后,最终显示: | |
| − | + | [[File:HMI7.png|RTENOTITLE]] | |
| − | + | 双击HMI访问附加属性配置: | |
| − | + | [[File:HMI8.png|RTENOTITLE]] | |
| − | + | == 导入参数文件 (CSV) == | |
| − | + | SoftMC Modbus Configurator生成包含项目参数及其Modbus地址的CSV文件。 | |
| − | + | 使用Modbus Configurator生成CSV文件 [[http://softmc.servotronix.com/wiki/Modbus_Communication_API#Modbus_Configurator [1]]] | |
| − | |||
| − | + | 将CSV文件导入HMIStudio:<br/> 转到“Graph Element Window”中的“Project Database”选项卡,选择“Address Tag”: | |
| − | + | [[File:HMI9.png|RTENOTITLE]] | |
| − | + | 导入CSV文件: | |
| − | [[File: | + | [[File:HMI10.png|RTENOTITLE]] |
| + | [[File:HMI11.png|RTENOTITLE]] | ||
| − | + | | |
| − | |||
| − | |||
| − | + | == 建立和设计界面 == | |
| − | + | HMI屏幕中的操作通过组件进行。<br/> 在这个组件中,用户可以执行SoftMC功能,读写数据。 | |
| − | + | 要进入屏幕设计窗口,请右键单击HMI,然后单击“Edit”: | |
| − | [[File: | + | [[File:HMI12.png|RTENOTITLE]] |
| − | + | 基本组件位于"PLC Parts"的"Graph Element Window"中: | |
| − | |||
| − | [[File: | + | [[File:HMI13.png|RTENOTITLE]] |
| − | + | 将所需组件拖放到中心窗口(HMI屏幕).<br/> 当这样做时,组件的属性将打开: | |
| − | |||
| − | + | [[File:HMI14.png|RTENOTITLE]] | |
| − | |||
| − | |||
| − | + | 选中“Use Address Tag”框。 然后CSV文件中的参数将显示在“Addr. Type” - 仅当它们的类型合适(例如这是“Bit”开关,因此只显示“EN_BIT1”,因为它是CSV文件中的唯一的一个位。<br/> 完成配置并按OK后,左击另一个在屏幕上放置开关。 | |
| − | + | == 组件属性 == | |
| − | In SoftMC:<br /> | + | |
| − | “Short” = 16bit<br /> | + | 在数据类型,大小,操作等方面完全配置组件很重要。<br/> 例如,当添加数字显示时,请确保“Data width”是根据在softMC Modbus配置器中配置的: |
| − | “long” = 32bit<br /> | + | |
| − | + | [[File:HMI15.png|RTENOTITLE]] | |
| + | |||
| + | “Word”是16bit<br/> In SoftMC:<br/> “Short” = 16bit<br/> “long” = 32bit<br/> 所以如果选择参数为“long”,选择DWORD(双字)。 | ||
| + | |||
| + | [[Category:Modbus Communication]] | ||
Latest revision as of 16:17, 6 February 2020
| 语言: | English • 中文(简体) |
|---|
这对于具有SoftMI的SoftMC的第一次通过HMIStudio的配置教程。
Contents
创建项目并添加网络组件
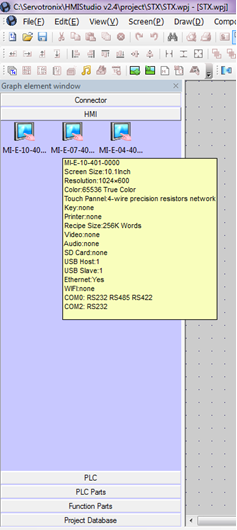
打开新项目:
在左侧栏 - "Graph Element Window"中选择HMI选项卡,然后选择HMI类型。
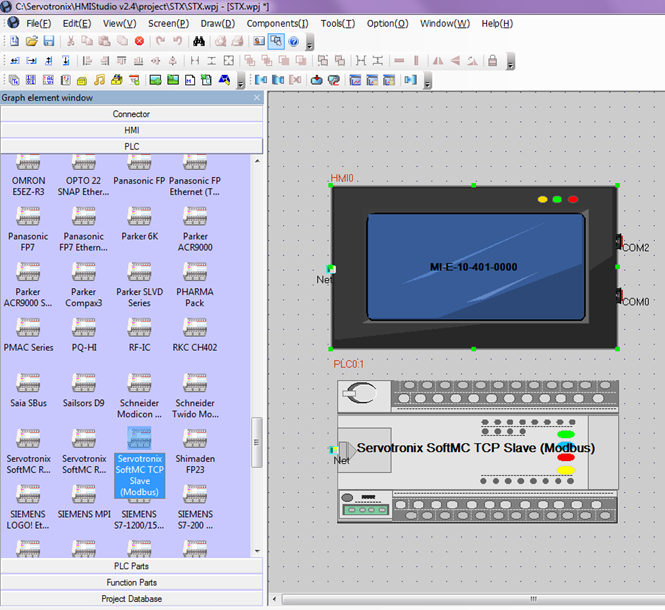
在左侧栏 - "Graph Element Window" 中选择PLC选项卡,并选择控制器/ PLC类型。
拖放在中心窗口中:
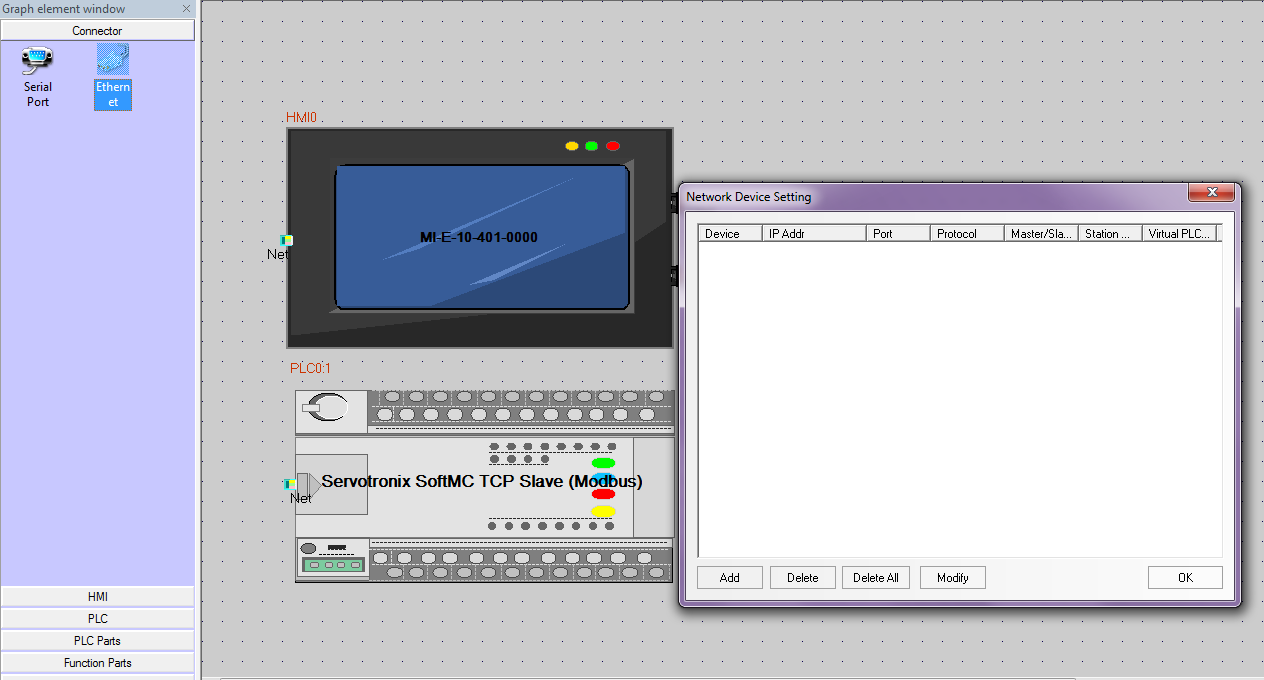
在左侧栏 - "Graph Element Window"中选择“Connector”选项卡,并选择通信类型。
在这个例子中,我们选择以太网(TCP)
拖放在中心窗口中:
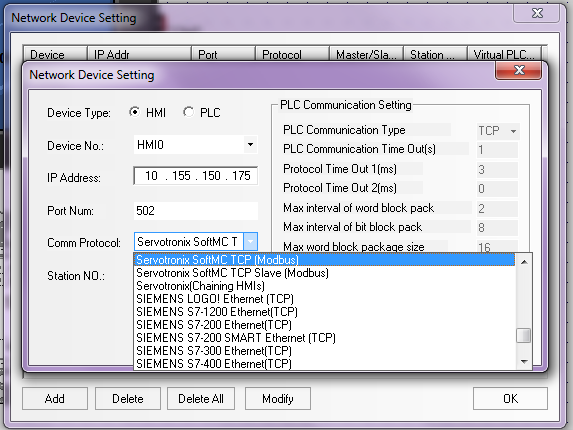
在弹出的窗口 - "Network Device Setting"点击"Add"。
设置HMI IP,并选择正确的通讯协议:
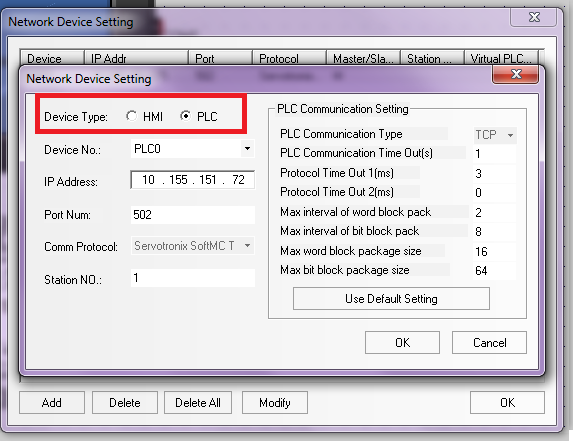
再次按"Add",并设置SoftMC IP和通讯协议:
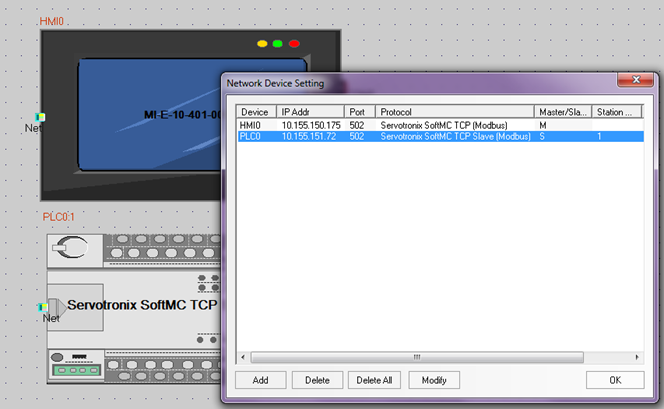
A在添加HMI和PLC之后,最终显示:
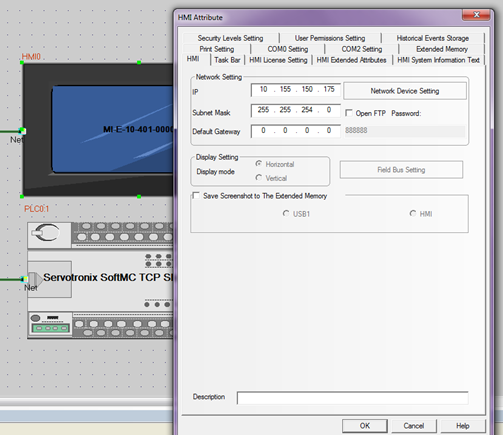
双击HMI访问附加属性配置:
导入参数文件 (CSV)
SoftMC Modbus Configurator生成包含项目参数及其Modbus地址的CSV文件。
使用Modbus Configurator生成CSV文件 [[1]]
将CSV文件导入HMIStudio:
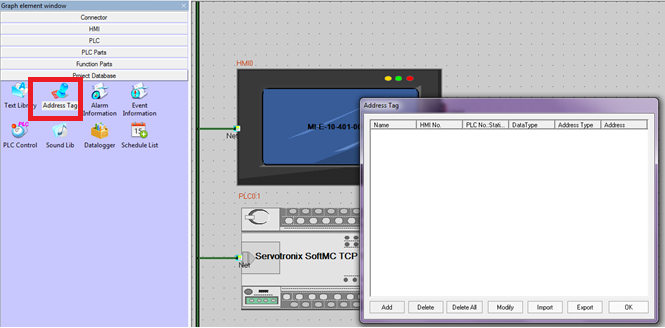
转到“Graph Element Window”中的“Project Database”选项卡,选择“Address Tag”:
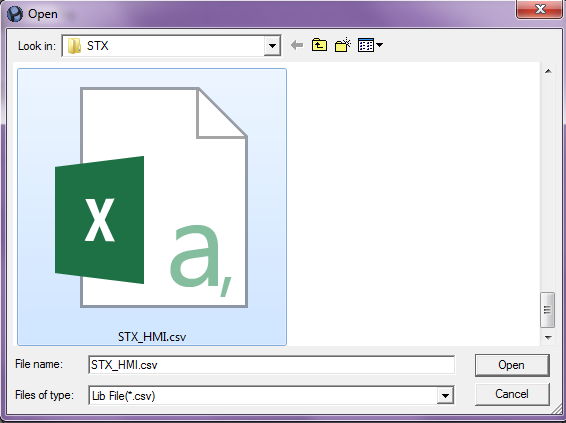
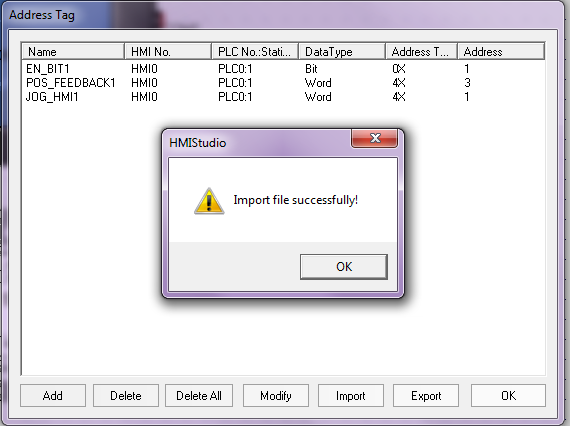
导入CSV文件:
建立和设计界面
HMI屏幕中的操作通过组件进行。
在这个组件中,用户可以执行SoftMC功能,读写数据。
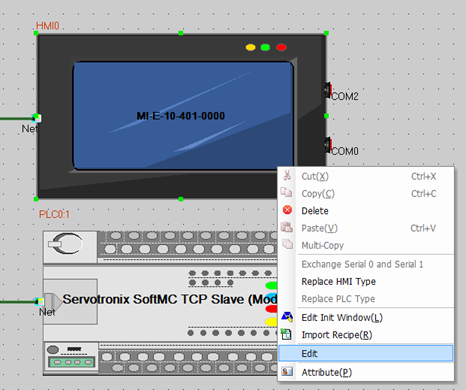
要进入屏幕设计窗口,请右键单击HMI,然后单击“Edit”:
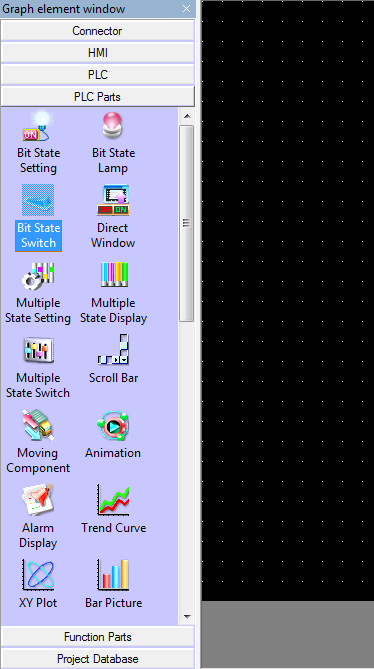
基本组件位于"PLC Parts"的"Graph Element Window"中:
将所需组件拖放到中心窗口(HMI屏幕).
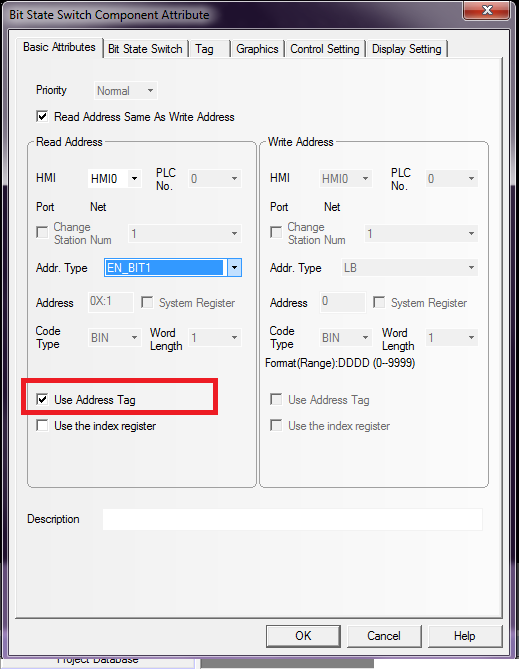
当这样做时,组件的属性将打开:
选中“Use Address Tag”框。 然后CSV文件中的参数将显示在“Addr. Type” - 仅当它们的类型合适(例如这是“Bit”开关,因此只显示“EN_BIT1”,因为它是CSV文件中的唯一的一个位。
完成配置并按OK后,左击另一个在屏幕上放置开关。
组件属性
在数据类型,大小,操作等方面完全配置组件很重要。
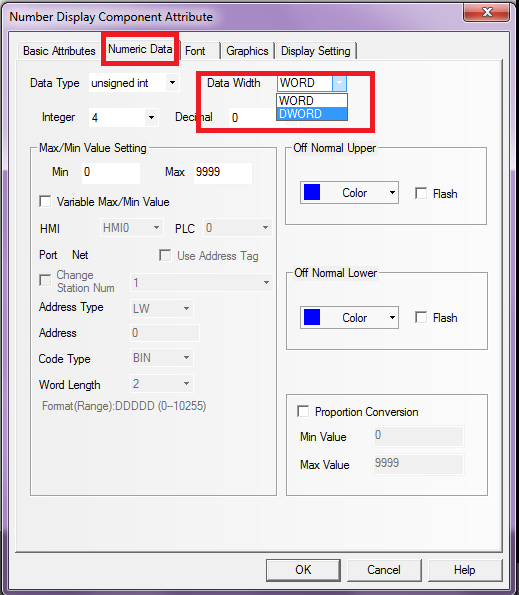
例如,当添加数字显示时,请确保“Data width”是根据在softMC Modbus配置器中配置的:
“Word”是16bit
In SoftMC:
“Short” = 16bit
“long” = 32bit
所以如果选择参数为“long”,选择DWORD(双字)。
