Difference between revisions of "AXY:Virtual Box MIB"
m (→Installation) |
m |
||
| (38 intermediate revisions by 2 users not shown) | |||
| Line 3: | Line 3: | ||
== Abstract == | == Abstract == | ||
| − | There are | + | <big>There are various virtual boxes running MIB like linux systems. Each has its own purpose. This document |
| + | is a tutorial to each virtual box mib. | ||
| − | * Virtual MIB | + | * General purpose Virtual MIB running ubunto |
| − | * Virtual MIB | + | * Light Virtual MIB for simulated MC |
| − | * Virtual MIB as mini build machine | + | * Light Virtual MIB as mini build machine |
| − | + | The reasoning to create an image for each machine is because various users has various uses. some may want | |
| + | to have a single multi purpose machine running ubunto that consume lots of resources, versus a dedicated single purpose machine. | ||
| + | So we have decided to provide all the configurations along with detailed documentation. | ||
| + | </big> | ||
| − | A machine running Ubunto. It provides a full working environment, such as eclipse,gitk, 3s and so on. | + | == General purpose Virtual MIB running ubunto == |
| + | |||
| + | <big>A machine running Ubunto. It provides a full working environment, such as eclipse,gitk, 3s and so on. | ||
This machine comes with two kernels, preempt rt and native ubunto kernel. | This machine comes with two kernels, preempt rt and native ubunto kernel. | ||
The native kernel comes with ubunto installation, the preempt rt kernel provides a coherent real time operating system | The native kernel comes with ubunto installation, the preempt rt kernel provides a coherent real time operating system | ||
| − | to run mc. A cohernet real time operating system here means a system that prioritize threads as mc expects, that is, by their priority. | + | to run mc. A cohernet real time operating system here means a system that prioritize threads as mc expects, that is, by their priority.</big> |
| − | + | === Installation === | |
| − | First download Virtual Box for windows ( ie . if you are running windows ) | + | |
| + | |||
| + | <big>First download Virtual Box for windows ( ie . if you are running windows )</big> | ||
| − | <big>Grab the virtual disks from //domainaxy/IL/MC/Linux/Ubunto-Lite-Preempt-RT. They are about 4GB combined so it would probably take some time to download.</big> | + | <big> |
| + | Grab the virtual disks from //domainaxy/IL/MC/Linux/Ubunto-Lite-Preempt-RT. They are about 4GB combined so it would probably take some time to download. | ||
| + | </big> | ||
[[File:vb1.png|picture|Directory]] | [[File:vb1.png|picture|Directory]] | ||
| − | <big>Now please follow these steps to create a virtual machine. | + | <big> |
| − | Launch the virtual box.</big> | + | Now please follow these steps to create a virtual machine. |
| + | Launch the virtual box. | ||
| + | </big> | ||
[[File:vb2.png|picture| vbox]] | [[File:vb2.png|picture| vbox]] | ||
| − | <big>Click on the New button, the bellow window will appear. | + | <big> |
| + | Click on the New button, the bellow window will appear. | ||
Enter the word "Ubunto" and press Next. | Enter the word "Ubunto" and press Next. | ||
</big> | </big> | ||
| Line 35: | Line 48: | ||
[[File:vb3.png|picture| ubunto]] | [[File:vb3.png|picture| ubunto]] | ||
| − | <big>Next, Choose amount of RAM memory. I decided to use 1GB. The do not choose too much as it will slow the host machine.</big> | + | <big> |
| + | Next, Choose amount of RAM memory. I decided to use 1GB. The do not choose too much as it will slow the host machine. | ||
| + | </big> | ||
[[File:vb4.png|picture| RAM]] | [[File:vb4.png|picture| RAM]] | ||
| − | <big>Choose the boot disk. Choose vbox-amcs-v1-disk1 and then "Open"</big> | + | <big> |
| + | Choose the boot disk. Choose vbox-amcs-v1-disk1 and then "Open" | ||
| + | </big> | ||
[[File:vb5.png|picture| Disk ]] | [[File:vb5.png|picture| Disk ]] | ||
| − | <big> You should have a bootable image ready </big> | + | <big> |
| + | You should have a bootable image ready | ||
| + | </big> | ||
[[File:vb6.png|picture| Disk ]] | [[File:vb6.png|picture| Disk ]] | ||
| − | <big> We need to configure it a little, so choose Settings for the ubunto machine </big> | + | <big> |
| + | We need to configure it a little, so choose Settings for the ubunto machine | ||
| + | </big> | ||
[[File:vb7.png|picture| Disk ]] | [[File:vb7.png|picture| Disk ]] | ||
| − | <big> Click "Storage". we will add an additional disk. | + | <big> |
| − | + | Click "Storage". we will add an additional disk. | |
| + | on the sata controller, click on "Add Hard Disk " icon | ||
| + | </big> | ||
[[File:vb10.png|picture| Disk ]] | [[File:vb10.png|picture| Disk ]] | ||
| − | <big>The bellow window pops </big> | + | <big> |
| − | + | The bellow window pops | |
| + | </big> | ||
[[File:vb9.png|picture| Disk ]] | [[File:vb9.png|picture| Disk ]] | ||
| − | <big>choose vbox-amcs-v1-disk2 as a secondary disk | + | <big> |
| + | choose vbox-amcs-v1-disk2 as a secondary disk | ||
| + | </big> | ||
[[File:vb12.png|picture| Disk ]] | [[File:vb12.png|picture| Disk ]] | ||
| + | <big> | ||
| + | This how this operation ends | ||
| + | </big> | ||
| + | [[File:vb13.png|picture| disk2 ]] | ||
| + | |||
| + | <big> | ||
| + | Network configration. we configure the virtual box to become part of the LAN. Click on "Network -->" "attached to" and choose Bridged Adapter. | ||
| + | </big> | ||
| − | |||
[[File:vb14.png|picture| Network ]] | [[File:vb14.png|picture| Network ]] | ||
| − | [[File:vb15.png|picture| | + | <big> |
| + | Serial Configuration. you may want to have serial ( rs232 ), as mc needs it from time to time. Click on "Serial Ports" and have "Port Numner" equal COM1 | ||
| + | </big> | ||
| + | |||
| + | [[File:vb15.png|picture| Serial ]] | ||
| + | |||
| + | <big> | ||
| + | Shared folder. It is possible sometimes to share a folder between the host to the target. you may choose any directory in the host as depicted bellow | ||
| + | </big> | ||
| + | |||
| + | [[File:vb18.png|picture| shared disk ]] | ||
| + | |||
| + | <big> | ||
| + | We are done with the configuration. Click on Start . screen will be black for few seconds, and then a count down will appear. Do no do anything. | ||
| + | </big> | ||
| + | |||
[[File:vb16.png|picture| Disk ]] | [[File:vb16.png|picture| Disk ]] | ||
| − | |||
| − | |||
| − | |||
| + | <big> | ||
| + | you are booting into the boot loader. There is a menu, do not do anything. ubunto is booting the preempt rt kernel | ||
| + | </big> | ||
| + | |||
| + | [[File:vb17.png|picture| boot ]] | ||
| + | |||
| + | <big> | ||
| + | ubunto loads. In the first boot the mouse may be lost of fuzzy. please reboot again . Once reboot is complete, click on the Terminal icon. Let us examine what is | ||
| + | this machine. Enter the command "df -h" . The df command dislay part of storage file systems. | ||
| + | There are two disks, /dev/sda and /dev/sdb. The working folder is /home/ directory. do not work in the / file system. | ||
| + | </big> | ||
| + | |||
| + | [[File:vb19.png|picture| Xwindows ]] | ||
| + | |||
| + | |||
| + | <big> | ||
| + | To access the virtual box you need to know its ip. please enter "ifconfig ". | ||
| + | The ethernet netowrk interface is eth2. the assigned dhcp ip is 10.4.20.93. you probably will have a different ip. | ||
| + | </big> | ||
| + | |||
| + | [[File:vb20.png|picture| eth ]] | ||
| + | |||
| + | === Running simulated MC === | ||
| + | |||
| + | |||
| + | <big> | ||
| + | To get MC running we need to get the sources, compile them, and launch mc. | ||
| + | Login into the Virtual box with user amcs password amcs .</big> | ||
| + | |||
| + | [[File:vb21.png|picture|ssh]] | ||
| + | |||
| + | <big>To get mc simply git clone the repository </big> | ||
| + | |||
| + | [[File:vb22.png|picture|git]] | ||
| + | |||
| + | <big>Now configure mc to simulated with --enable-amcssim </big> | ||
| + | [[File:vb23.png|picture|conf]] | ||
| + | |||
| + | <big>The bellow is the result of run_configure </big> | ||
| + | |||
| + | [[File:vb24.png|picture|conf]] | ||
| + | |||
| + | <big>Ente make </big> | ||
| + | |||
| + | [[File:vb25.png|picture|make]] | ||
| + | |||
| + | <big>This how make should end </big> | ||
| + | |||
| + | [[File:vb26.png|picture|make]] | ||
| + | |||
| + | <big>If you try to launch mc you will fail. | ||
| + | This is because some libraries are missing. | ||
| + | All the libraries are in the Implementation/libs directory. so we need to add Implementation/libs | ||
| + | to the library path. to see what is missing use the ldd command. | ||
| + | </big> | ||
| + | |||
| + | [[File:vb27.png|picture|ldd]] | ||
| + | |||
| + | <big> To fix the matter with the libraries, we supplied run_sim.sh script. if you try to use it as-is you bound to fail | ||
| + | as depicted bellow. | ||
| + | </big> | ||
| + | |||
| + | [[File:vb28.png|picture|run_sim]] | ||
| + | |||
| + | <big> you have to be user root inorder to launch mc. so switch to user root. passowrd is qwerty , and change to directory | ||
| + | /home/amcs/AMCS/Software/Versions/Implementation/ . </big> | ||
| + | |||
| + | [[File:vb32.png|picture|su]] | ||
| + | |||
| + | <big>and enter source run_sim.sh</big> | ||
| + | |||
| + | [[File:vb33.png|picture|run_sim]] | ||
| − | + | <big> launch MC as bellow. the failure is due to the fact that MC searches for eth0 while we do not have eth0 but eth2 </big> | |
| + | [[File:vb29.png|picture|root]] | ||
| − | = | + | <big> |
| − | + | Press cntrl+C to break the mc. | |
| + | Let is fix it. edit the file /FFS0/FWCONFIG and enter the line netif=eth2 | ||
| + | </big> | ||
| − | + | [[File:vb30.png|picture|Directory]] | |
| − | == | + | <big> |
| + | Now relaunch MC. | ||
| + | </big> | ||
| + | |||
| + | [[File:vb31.png|picture|Directory]] | ||
| + | |||
| + | == Light Virtual MIB for simulated MC == | ||
| + | |||
| + | <big> | ||
| + | One may want to use a light version of virtual machine. one that consume less resources. Virtual Box Ubunto consumes cpu ram and storage resources. | ||
| + | For this we created a lighter version of virtual mib to launch MC and codeasys software. | ||
| + | </big> | ||
| + | |||
| + | ==== Installation ==== | ||
| + | |||
| + | <big> | ||
| + | Grab the disk images from \\domainaxy\IL\MC\Linux\CoDesys-VirtualBox\ . | ||
| + | The disks are one for the root file system and the other is for the tool chain. | ||
| + | You can create your own disks and add them if you wish. | ||
| + | Storage is configured as follows: | ||
| + | </big> | ||
| + | |||
| + | [[File:vb40.png|picture|disk]] | ||
| + | |||
| + | <big>I assume you configured the network as bridged. boot the virtual box , at the end of the boot your machine should look like the bellow | ||
| + | </big> | ||
| + | |||
| + | [[File:vb41.png|picture|login]] | ||
| + | |||
| + | <big> | ||
| + | this machine is light on storage. as you can see bellow "/" has 10MB left and /opt/ has 75 MB left. This is why i recommend you to add some disks locally. | ||
| + | |||
| + | [[File:vb42.png|picture|disk]] | ||
| + | |||
| + | saying that we still have enough space in /opt to copy binary only mc. | ||
| + | so first please check what is the machine's ip. | ||
| + | |||
| + | [[File:vb43.png|picture|eth]] | ||
| + | |||
| + | <big>Copy mc binary only ball into this machine. assuming you use windows, i suggest you use winscp.</big> | ||
| + | |||
| + | [[File:vb44.png|picture|winscp]] | ||
| + | |||
| + | simply drag and drop the tar ball. This tar ball is found in \domainaxy\IL\MC\Linux\mc_sim\ . | ||
| + | It is an binary only version of MC. | ||
| + | |||
| + | [[File:vb45.png|picture|winscp]] | ||
| − | + | Now unzip it. we use gunzip. | |
| − | + | [[File:vb46.png|picture|winscp]] | |
| − | |||
| − | + | and untar it. use tar for that. | |
| − | + | [[File:vb47.png|picture|winscp]] | |
| − | + | to run mc, simply cd mc_sim . use the source command for that. | |
| + | [[File:vb48.png|picture|winscp]] | ||
| + | rbootp fails, we need to fix the network interface for that. | ||
| + | edit with nano /FFS0/FWCONFIG and relaunch mc. | ||
| − | + | == Light Virtual MIB build machine == | |
| + | Plase refer to [[AXY:Linux MIB#Virtual_Build_Machine]]. | ||
| − | + | == Getting the Virtual MIB == | |
| − | |||
Latest revision as of 12:33, 29 April 2014
This document describe how to install and build a MIB in a virtual box.
Contents
Abstract
There are various virtual boxes running MIB like linux systems. Each has its own purpose. This document is a tutorial to each virtual box mib.
- General purpose Virtual MIB running ubunto
- Light Virtual MIB for simulated MC
- Light Virtual MIB as mini build machine
The reasoning to create an image for each machine is because various users has various uses. some may want to have a single multi purpose machine running ubunto that consume lots of resources, versus a dedicated single purpose machine. So we have decided to provide all the configurations along with detailed documentation.
General purpose Virtual MIB running ubunto
A machine running Ubunto. It provides a full working environment, such as eclipse,gitk, 3s and so on. This machine comes with two kernels, preempt rt and native ubunto kernel. The native kernel comes with ubunto installation, the preempt rt kernel provides a coherent real time operating system to run mc. A cohernet real time operating system here means a system that prioritize threads as mc expects, that is, by their priority.
Installation
First download Virtual Box for windows ( ie . if you are running windows )
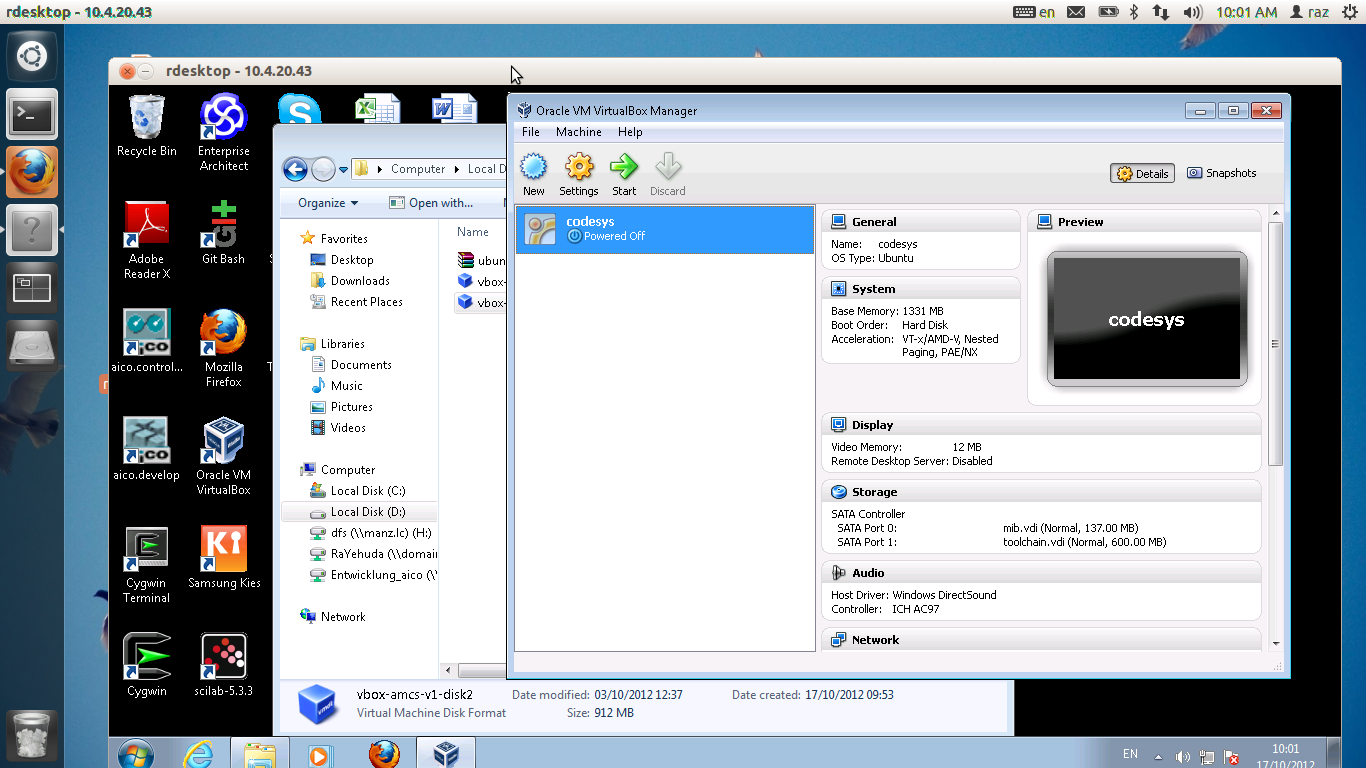
Grab the virtual disks from //domainaxy/IL/MC/Linux/Ubunto-Lite-Preempt-RT. They are about 4GB combined so it would probably take some time to download.
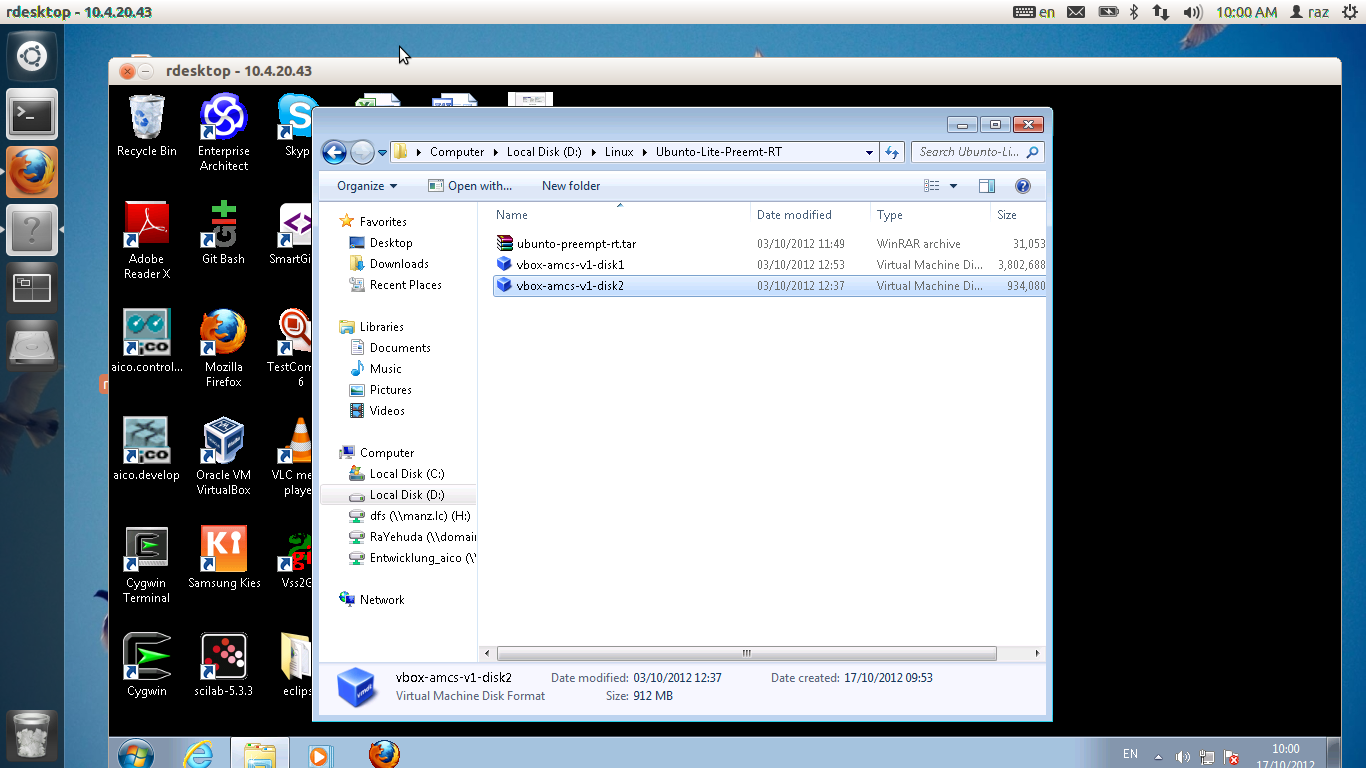
Now please follow these steps to create a virtual machine. Launch the virtual box.
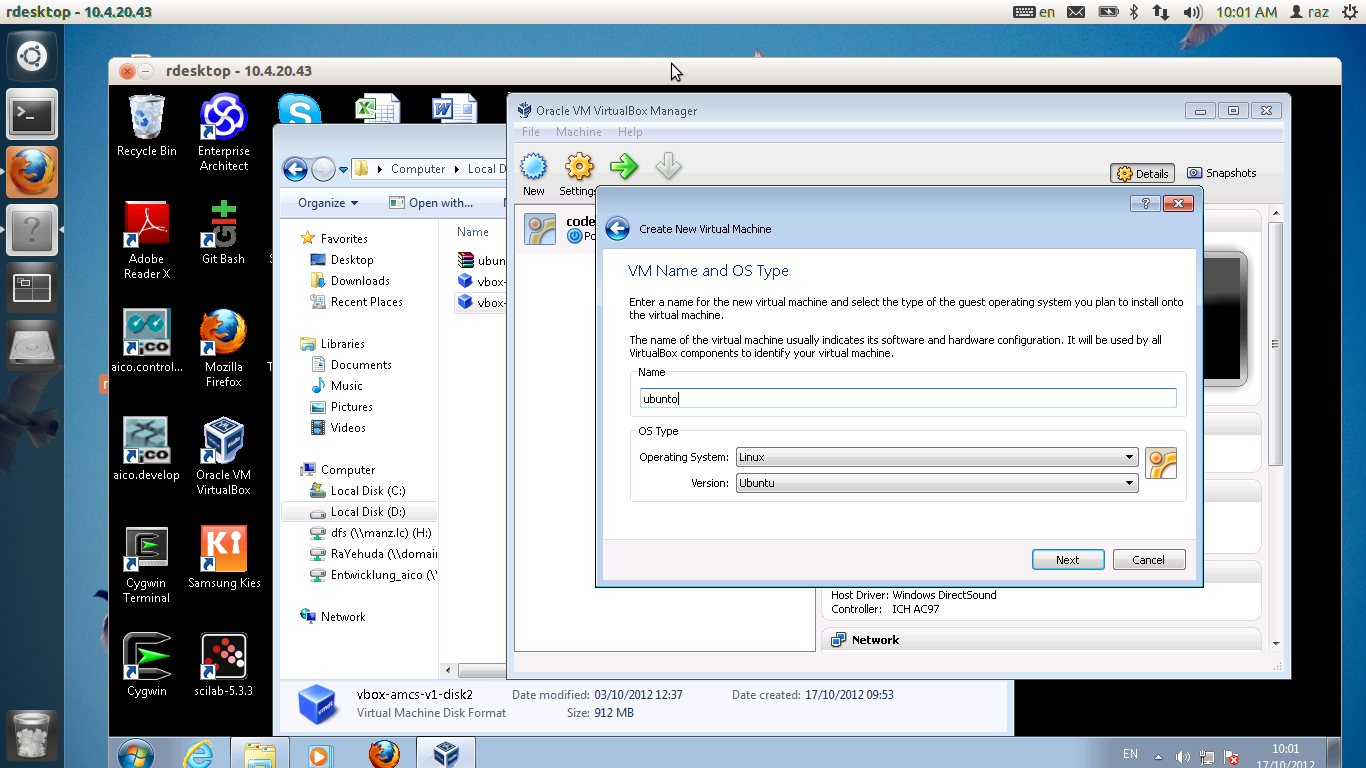
Click on the New button, the bellow window will appear. Enter the word "Ubunto" and press Next.
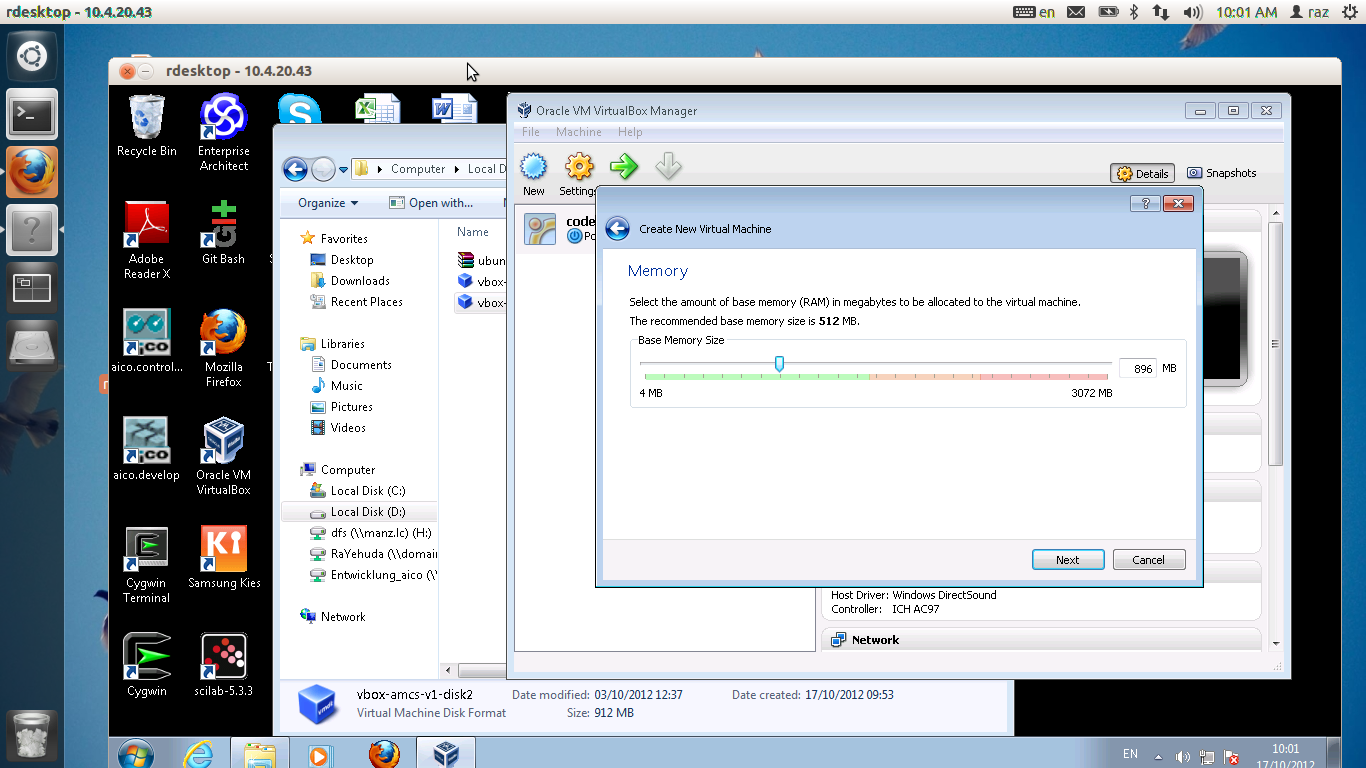
Next, Choose amount of RAM memory. I decided to use 1GB. The do not choose too much as it will slow the host machine.
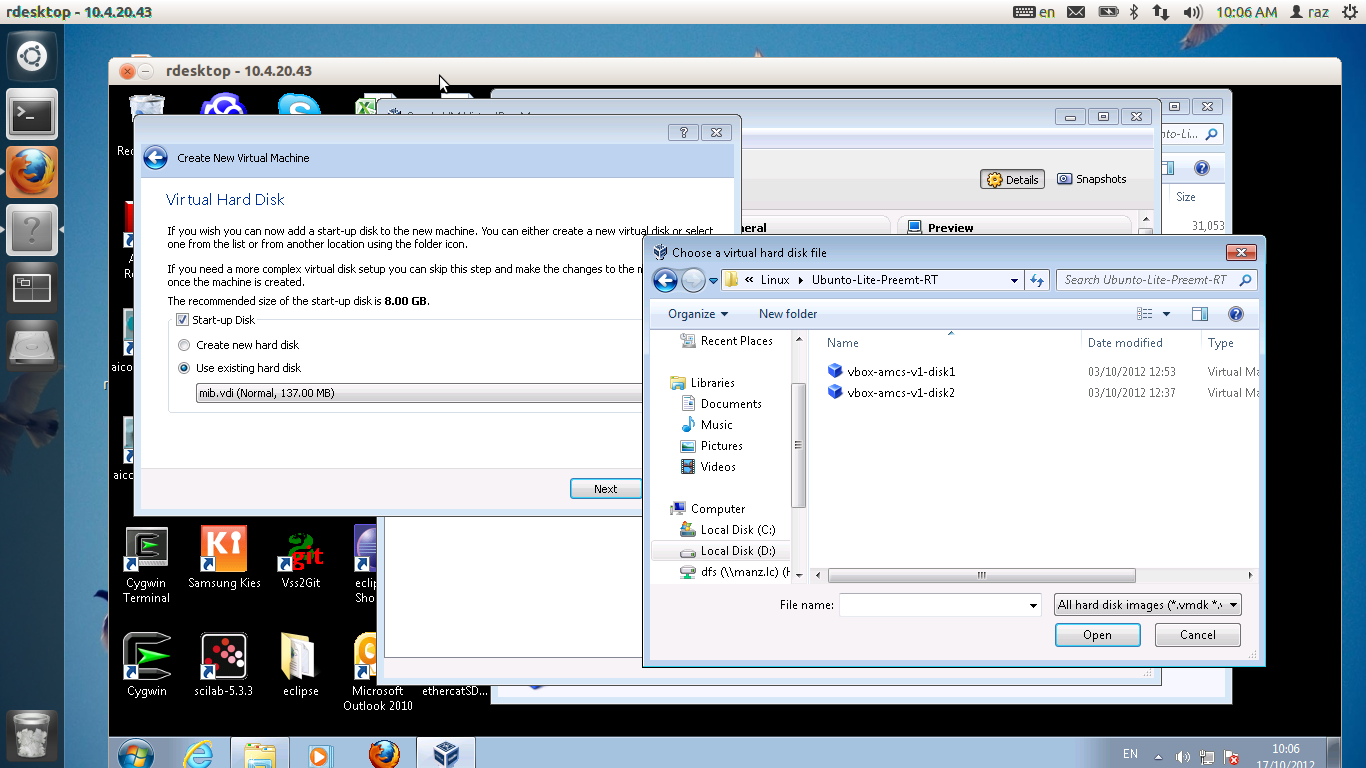
Choose the boot disk. Choose vbox-amcs-v1-disk1 and then "Open"
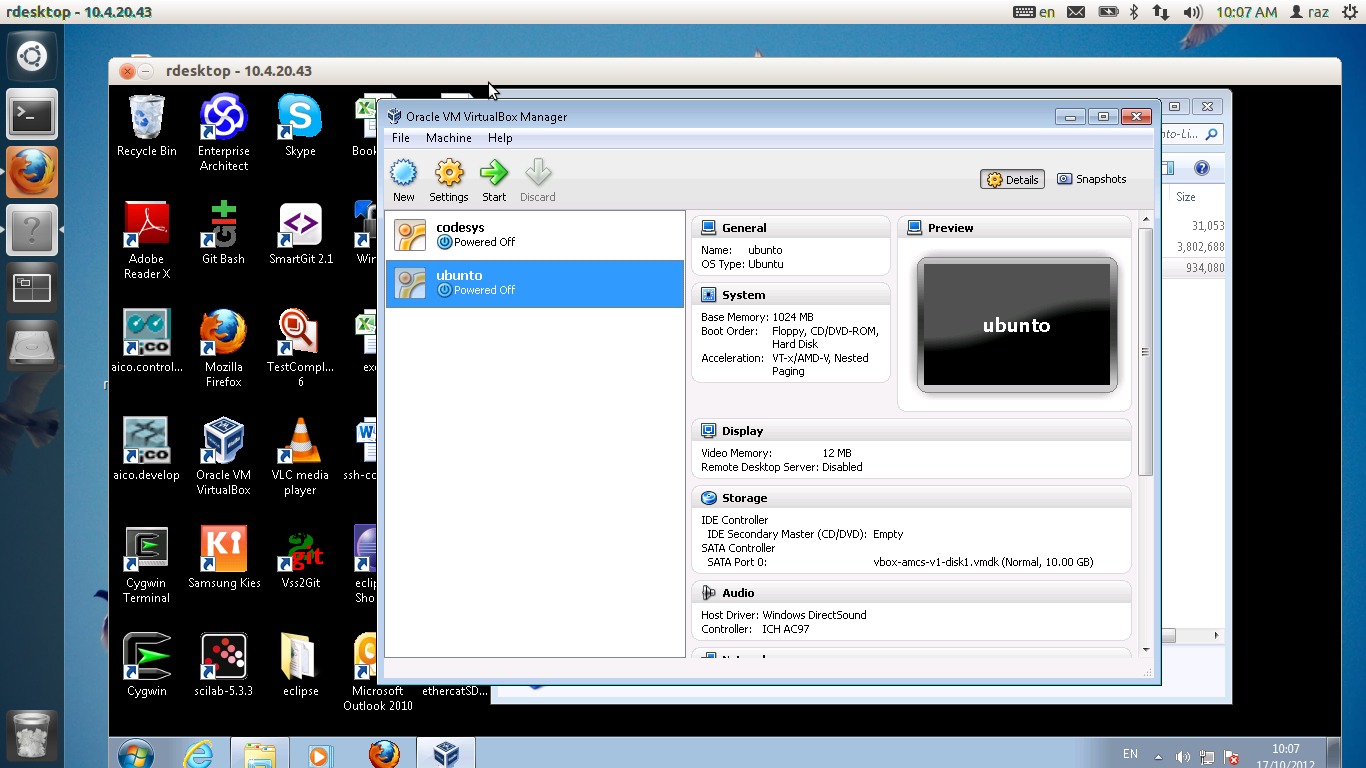
You should have a bootable image ready
We need to configure it a little, so choose Settings for the ubunto machine
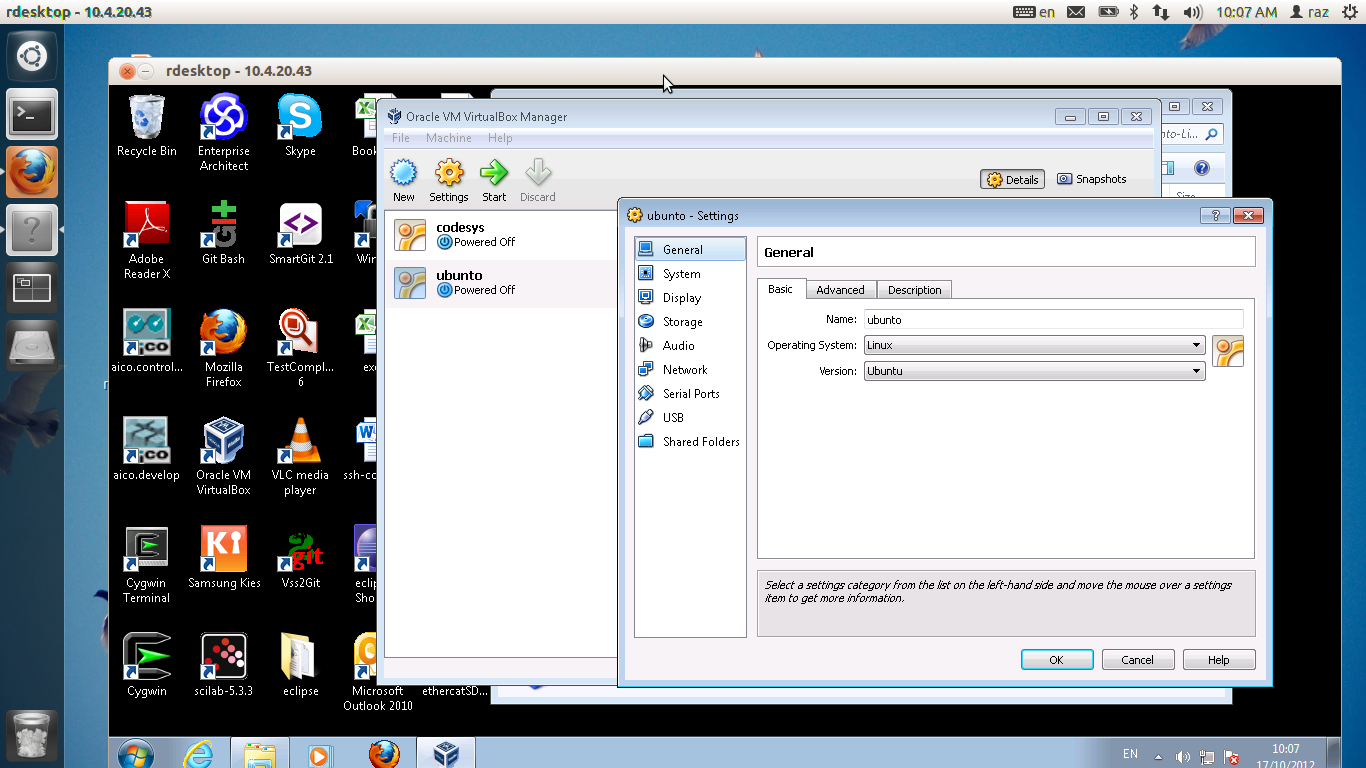
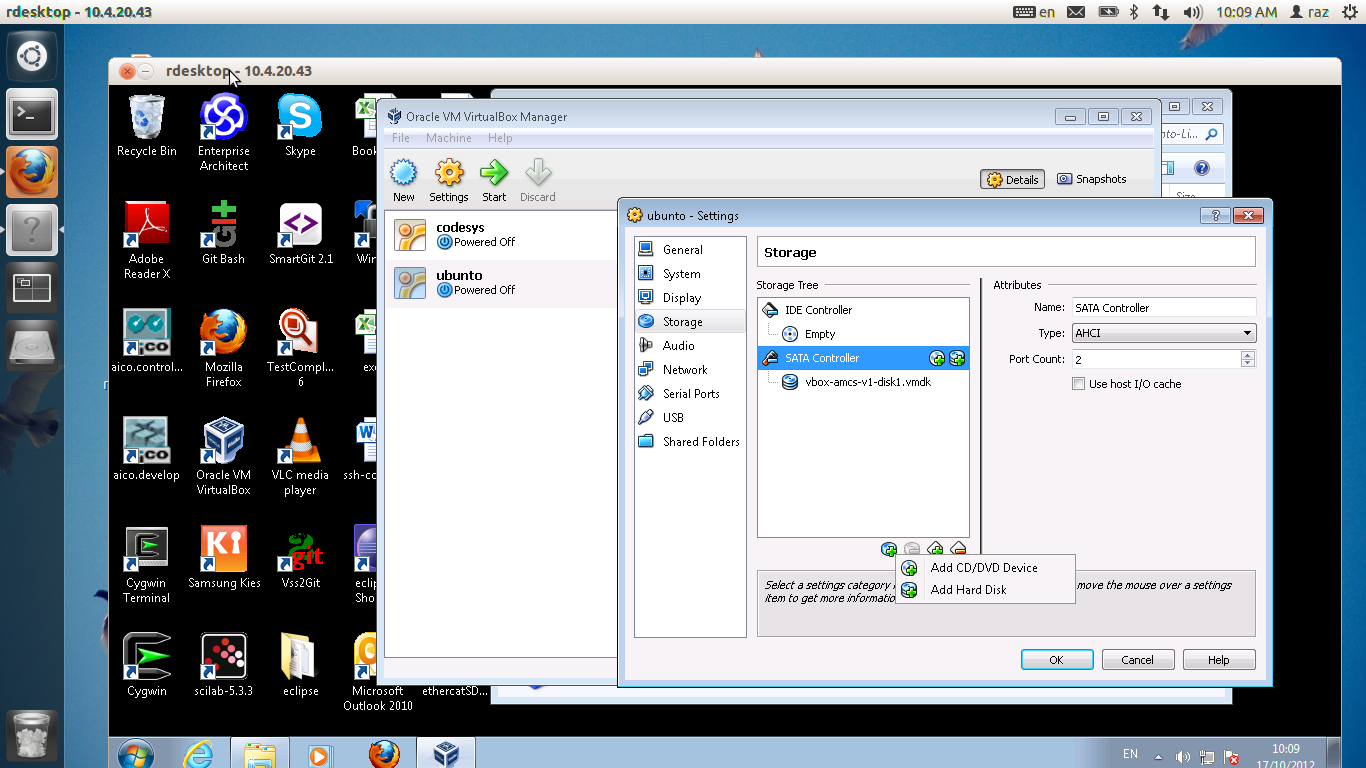
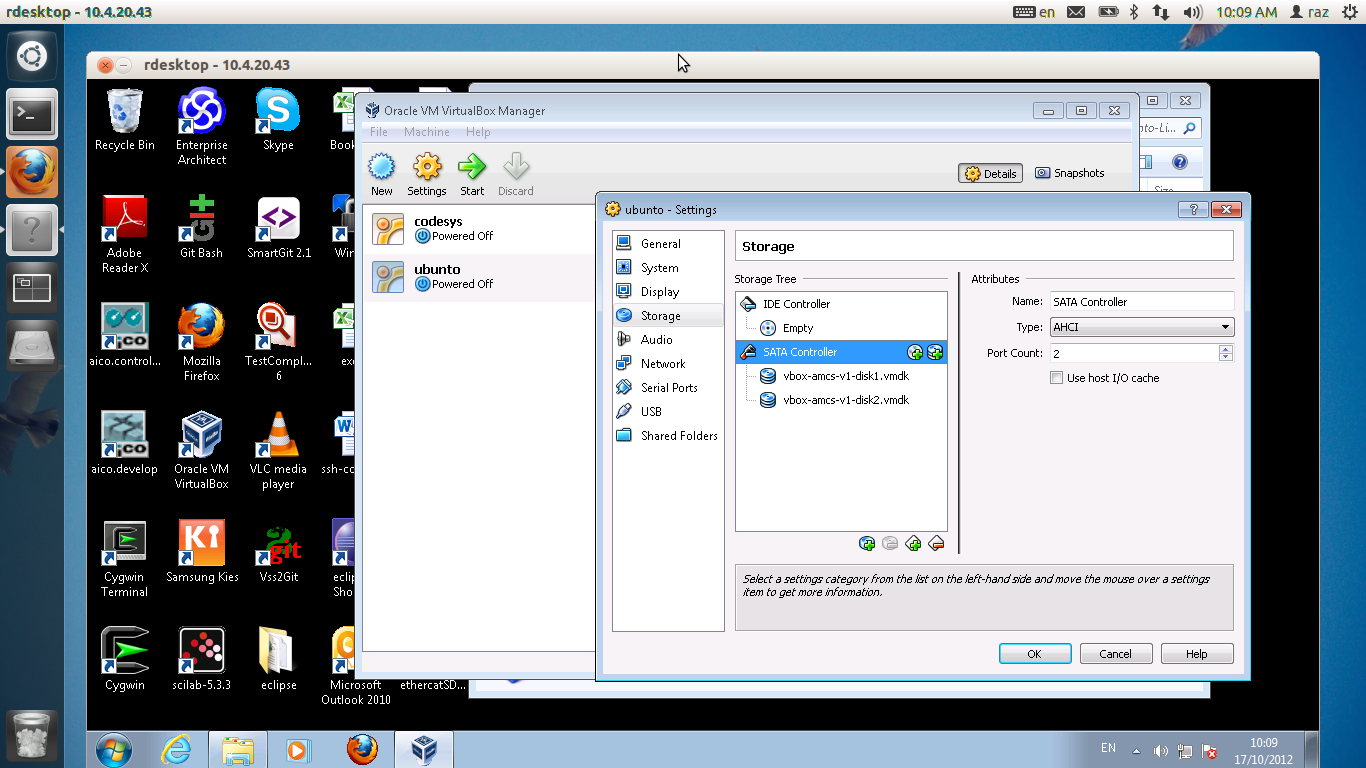
Click "Storage". we will add an additional disk. on the sata controller, click on "Add Hard Disk " icon
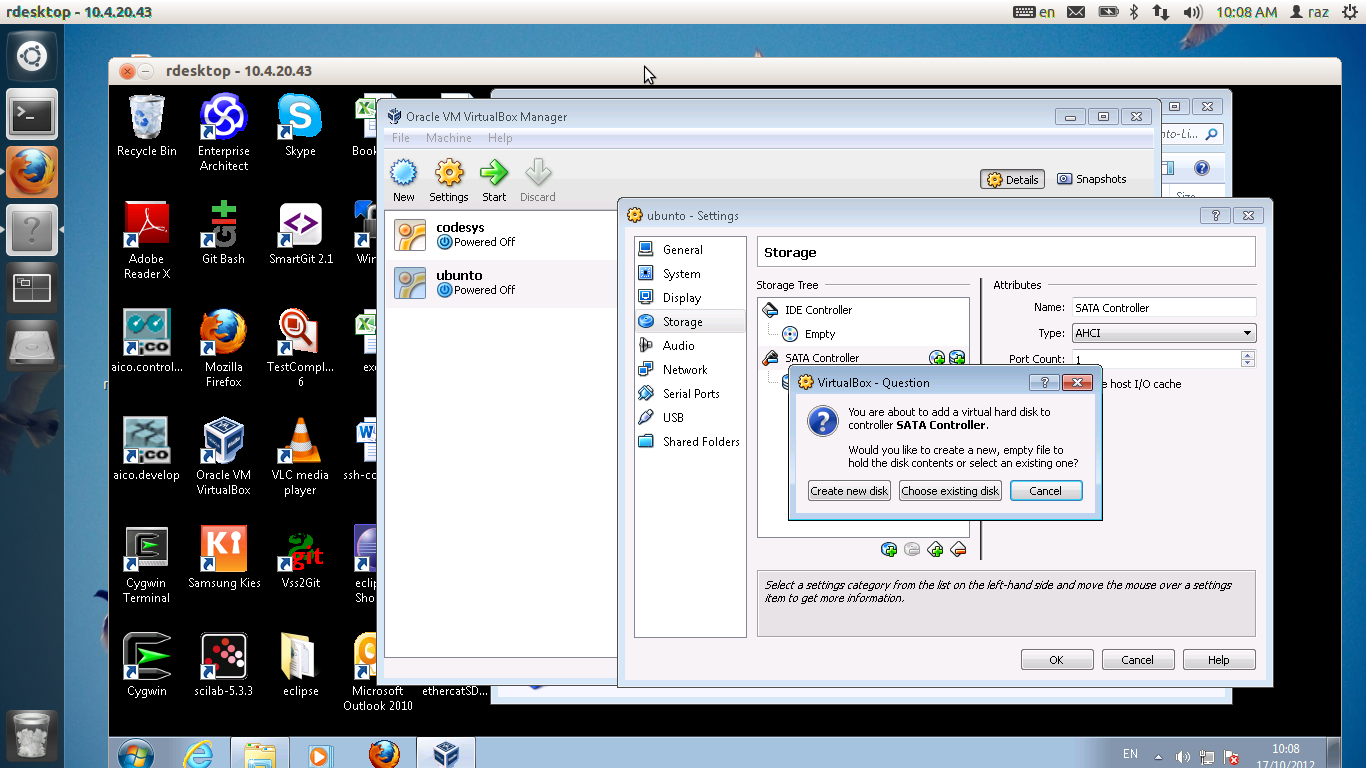
The bellow window pops
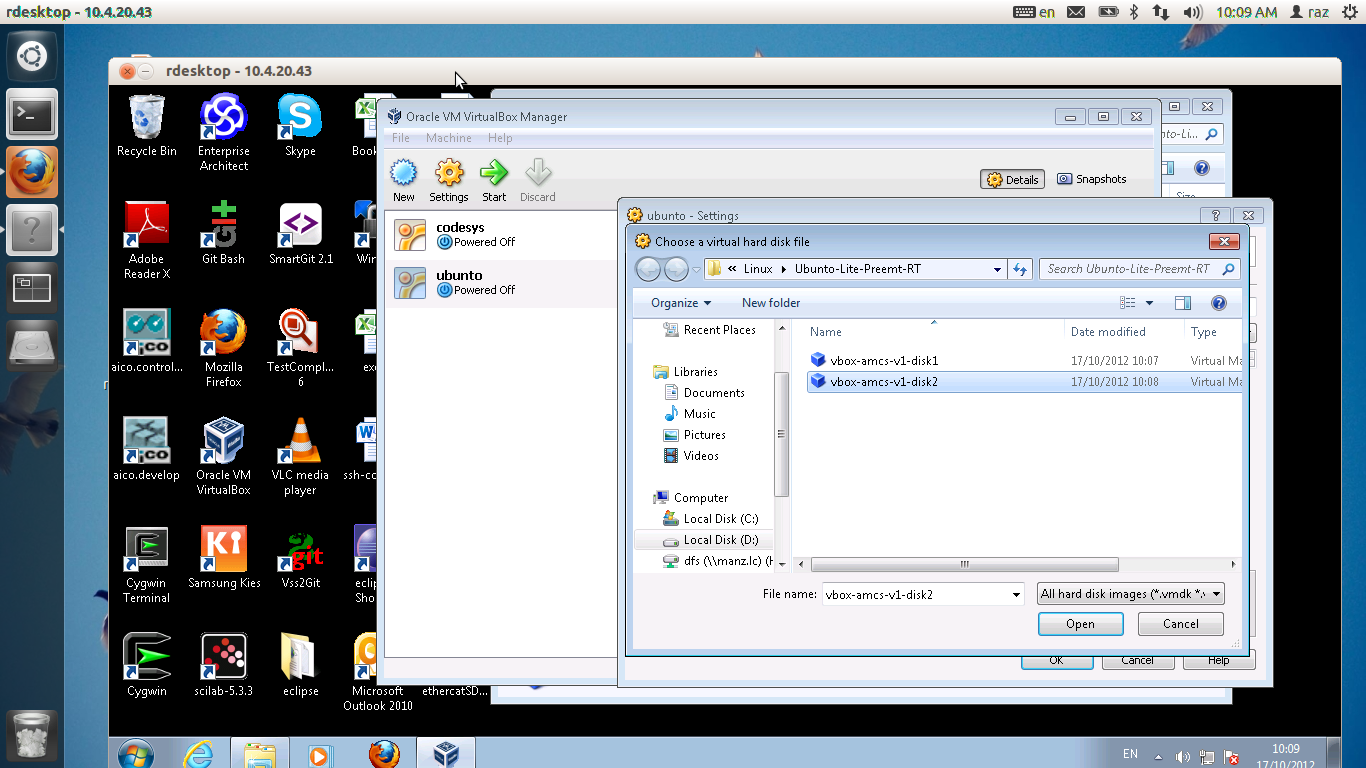
choose vbox-amcs-v1-disk2 as a secondary disk
This how this operation ends
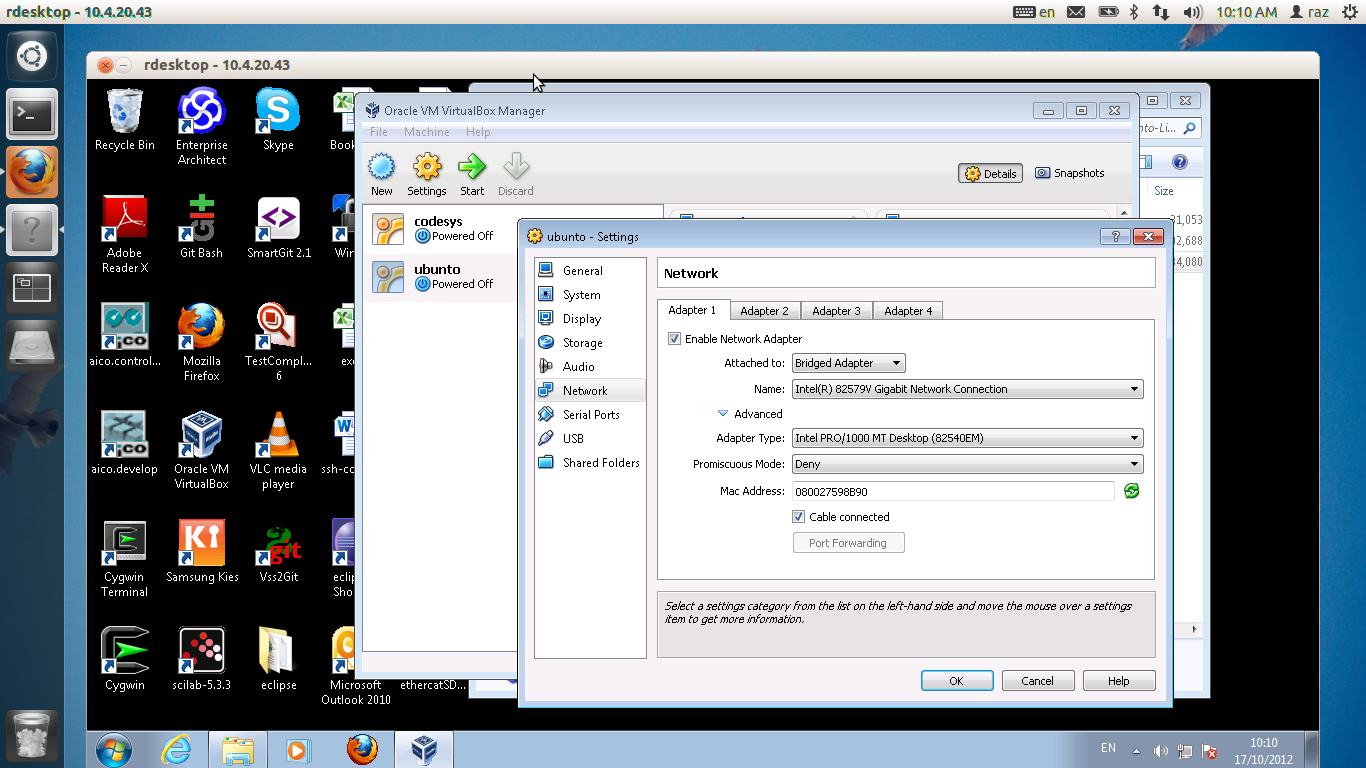
Network configration. we configure the virtual box to become part of the LAN. Click on "Network -->" "attached to" and choose Bridged Adapter.
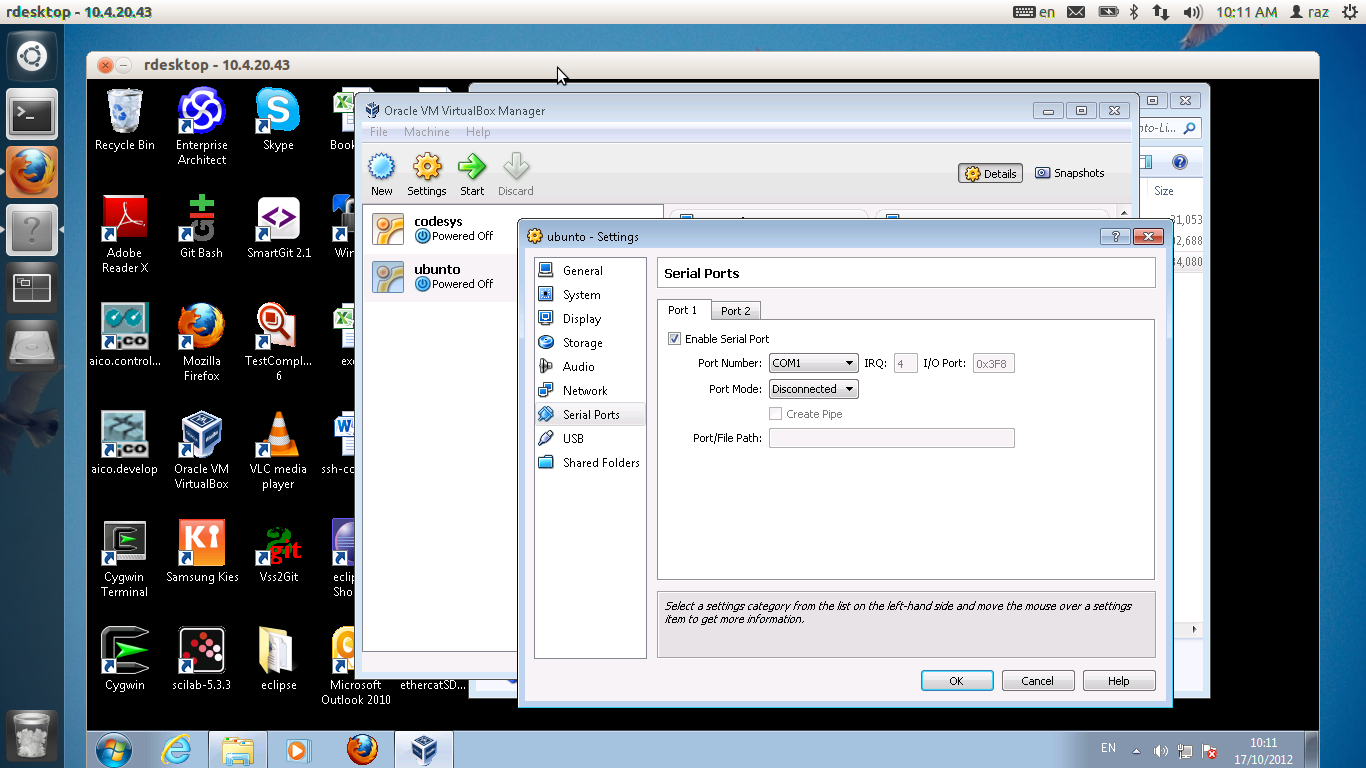
Serial Configuration. you may want to have serial ( rs232 ), as mc needs it from time to time. Click on "Serial Ports" and have "Port Numner" equal COM1
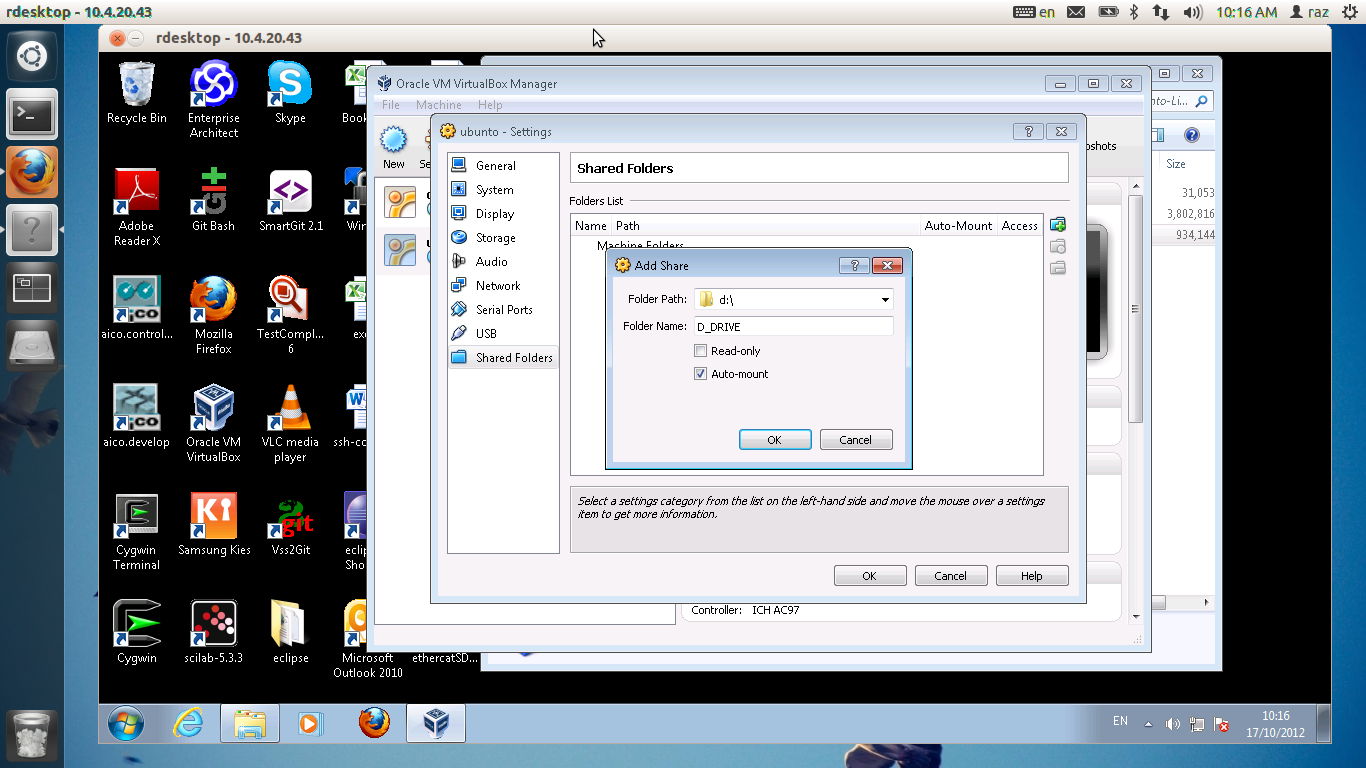
Shared folder. It is possible sometimes to share a folder between the host to the target. you may choose any directory in the host as depicted bellow
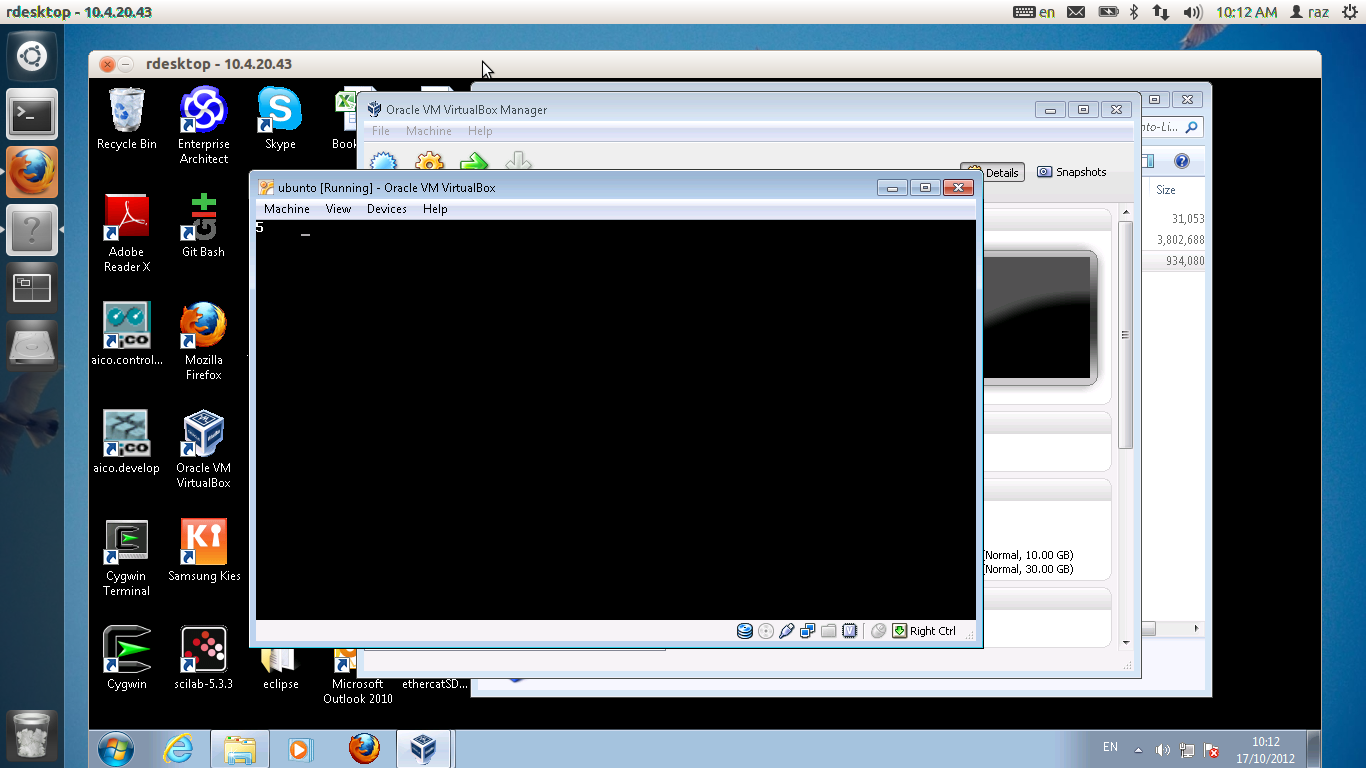
We are done with the configuration. Click on Start . screen will be black for few seconds, and then a count down will appear. Do no do anything.
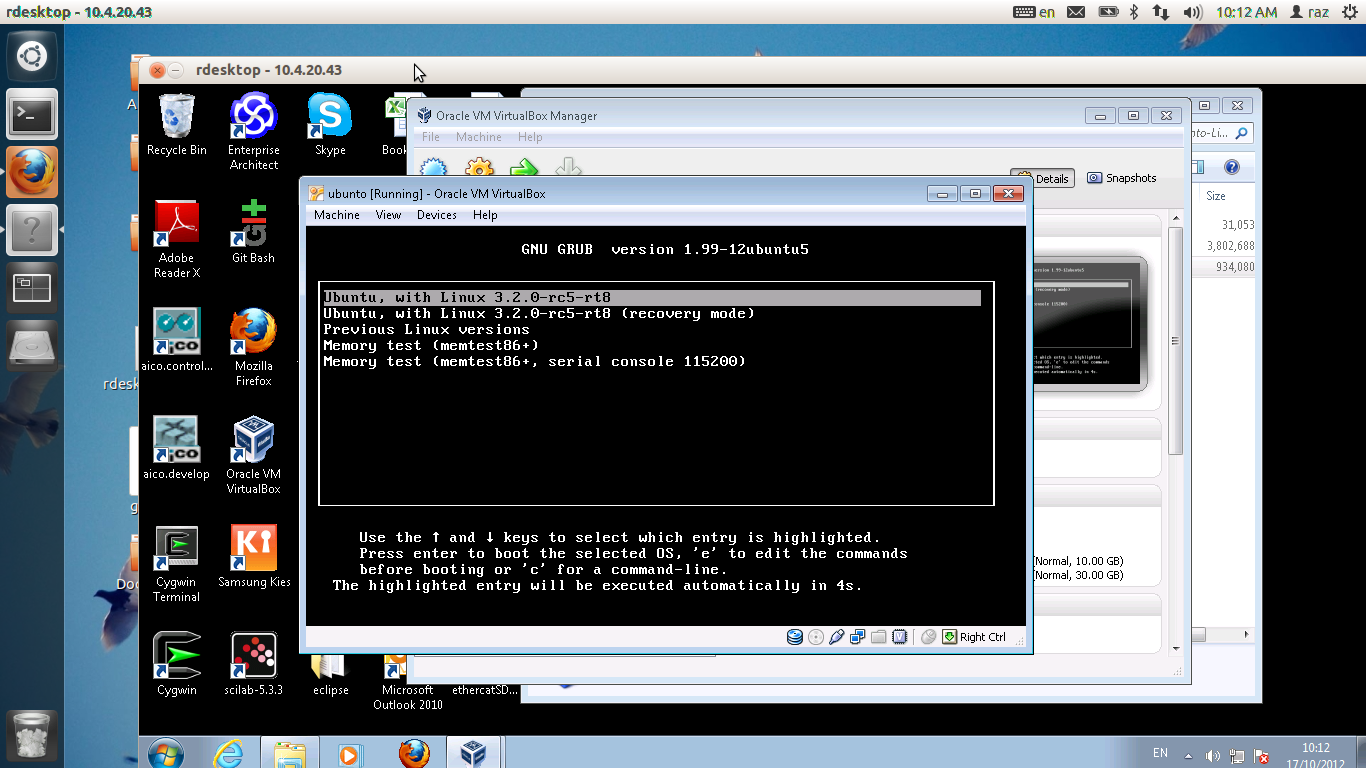
you are booting into the boot loader. There is a menu, do not do anything. ubunto is booting the preempt rt kernel
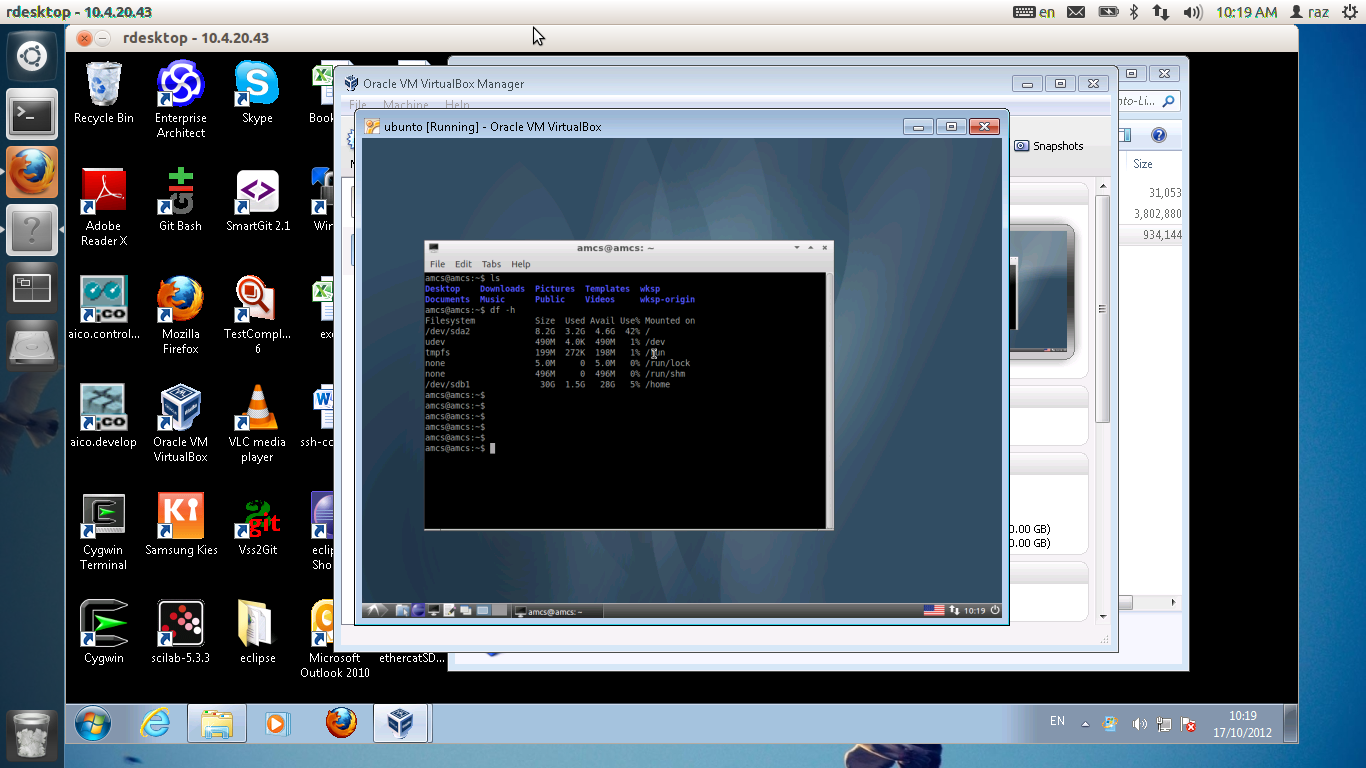
ubunto loads. In the first boot the mouse may be lost of fuzzy. please reboot again . Once reboot is complete, click on the Terminal icon. Let us examine what is this machine. Enter the command "df -h" . The df command dislay part of storage file systems. There are two disks, /dev/sda and /dev/sdb. The working folder is /home/ directory. do not work in the / file system.
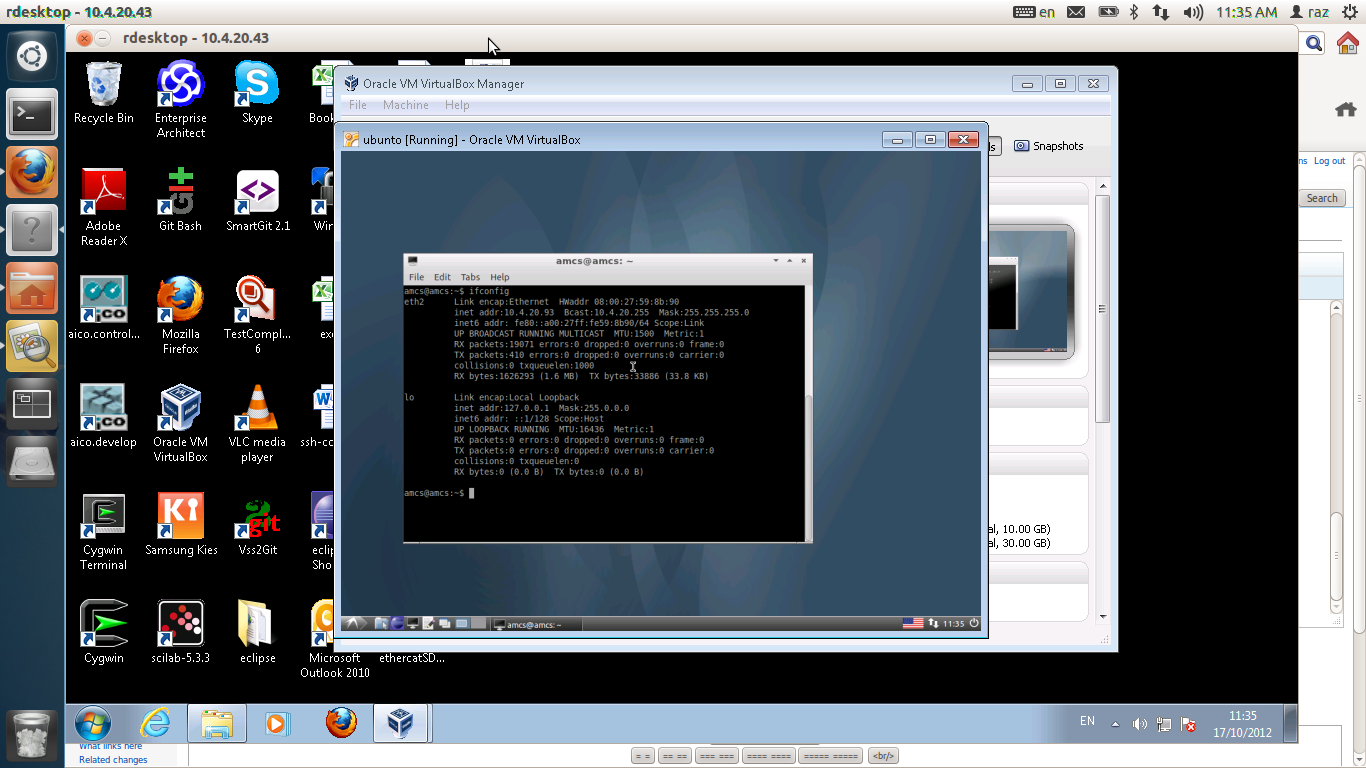
To access the virtual box you need to know its ip. please enter "ifconfig ".
The ethernet netowrk interface is eth2. the assigned dhcp ip is 10.4.20.93. you probably will have a different ip.
Running simulated MC
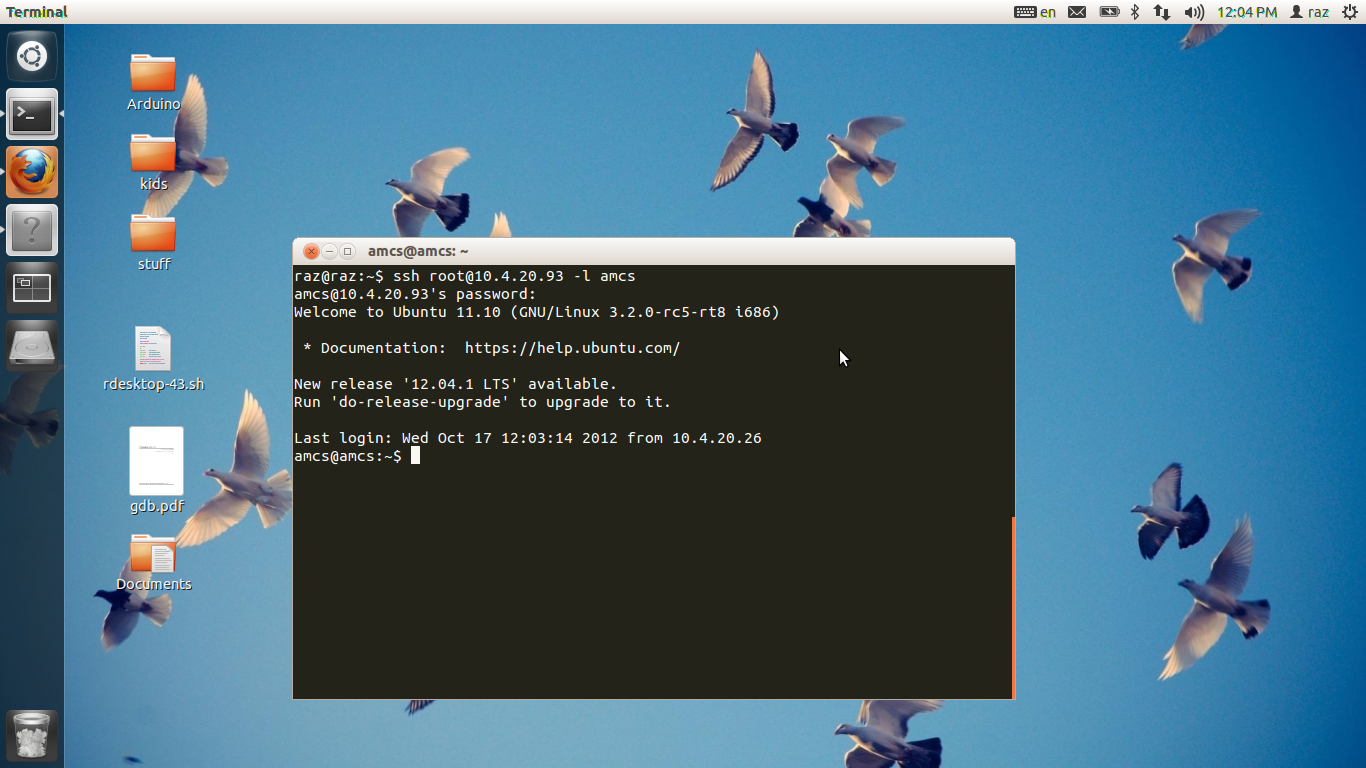
To get MC running we need to get the sources, compile them, and launch mc. Login into the Virtual box with user amcs password amcs .
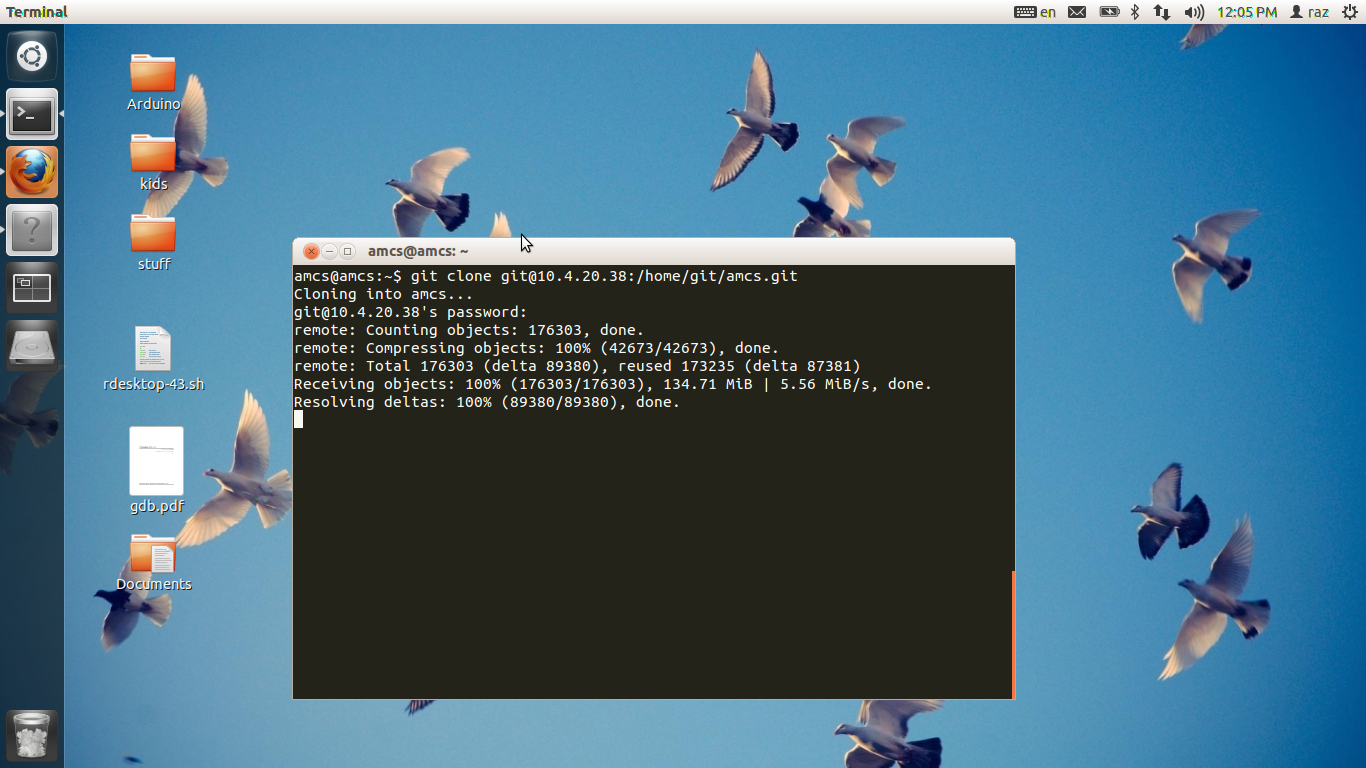
To get mc simply git clone the repository
Now configure mc to simulated with --enable-amcssim
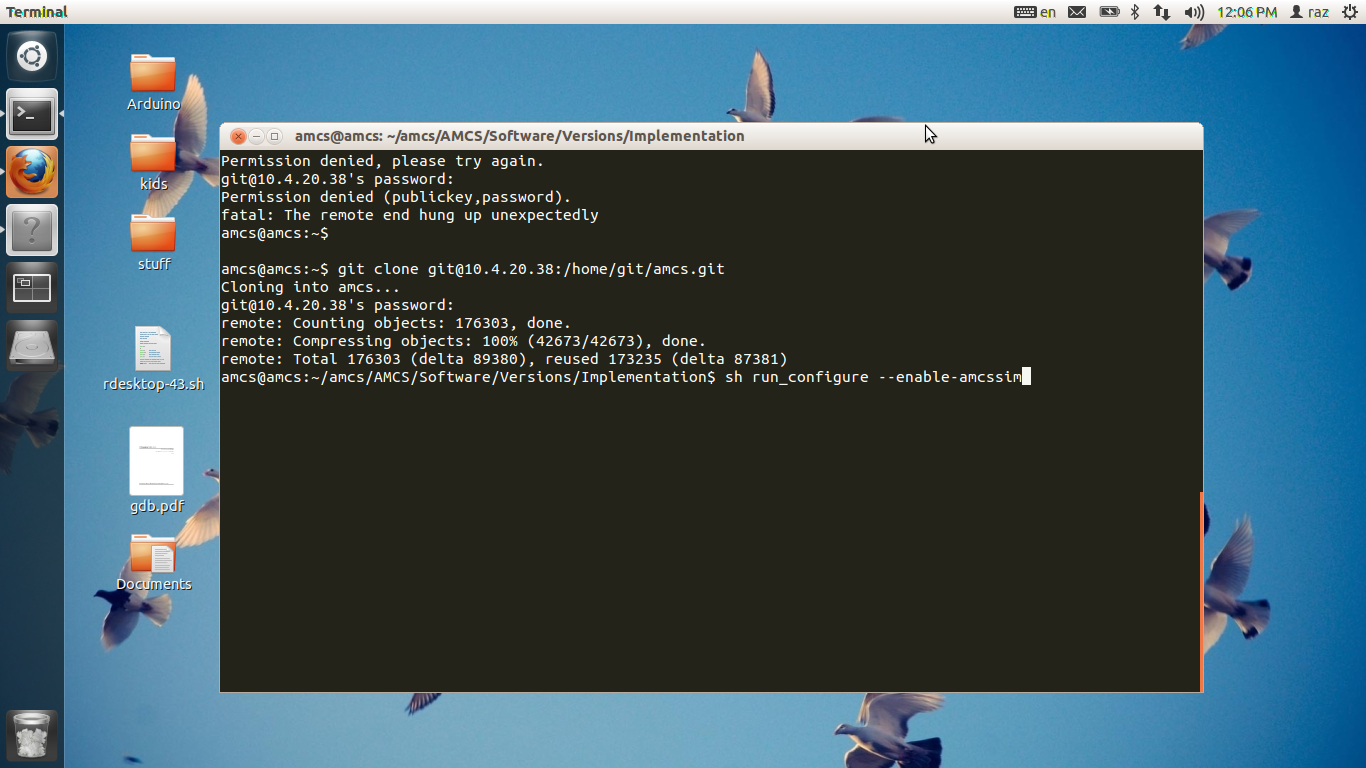
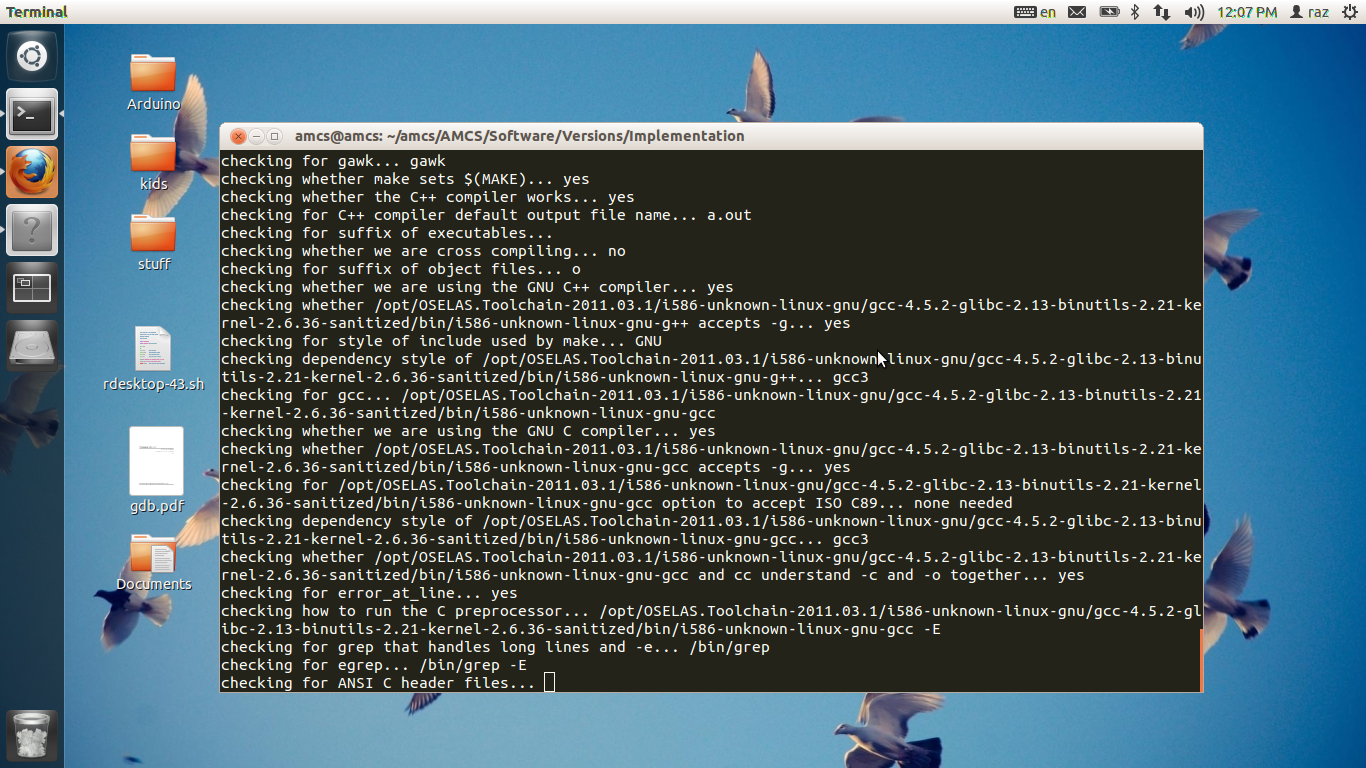
The bellow is the result of run_configure
Ente make
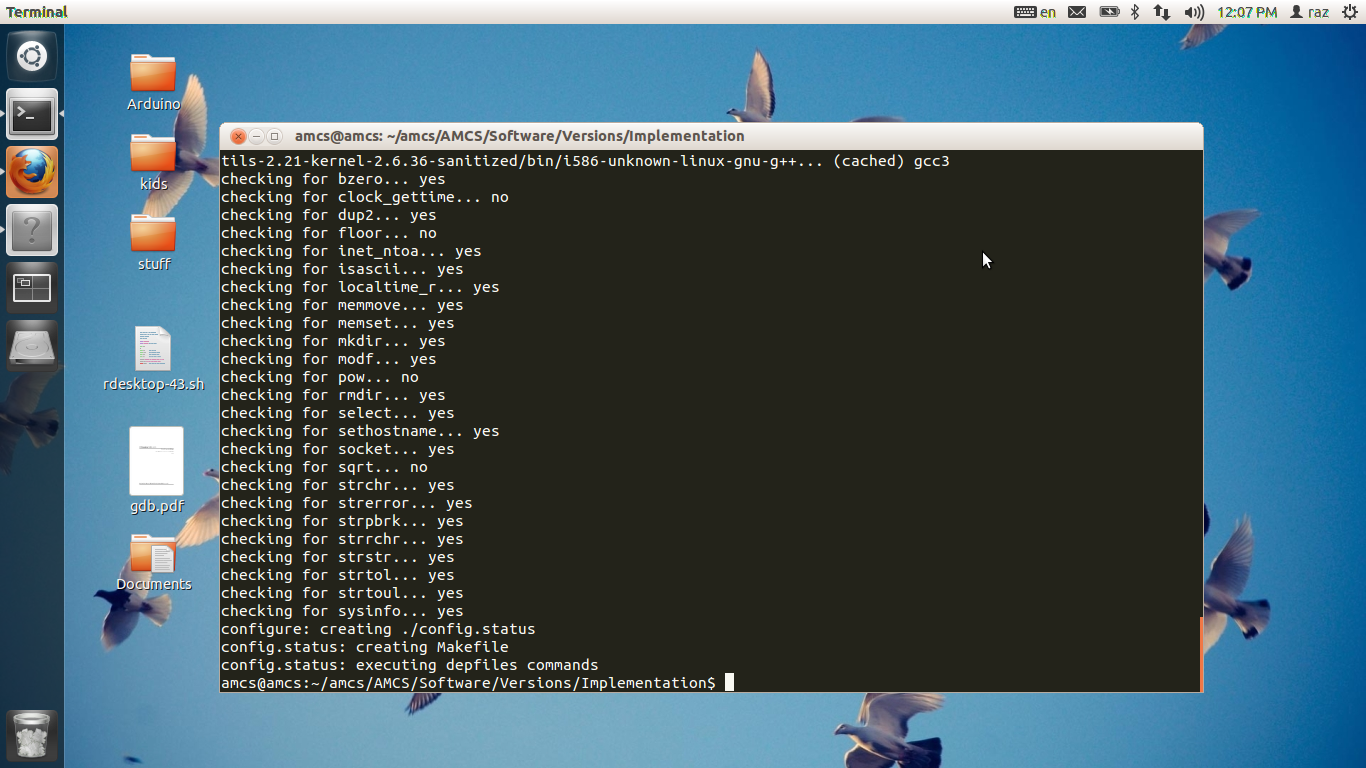
This how make should end
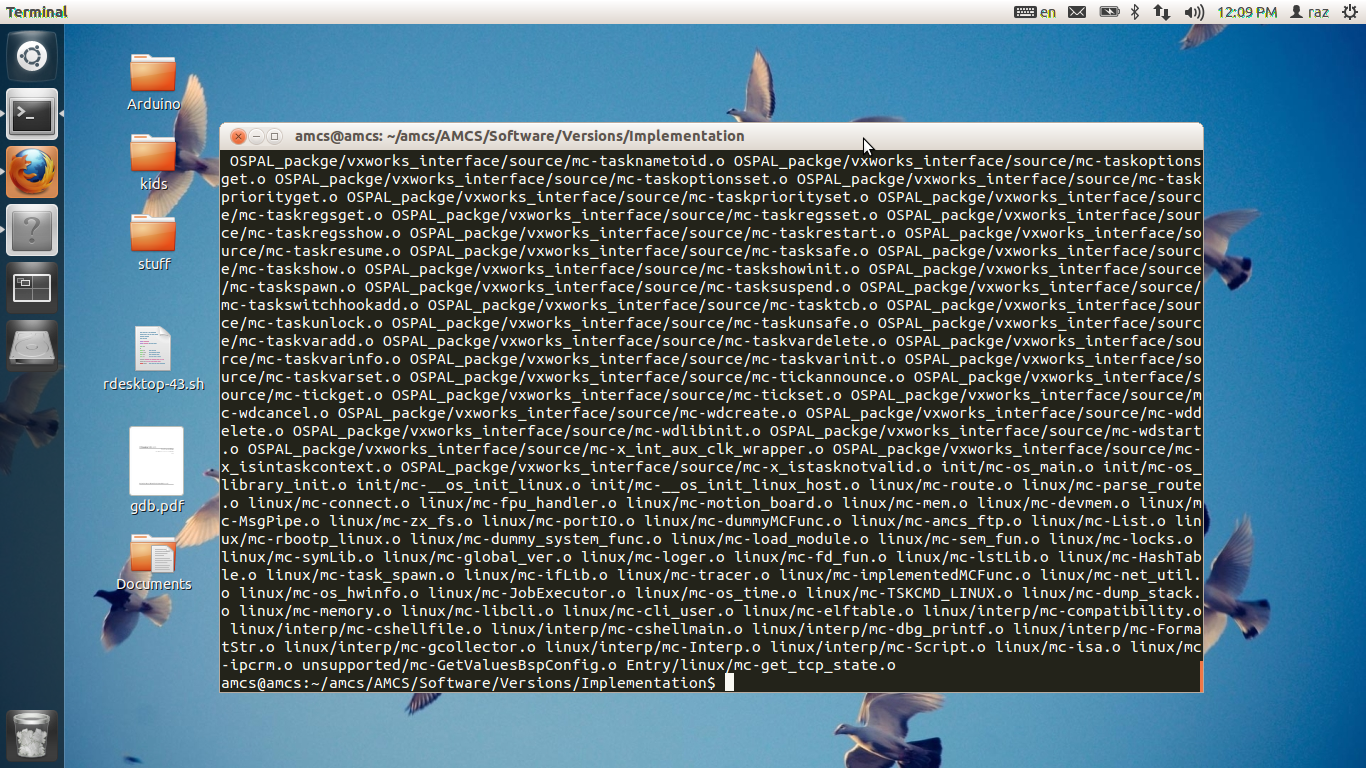
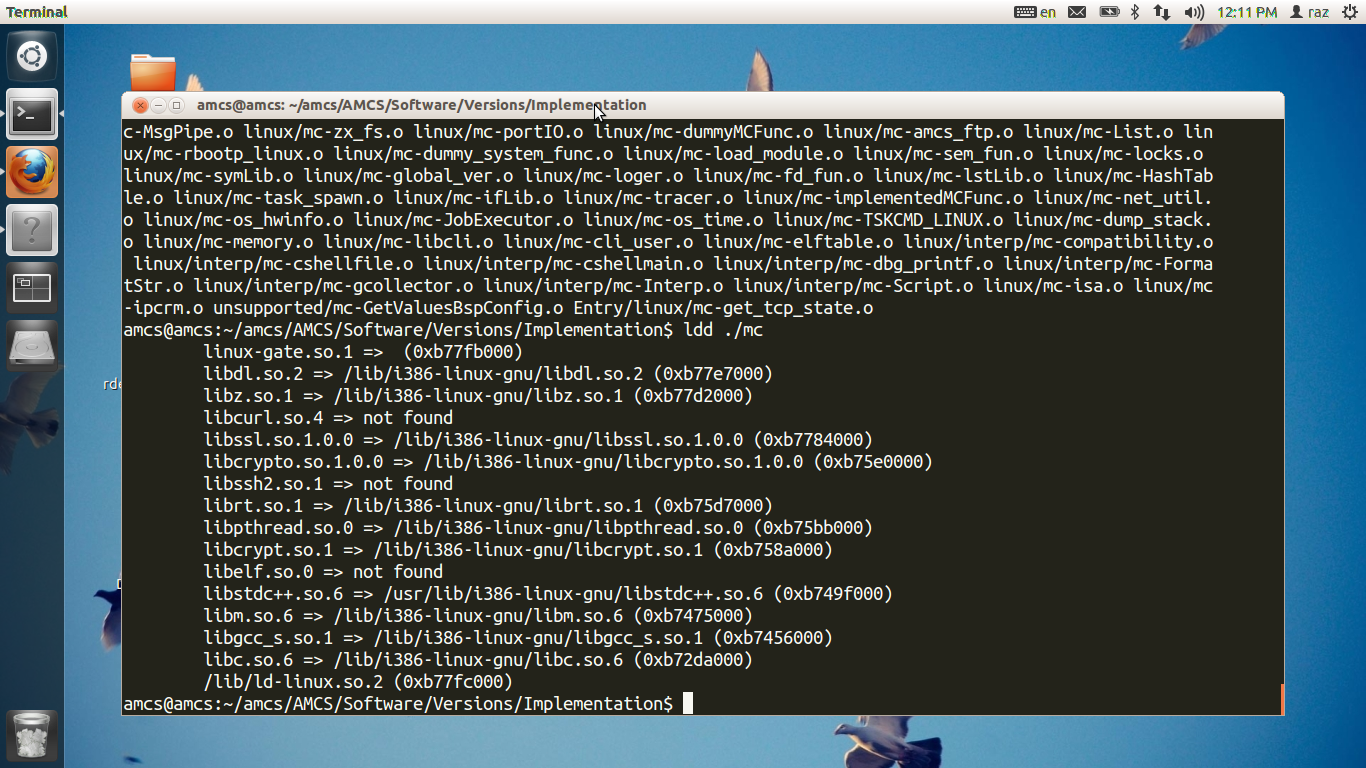
If you try to launch mc you will fail. This is because some libraries are missing. All the libraries are in the Implementation/libs directory. so we need to add Implementation/libs to the library path. to see what is missing use the ldd command.
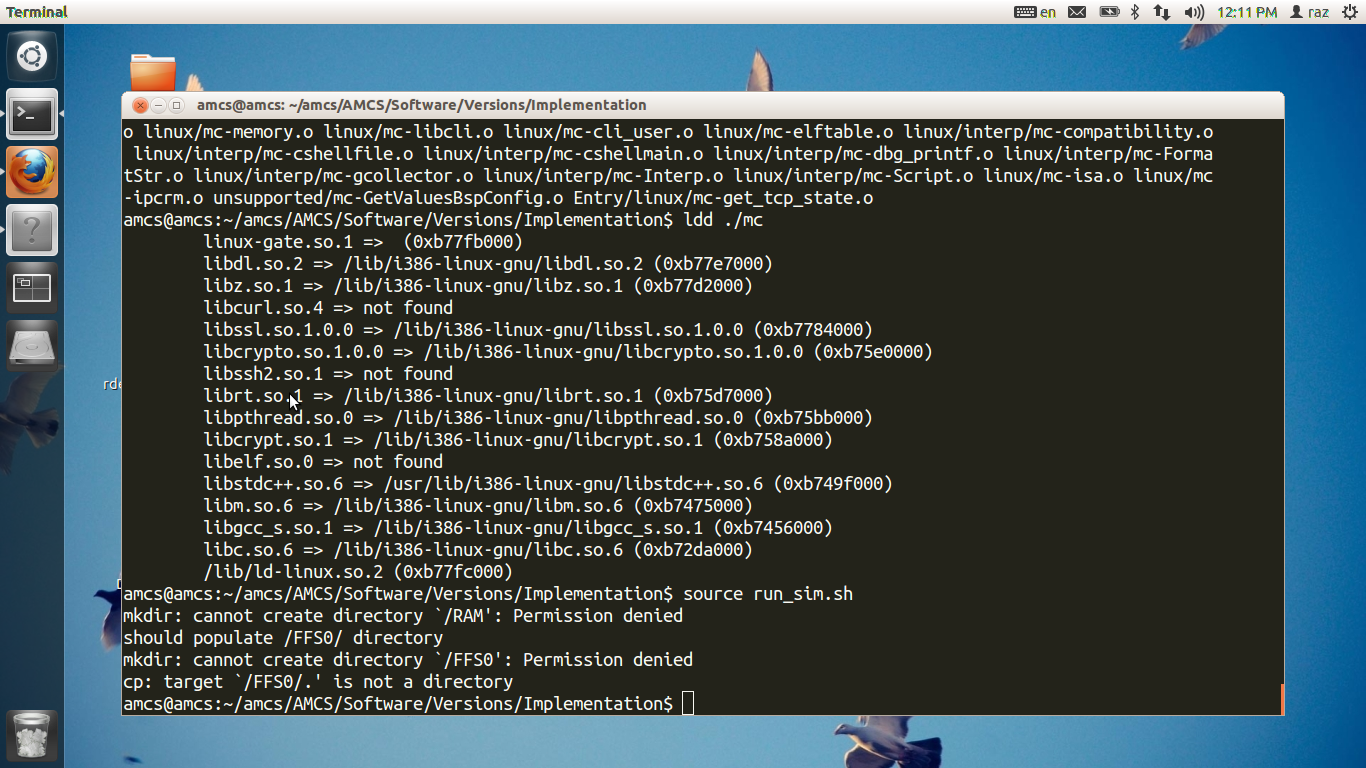
To fix the matter with the libraries, we supplied run_sim.sh script. if you try to use it as-is you bound to fail as depicted bellow.
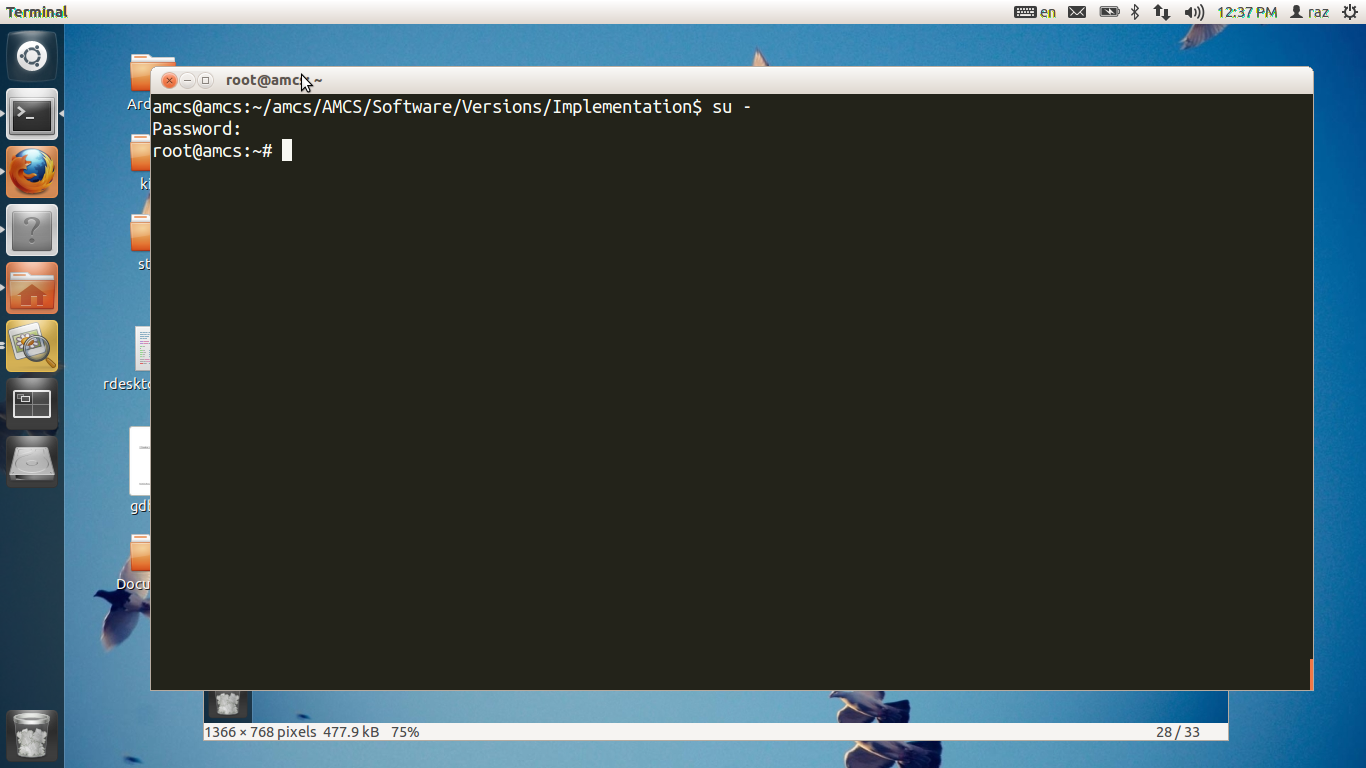
you have to be user root inorder to launch mc. so switch to user root. passowrd is qwerty , and change to directory /home/amcs/AMCS/Software/Versions/Implementation/ .
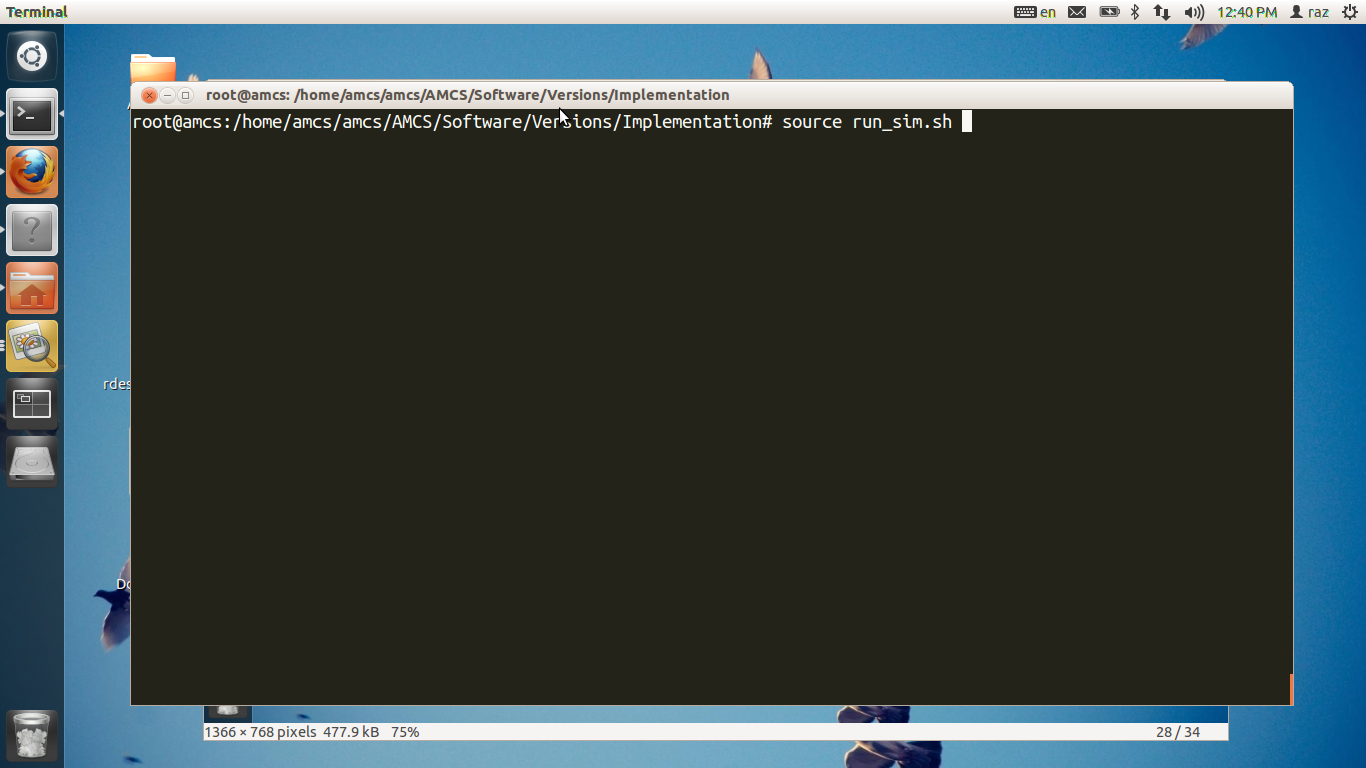
and enter source run_sim.sh
launch MC as bellow. the failure is due to the fact that MC searches for eth0 while we do not have eth0 but eth2
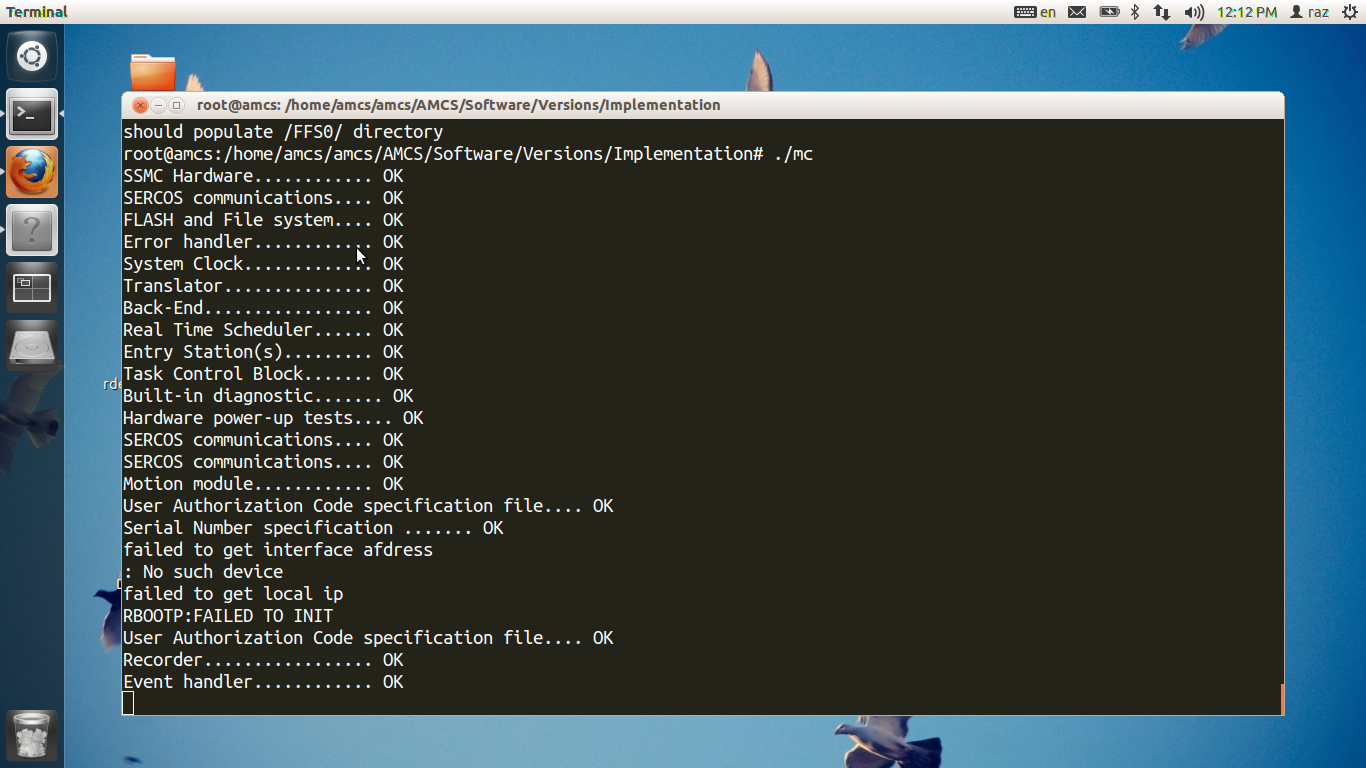
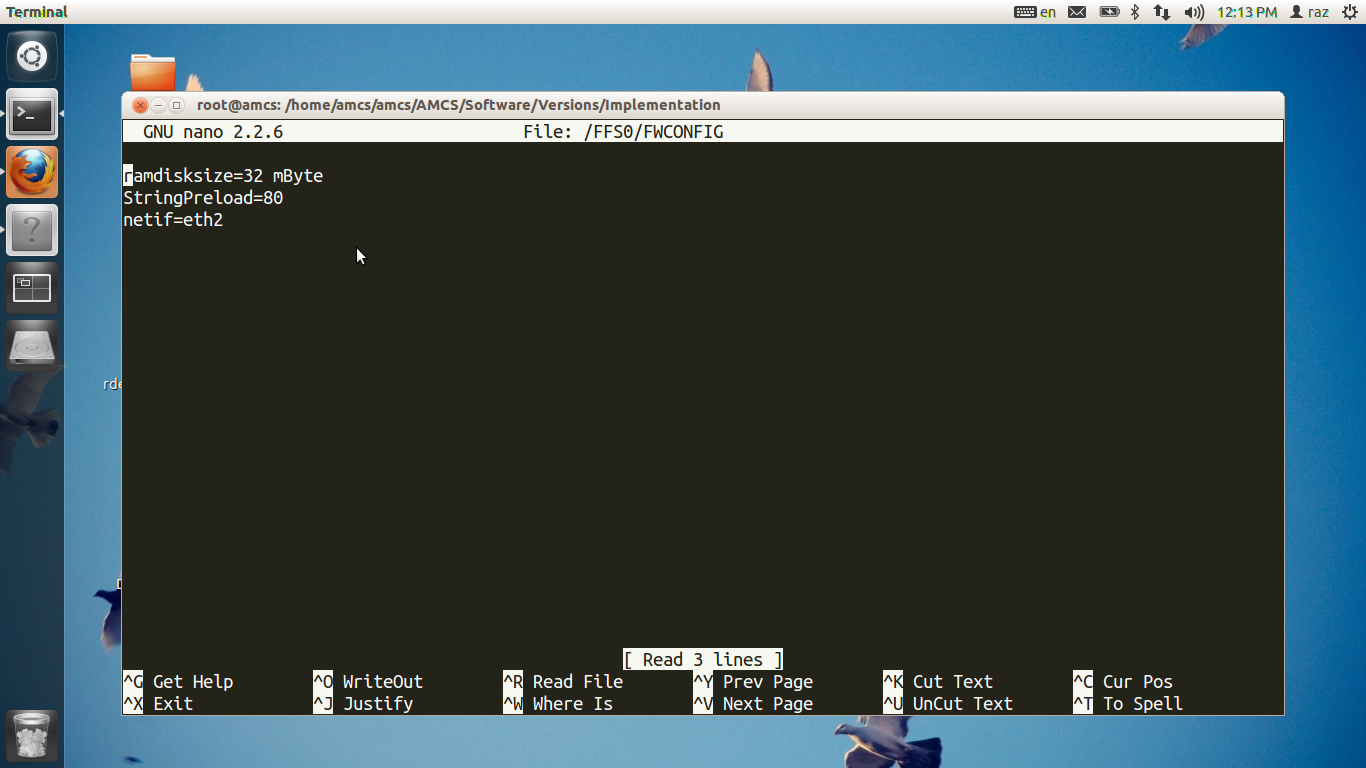
Press cntrl+C to break the mc. Let is fix it. edit the file /FFS0/FWCONFIG and enter the line netif=eth2
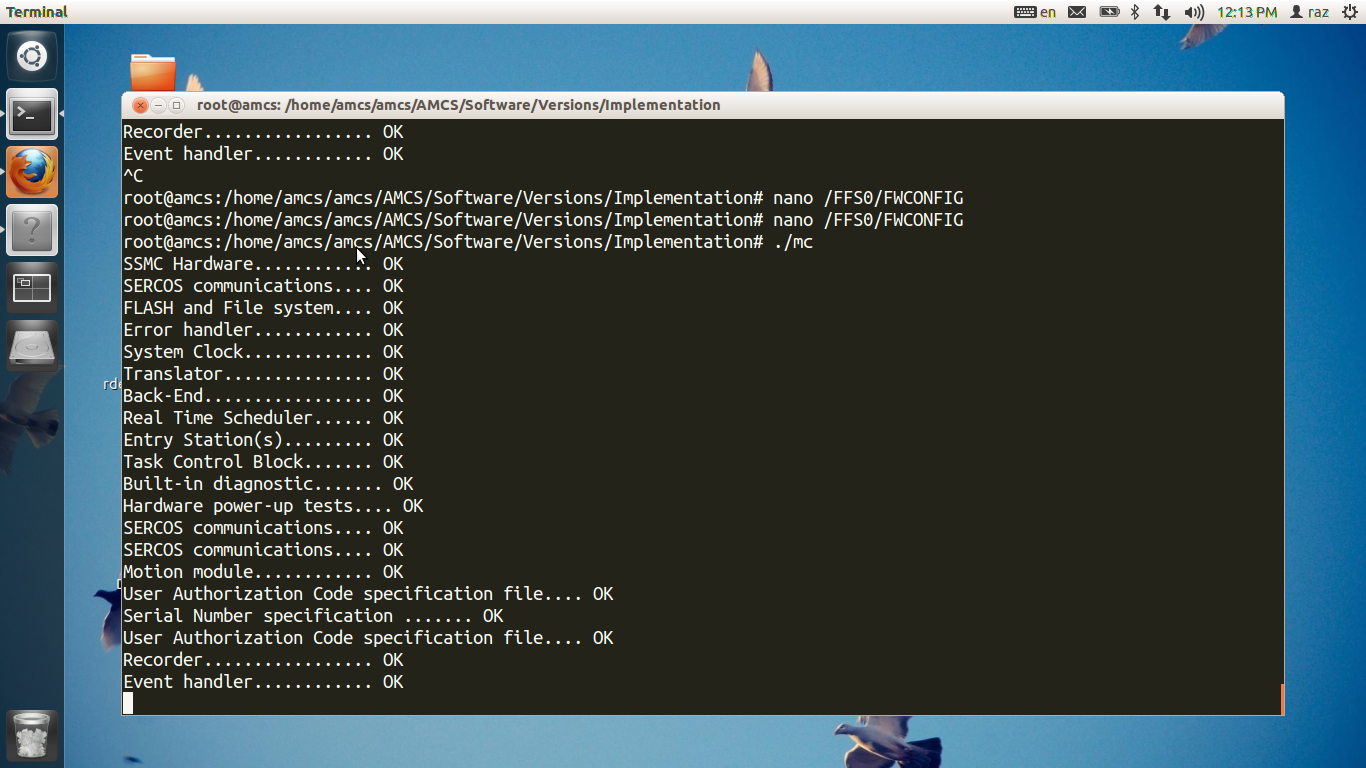
Now relaunch MC.
Light Virtual MIB for simulated MC
One may want to use a light version of virtual machine. one that consume less resources. Virtual Box Ubunto consumes cpu ram and storage resources. For this we created a lighter version of virtual mib to launch MC and codeasys software.
Installation
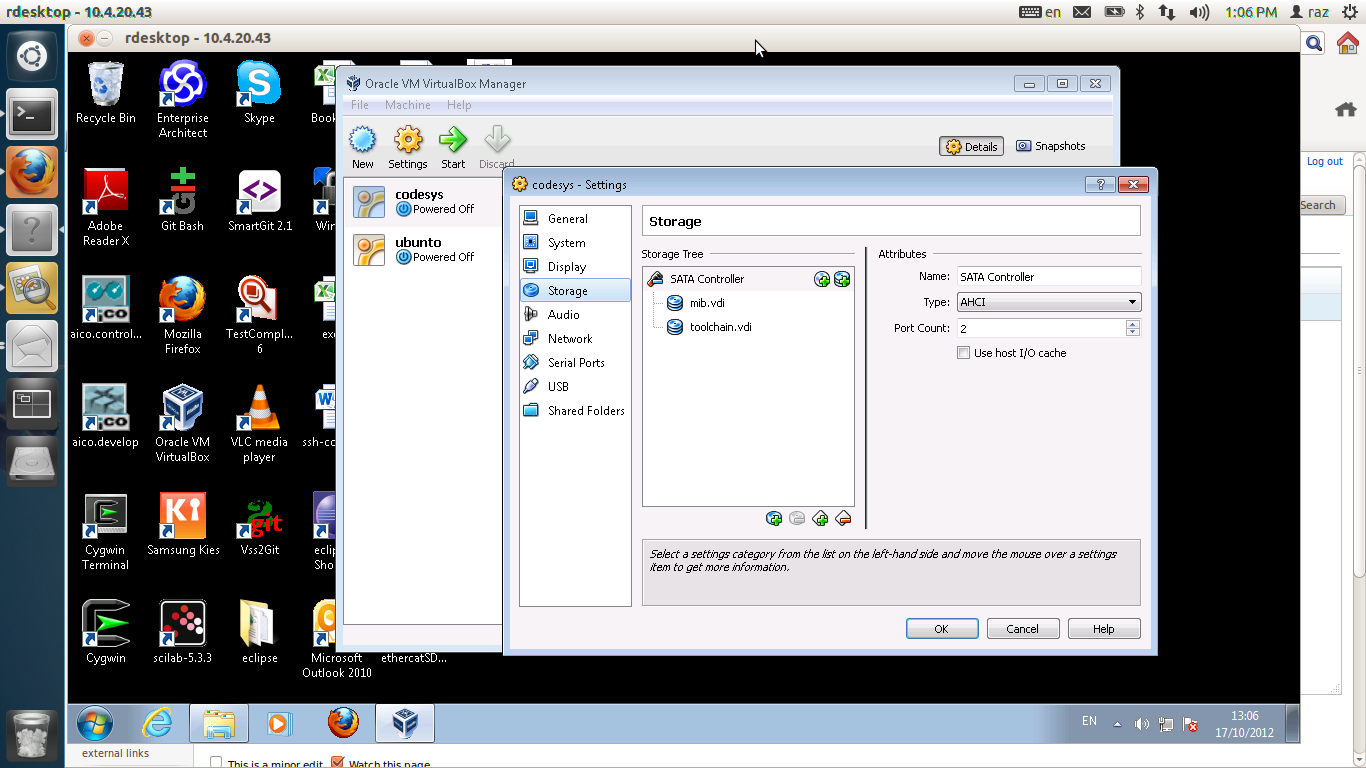
Grab the disk images from \\domainaxy\IL\MC\Linux\CoDesys-VirtualBox\ . The disks are one for the root file system and the other is for the tool chain. You can create your own disks and add them if you wish. Storage is configured as follows:
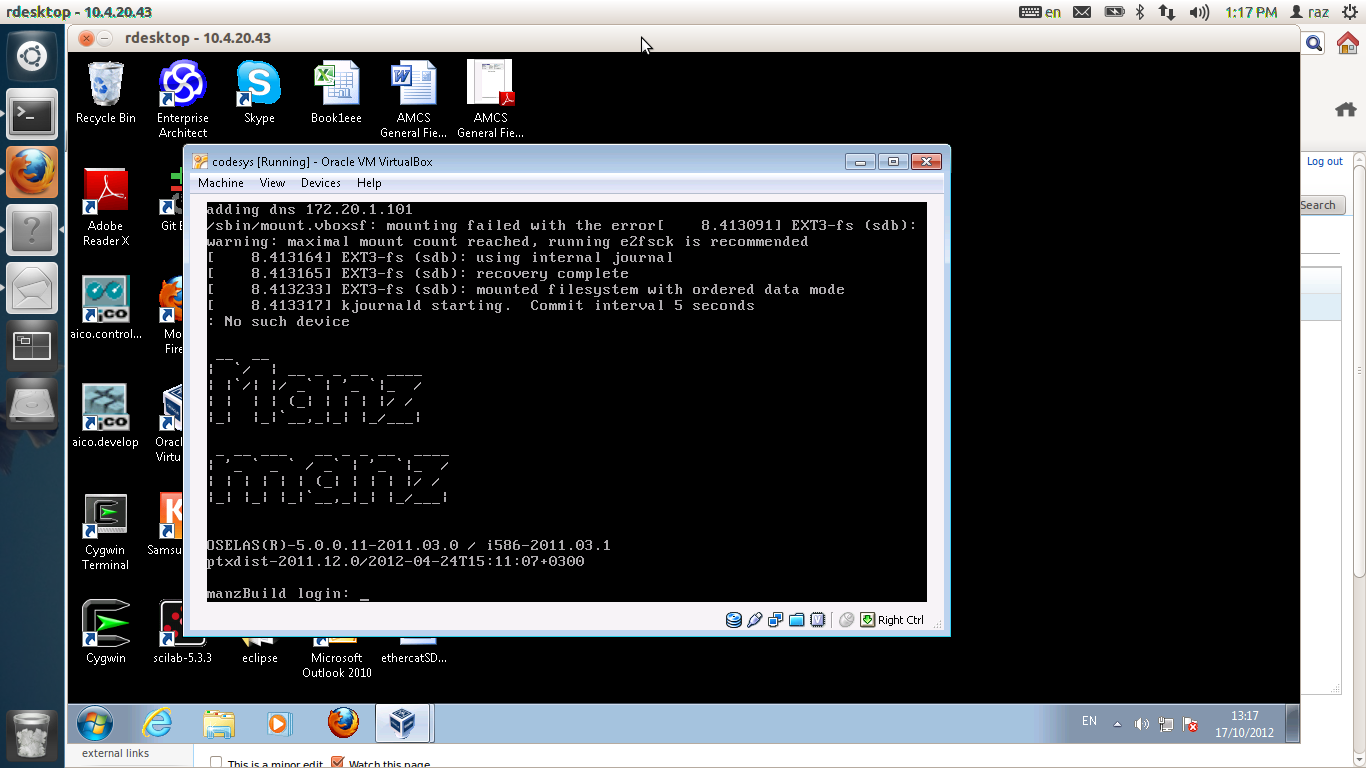
I assume you configured the network as bridged. boot the virtual box , at the end of the boot your machine should look like the bellow
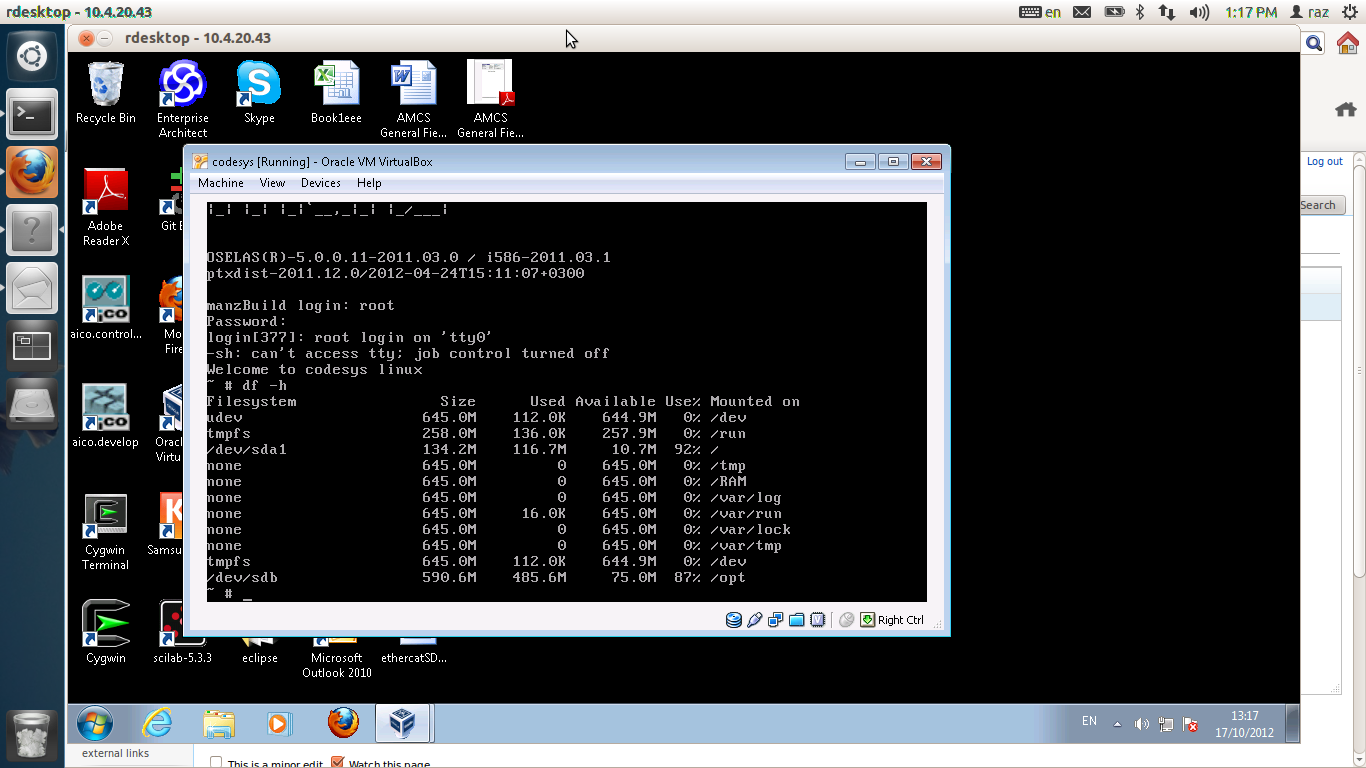
this machine is light on storage. as you can see bellow "/" has 10MB left and /opt/ has 75 MB left. This is why i recommend you to add some disks locally.
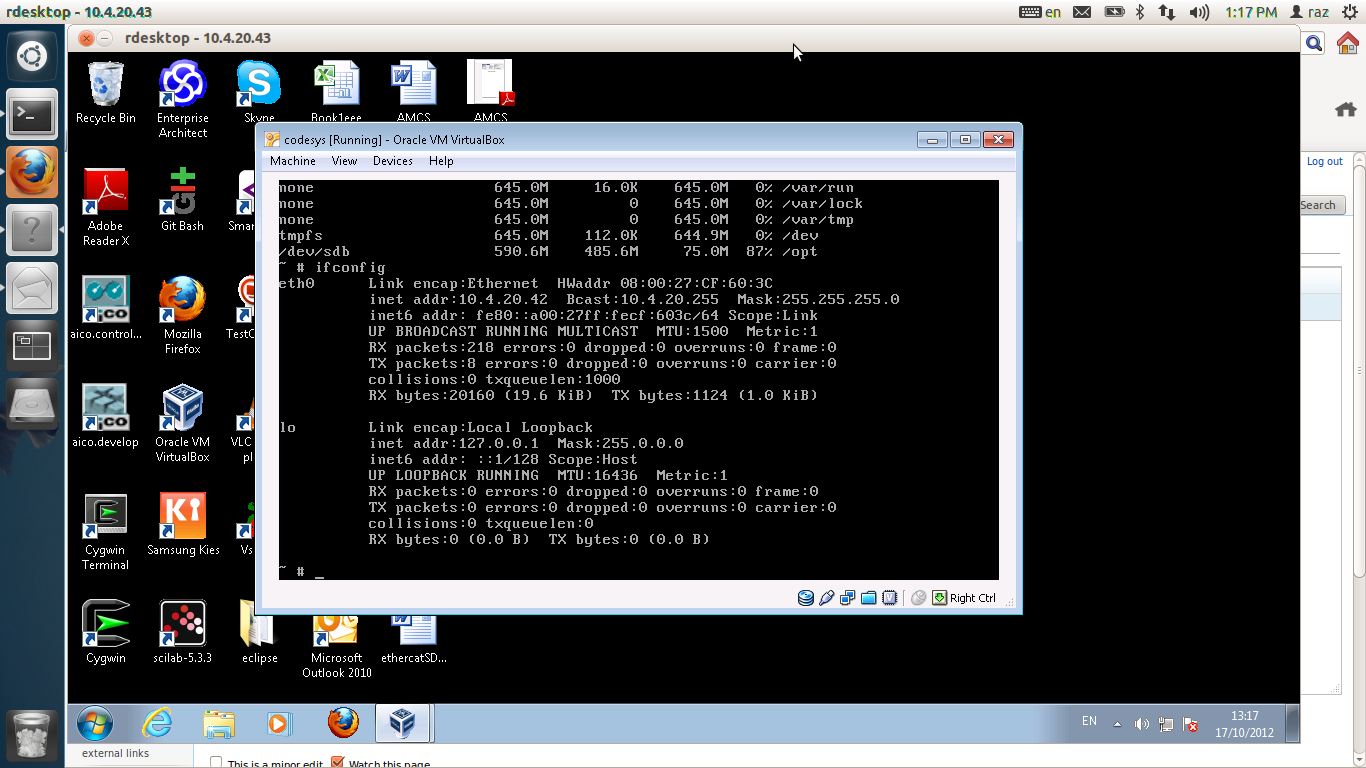
saying that we still have enough space in /opt to copy binary only mc. so first please check what is the machine's ip.
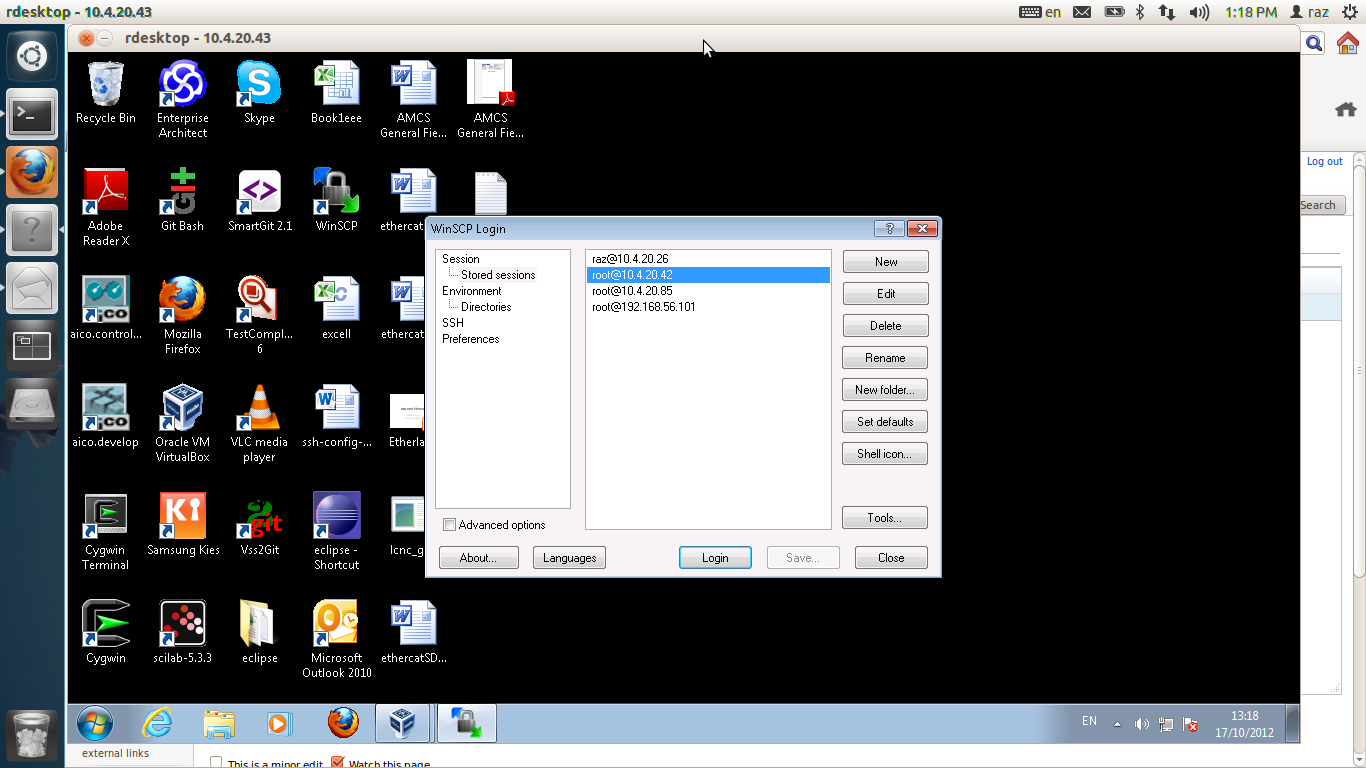
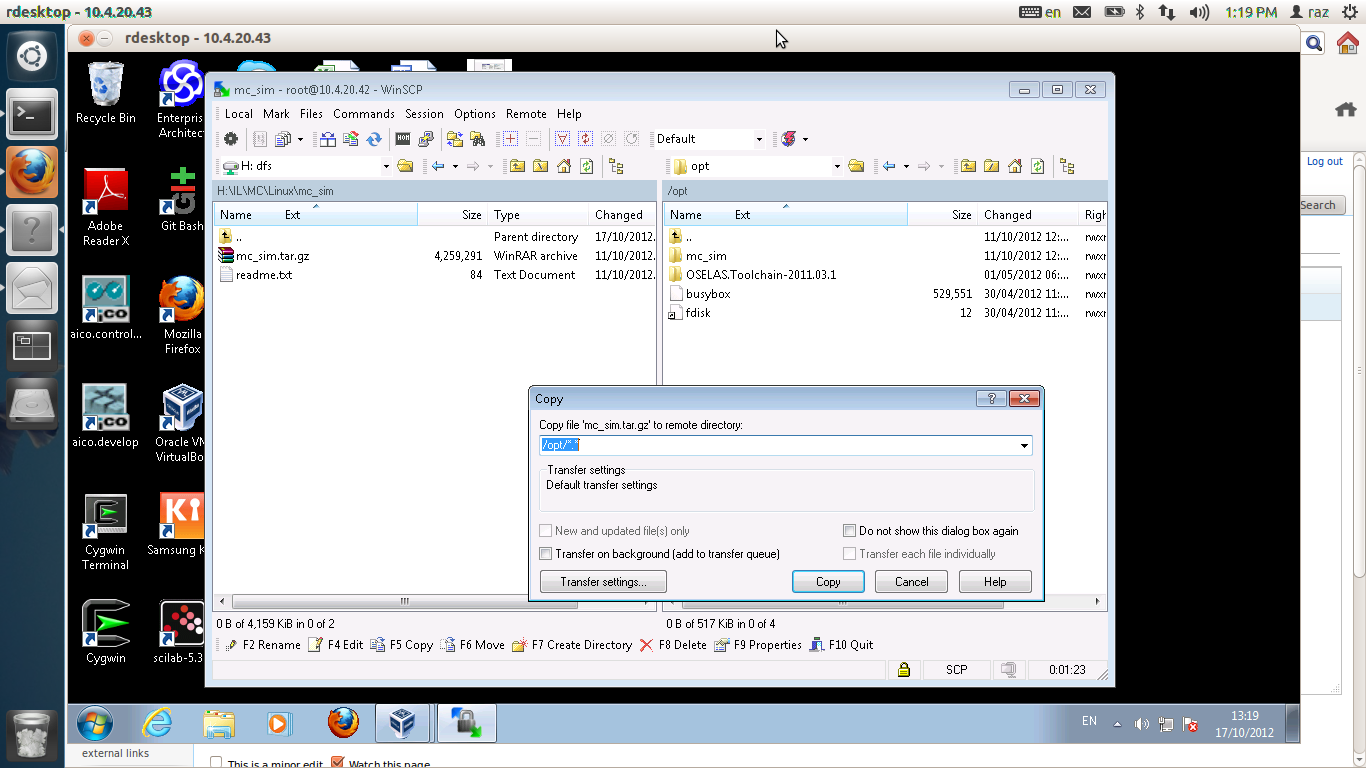
Copy mc binary only ball into this machine. assuming you use windows, i suggest you use winscp.
simply drag and drop the tar ball. This tar ball is found in \domainaxy\IL\MC\Linux\mc_sim\ . It is an binary only version of MC.
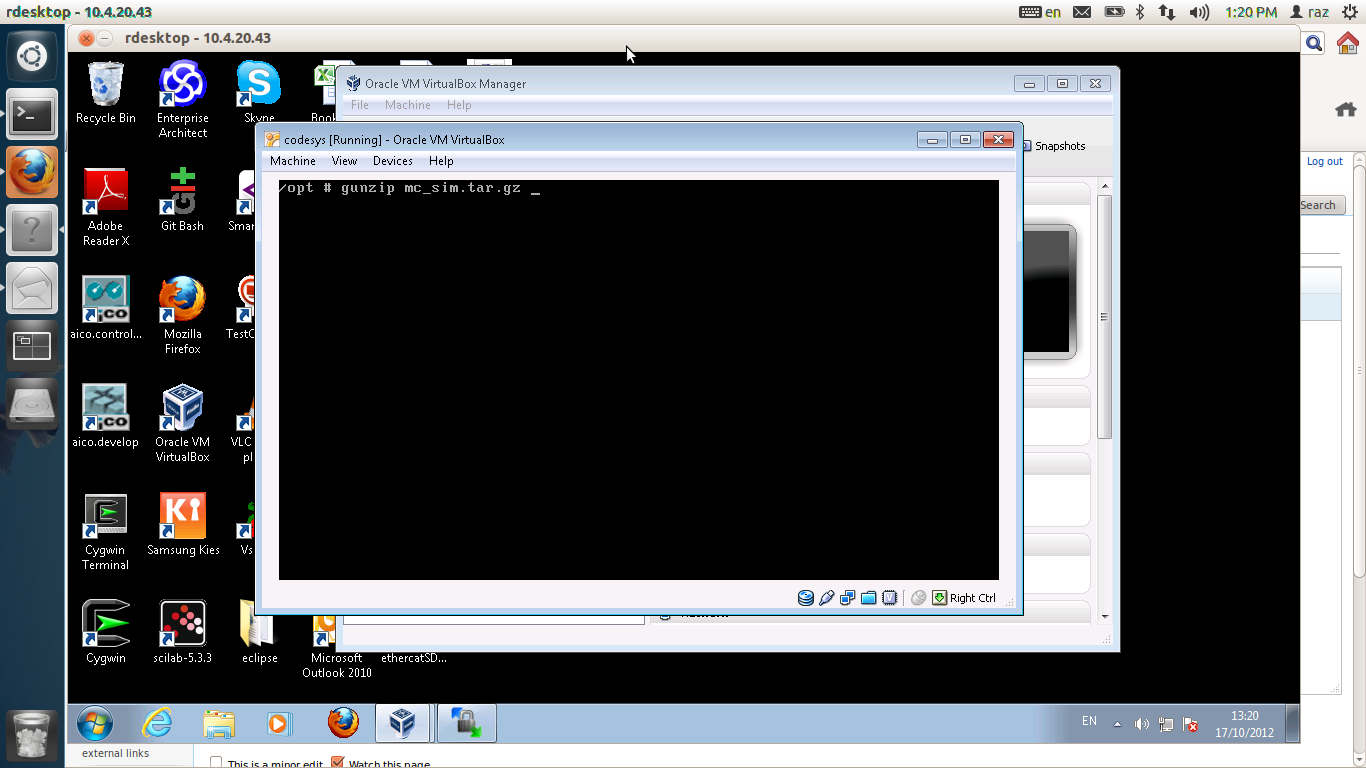
Now unzip it. we use gunzip.
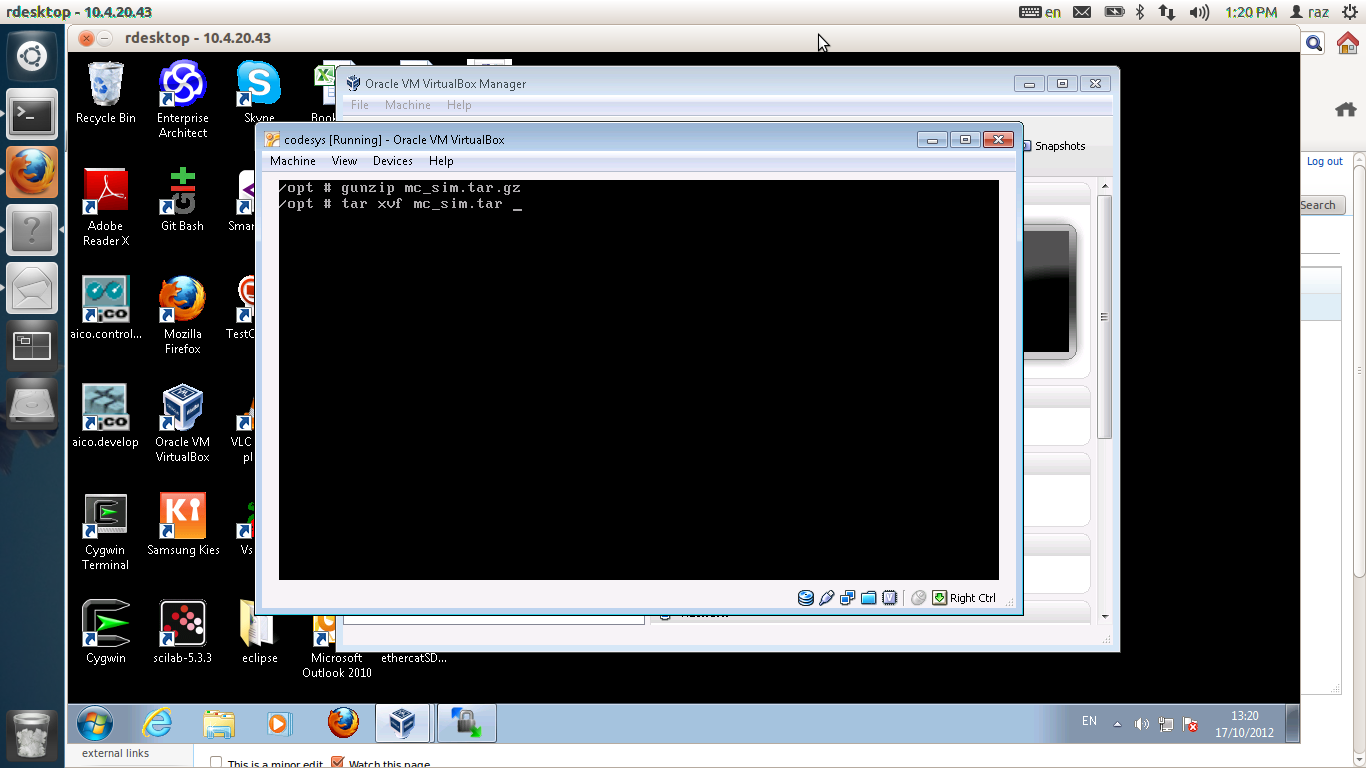
and untar it. use tar for that.
to run mc, simply cd mc_sim . use the source command for that.
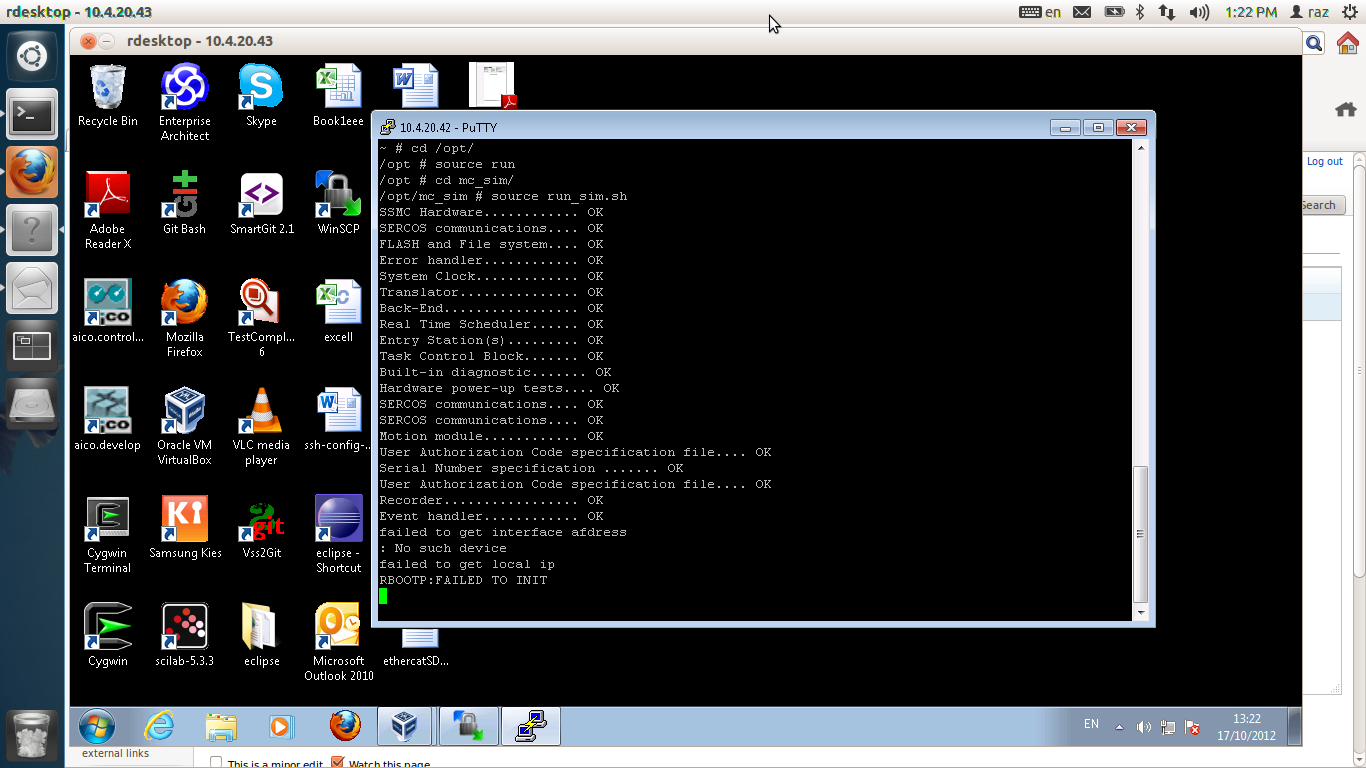
rbootp fails, we need to fix the network interface for that. edit with nano /FFS0/FWCONFIG and relaunch mc.
Light Virtual MIB build machine
Plase refer to AXY:Linux MIB#Virtual_Build_Machine.
== Getting the Virtual MIB ==
