Difference between revisions of "Project Examples Manual/zh-hans"
(Created page with "{{Languages}} 以下的示例创建演示了机器人的简单配置和机器人执行的运动。<br> 每个例子包含了'''"ZIP"'''文件,它包含了你运行项目所...") |
|||
| Line 1: | Line 1: | ||
| − | {{Languages}} | + | {{Languages|Project_Examples_Manual}} |
以下的示例创建演示了机器人的简单配置和机器人执行的运动。<br> | 以下的示例创建演示了机器人的简单配置和机器人执行的运动。<br> | ||
每个例子包含了'''"ZIP"'''文件,它包含了你运行项目所需的所有文件。您将在项目示例页面中找到文件列表。 | 每个例子包含了'''"ZIP"'''文件,它包含了你运行项目所需的所有文件。您将在项目示例页面中找到文件列表。 | ||
| Line 23: | Line 23: | ||
# 该项目现在准备根据示例文件运行特定的运动示例程序 - 在每个示例页面中给出的说明。 <br> | # 该项目现在准备根据示例文件运行特定的运动示例程序 - 在每个示例页面中给出的说明。 <br> | ||
| − | == | + | ==如何使用softMC Configurator打开项目示例属性== |
| − | # | + | # 在ControlStudio加载并运行示例后,从菜单栏中打开softMC Configurator,'''Tools → softMC Configurator'''. <br> [[image: open project5.png|700px]] <br> |
| − | # | + | # 项目设置将在softMC Configurator窗口打开,请注意,您使用与示例页面中所述相同的系统。 <br> [[image: open project10.png|700px]] <br> |
| − | # | + | # 您可以根据需要观察和更改坐标轴和机器人的属性。 '''如下所述,建议使项目副本,并对副本进行更改。''' |
| − | # | + | # 你可以在[[softMC Configurator | HERE]]看到关于softMC Configurator的更多信息。 |
| − | == | + | ==如何使用RoboDK进行机器人仿真== |
| − | + | 为了模拟RoboDk上的相关示例,您需要以下内容: | |
| − | * | + | * RoboDK软件,您可以从[https://robodk.com/download HERE]下载 |
| − | * '''mcEnv.py''' | + | * '''mcEnv.py'''文件 - 从[[:File: mcEnv.zip| HERE]]下载并提取文件。 在'''roboDK'''文件夹中保存这个文件. |
| − | * | + | * 机器人模板,与项目一起提供。 |
| − | * | + | * 运行连接到您的SoftMC的ControlStudio。 |
| − | + | 按照以下步骤使用ControlStudio将您的softMC与模拟的机器人连接起来: | |
| − | # | + | # 在加载项目文件之前,先从ControlStudio终端加载 '''SERVER.PRG'''程序: <br> <pre>--> load SERVER.PRG </pre> <br> |
| − | # | + | # 程序结束后,你会在'''消息日志'''中看到以下消息("socket 2"是一个示例)<br> <pre> socket 2 is set </pre> <br> |
| − | # | + | # 用RoboDK打开机器人文件,'''RoboDK Station'''文件或 '''.rdk'''文件。 |
| − | # | + | # 在左侧,右键单击 '''Prog1'''python文件,然后选择'''编辑Python脚本'''。 一个新窗口将打开。 <br> [[image: open project9.png|700px]] <br> |
| − | # | + | # 在Python脚本中,您需要确保主机IP地址是您的softMC所拥有的IP地址。 如果不一样 - 更改并保存,然后关闭窗口:<br> [[image: open project11.png|500px]] <br> |
# Execute double click on the Python script symbol, a small yellow arrow should appear on the symbol. You will get the following message at the '''Message Log''' <br> <pre> client is connected </pre> <br> | # Execute double click on the Python script symbol, a small yellow arrow should appear on the symbol. You will get the following message at the '''Message Log''' <br> <pre> client is connected </pre> <br> | ||
| − | # | + | # 从现在开始,直到从RoboDK文件断开连接,从网络或其他中断,您都可以查看将在ControlStudio中执行的每个运动命令。 |
| − | == | + | ==项目示例副本== |
| − | + | 如果您想要使用项目示例设置,或者想要创建自己的设置,则可以按照以下步骤复制示例属性,包括程序文件,库等等: | |
| − | # | + | # 从ControlStudio的菜单栏中选择'''File → Save Project as...''' |
| − | # | + | # 找到您选定的任何文件夹的项目副本。 |
| − | # | + | # 您现在已经有了一个包含所有必要的文件的新机器人,已准备好控制。 |
Latest revision as of 08:01, 26 November 2017
| 语言: | English • 中文(简体) |
|---|
以下的示例创建演示了机器人的简单配置和机器人执行的运动。
每个例子包含了"ZIP"文件,它包含了你运行项目所需的所有文件。您将在项目示例页面中找到文件列表。
注意 有真实系统的例子,以及模拟系统的例子。
您可以复制和修改每个项目示例 - 您将在下面找到说明。
| NOTE | |
| 在 "ZIP"文件夹中,您将找到一个包含机器人/电机制造商提供的基本参数的excel文件。 这些参数在使用softMC Configurator中配置机器人使用 |
| NOTE | |
| 在一些模拟的例子中,有一个通过 RoboDK软件 运行虚拟机器人的选项,你会发现下面的说明。 |
如何将项目示例加载到ControlStudio
- 将项目ZIP文件下载到您的计算机中,解压并保存到可访问的文件夹中。
- 打开ControlStudio,在菜单栏中选择File → Open Project...并找到项目示例文件。 注意相关的文件是 ".apj"文件.
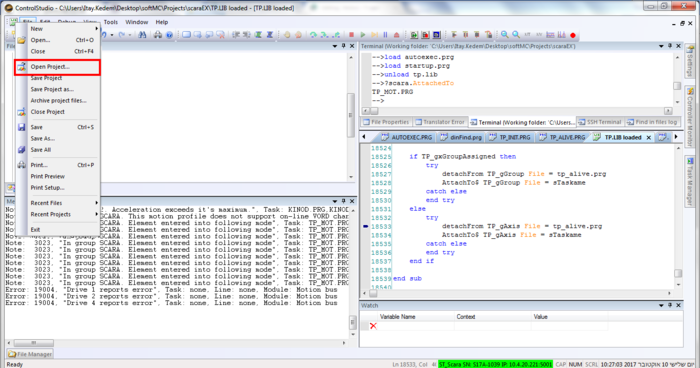
- 要将项目文件上传到控制器,请执行以下操作:
- 在"File View"窗口的项目树上, 右键单击项目名称并选择 "Copy all files to controller"
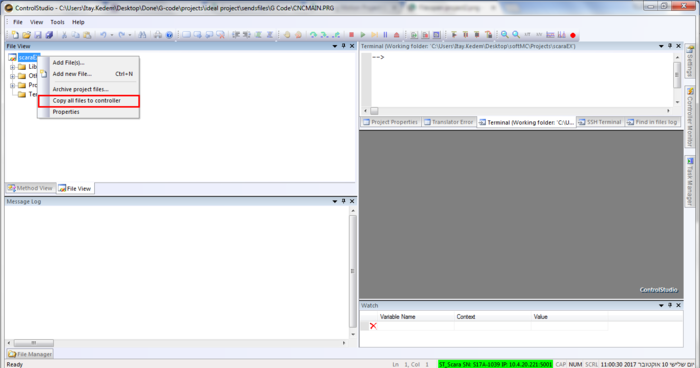
- 在terminal → 发送 Reset All命令, 在发送 Load AUTOEXEC.PRG任务后执行.
- 在"File View"窗口的项目树上, 右键单击项目名称并选择 "Copy all files to controller"
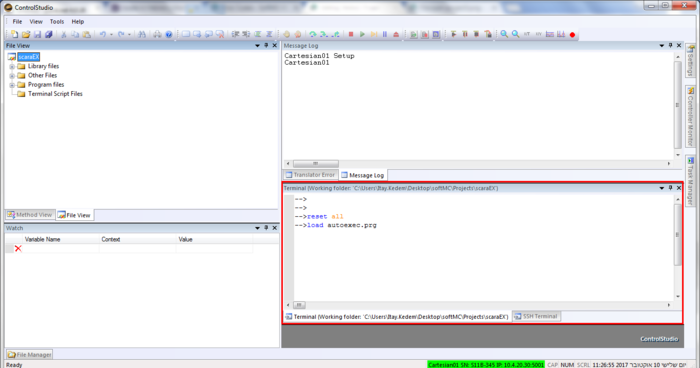
- 该项目现在准备根据示例文件运行特定的运动示例程序 - 在每个示例页面中给出的说明。


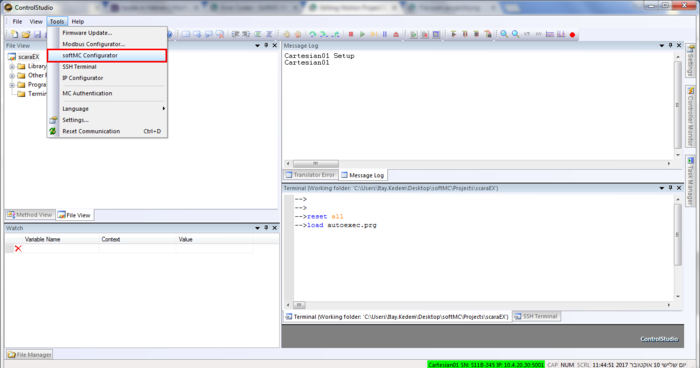
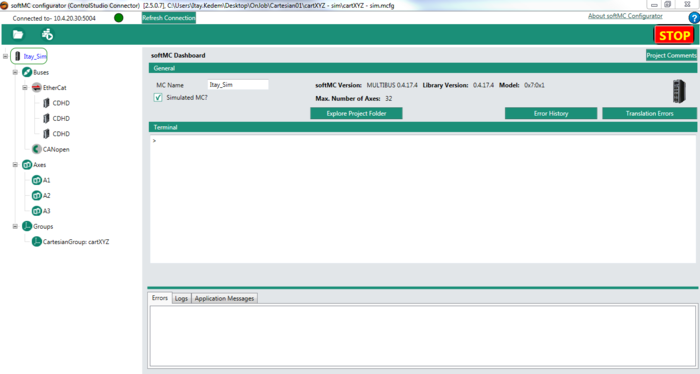
如何使用softMC Configurator打开项目示例属性
- 在ControlStudio加载并运行示例后,从菜单栏中打开softMC Configurator,Tools → softMC Configurator.
- 项目设置将在softMC Configurator窗口打开,请注意,您使用与示例页面中所述相同的系统。
- 您可以根据需要观察和更改坐标轴和机器人的属性。 如下所述,建议使项目副本,并对副本进行更改。
- 你可以在 HERE看到关于softMC Configurator的更多信息。


如何使用RoboDK进行机器人仿真
为了模拟RoboDk上的相关示例,您需要以下内容:
- RoboDK软件,您可以从HERE下载
- mcEnv.py文件 - 从 HERE下载并提取文件。 在roboDK文件夹中保存这个文件.
- 机器人模板,与项目一起提供。
- 运行连接到您的SoftMC的ControlStudio。
按照以下步骤使用ControlStudio将您的softMC与模拟的机器人连接起来:
- 在加载项目文件之前,先从ControlStudio终端加载 SERVER.PRG程序:
--> load SERVER.PRG
- 程序结束后,你会在消息日志中看到以下消息("socket 2"是一个示例)
socket 2 is set
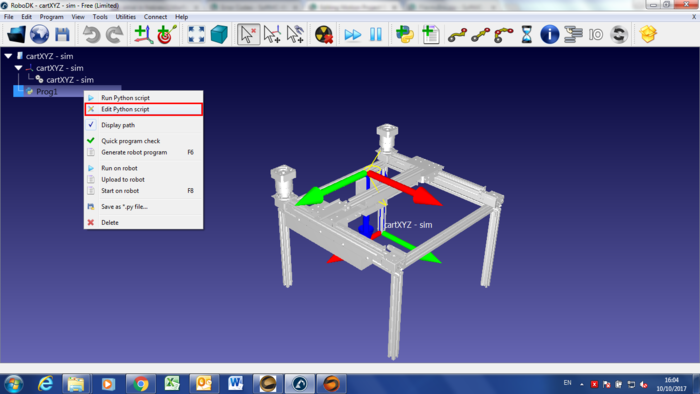
- 用RoboDK打开机器人文件,RoboDK Station文件或 .rdk文件。
- 在左侧,右键单击 Prog1python文件,然后选择编辑Python脚本。 一个新窗口将打开。
- 在Python脚本中,您需要确保主机IP地址是您的softMC所拥有的IP地址。 如果不一样 - 更改并保存,然后关闭窗口:

- Execute double click on the Python script symbol, a small yellow arrow should appear on the symbol. You will get the following message at the Message Log
client is connected
- 从现在开始,直到从RoboDK文件断开连接,从网络或其他中断,您都可以查看将在ControlStudio中执行的每个运动命令。


项目示例副本
如果您想要使用项目示例设置,或者想要创建自己的设置,则可以按照以下步骤复制示例属性,包括程序文件,库等等:
- 从ControlStudio的菜单栏中选择File → Save Project as...
- 找到您选定的任何文件夹的项目副本。
- 您现在已经有了一个包含所有必要的文件的新机器人,已准备好控制。